

After five months, she’s back. I wrote a decent amount about her and the mess that followed in another blog post, so this post is just about the pictures.

After five months, she’s back. I wrote a decent amount about her and the mess that followed in another blog post, so this post is just about the pictures.
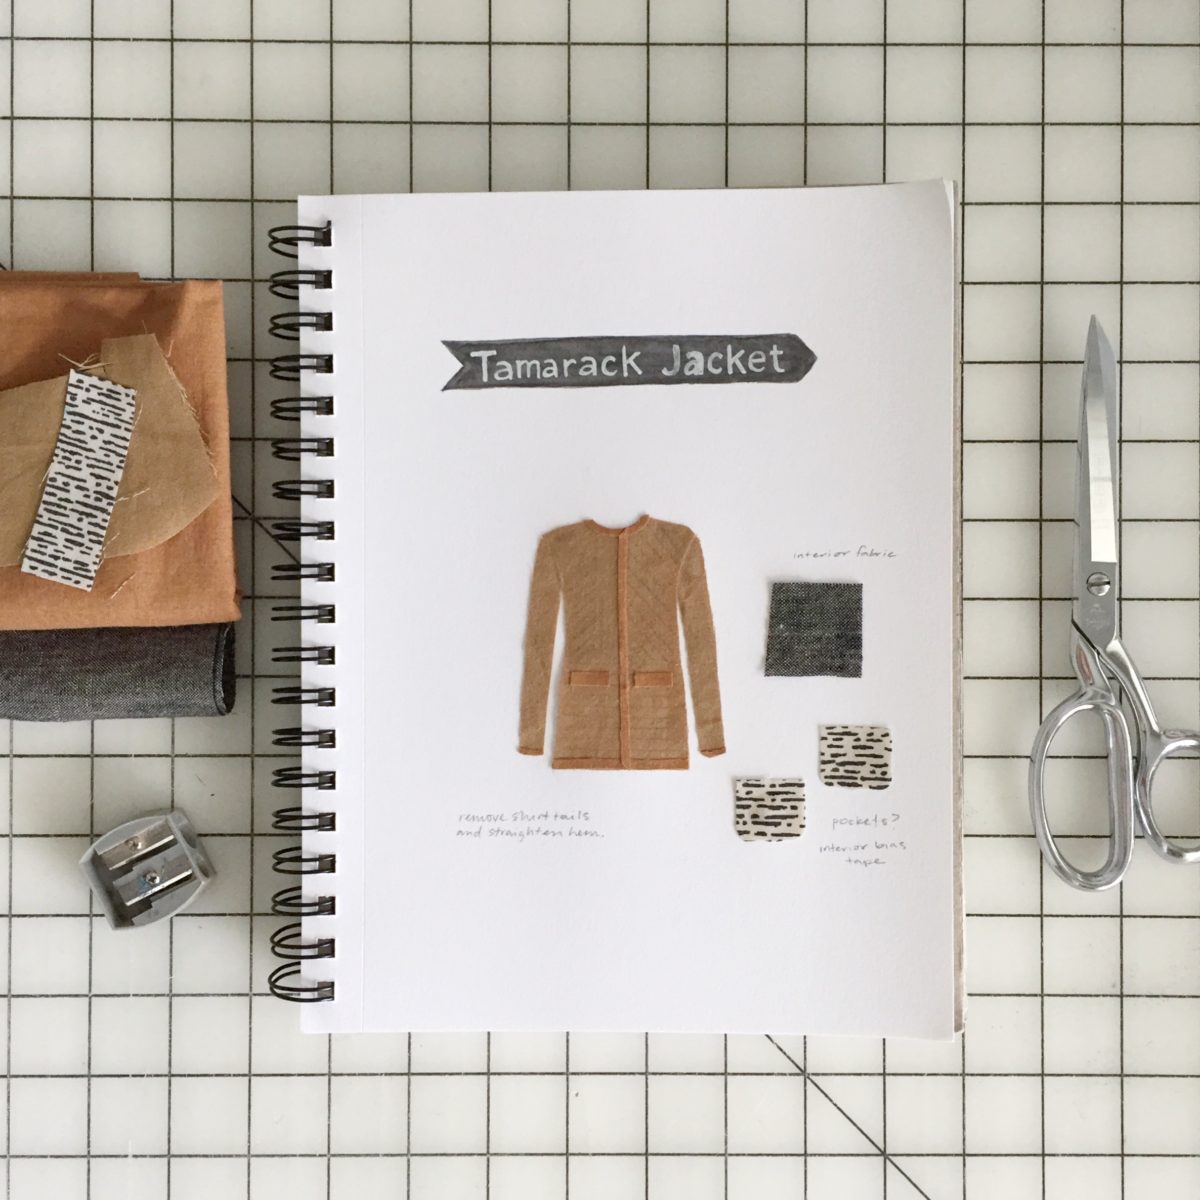
Back in September of 2018, I was asked to contribute to a Sew News article about Grainline Tamarack hacks that would be in the Fall 2019 issue. I agreed, signed a contract for a small payment, and started planning. Sew News wasn’t providing fabric, or compensation for material costs. The jacket and article were due January 10, 2019 and I had to pay for its shipping to Sew News for the photo shoot. Months passed and I didn’t receive my payment. I inquired multiple times, but it was chocked up to a slow system. Then I received a Chapter 11 Notice in the mail. I reached out to the point person again and learned that I would need to submit a claim to the courts in order to receive payment.
Needless to say, I’m miffed. However, I am pleased to report that after asking for my jacket to be returned and for my writing to be removed from the issue, it happened. It’s not a good feeling to leave the magazine in a lurch, but it’s also unfair for them to publish it when I haven’t received the agreed upon compensation. The whole thing makes me feel very wary of working with “larger” companies in the future. As far as I know, they’re still asking for contributors for future issues. I don’t know if the magazine has been bought/has a stable financial future, or if they’re able to pay for contract work moving forward.
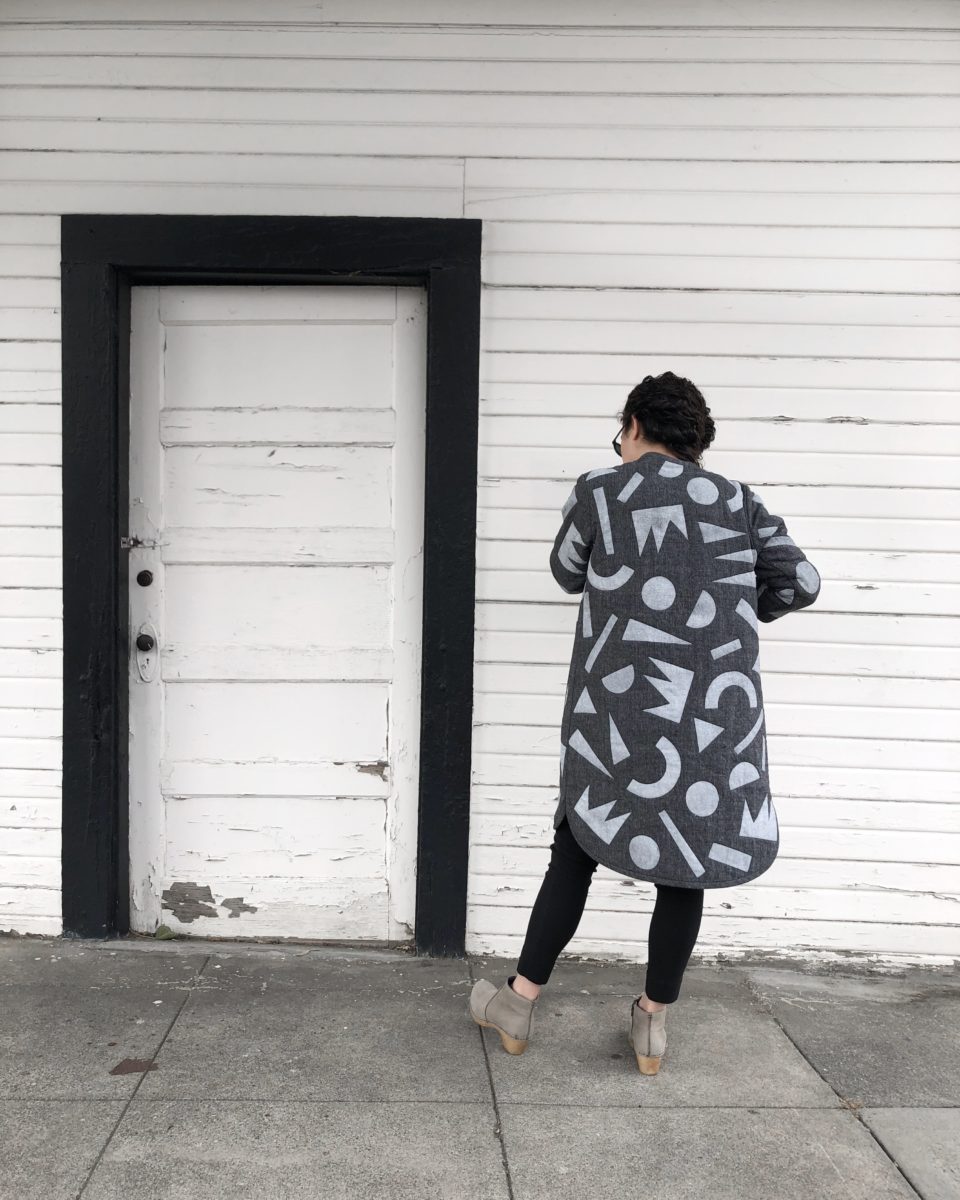
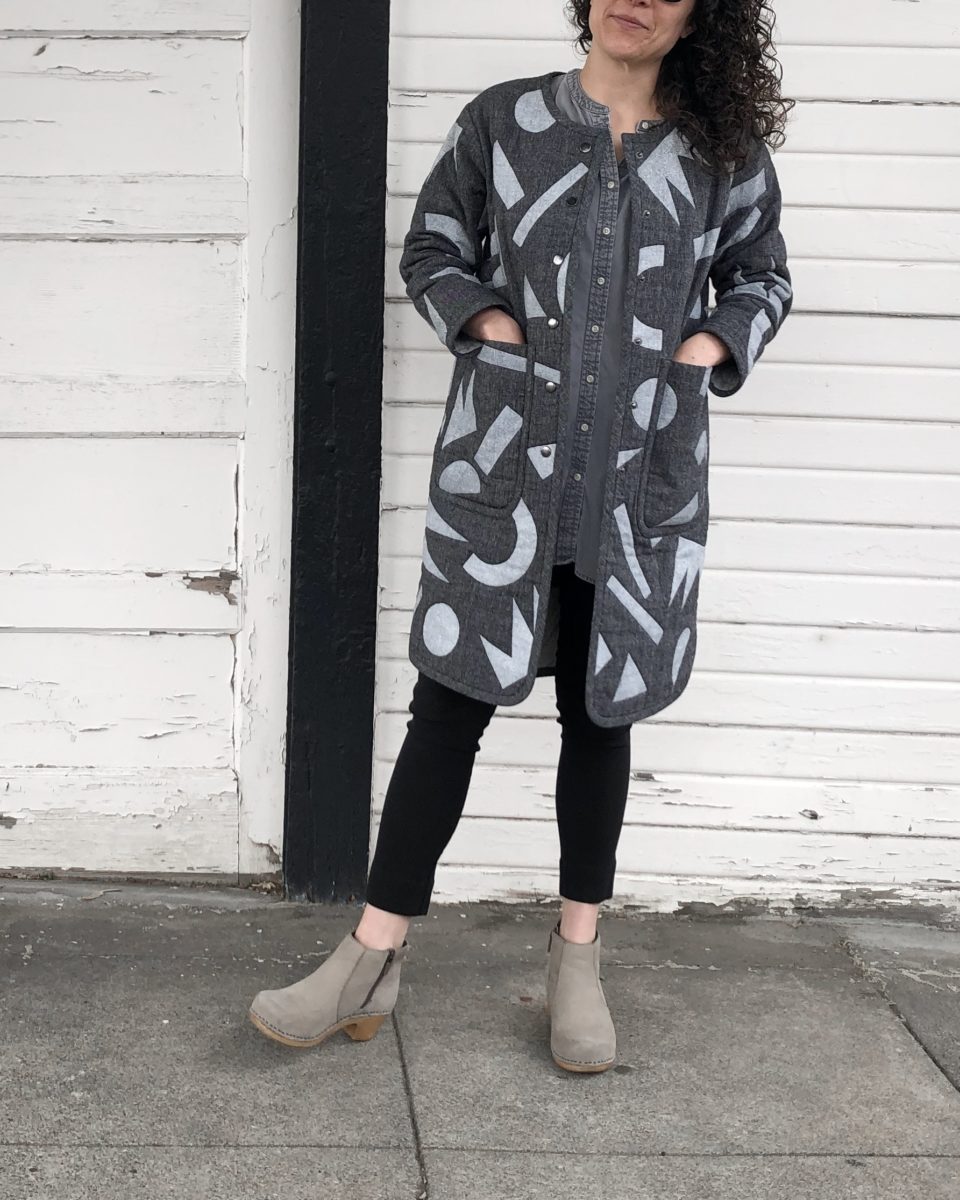
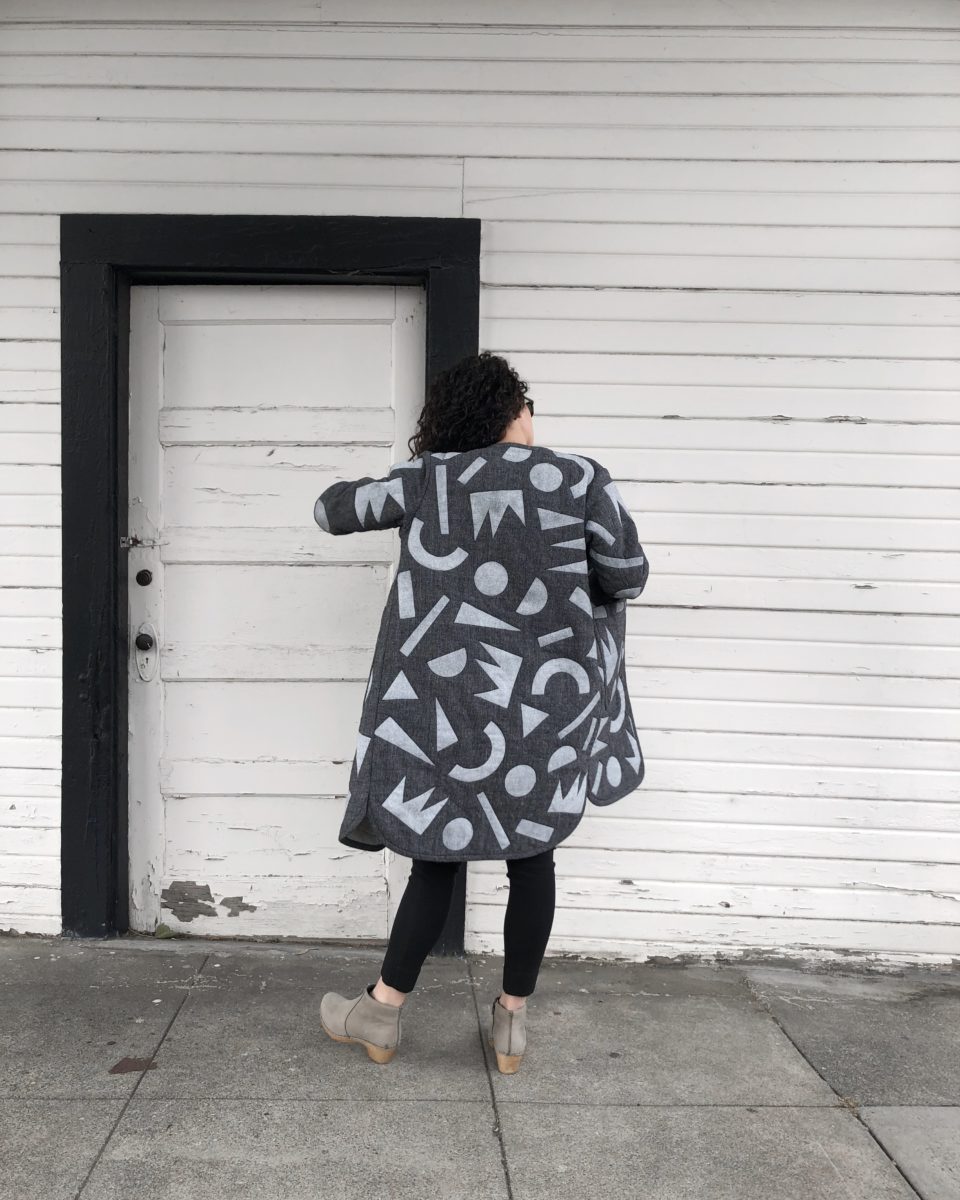
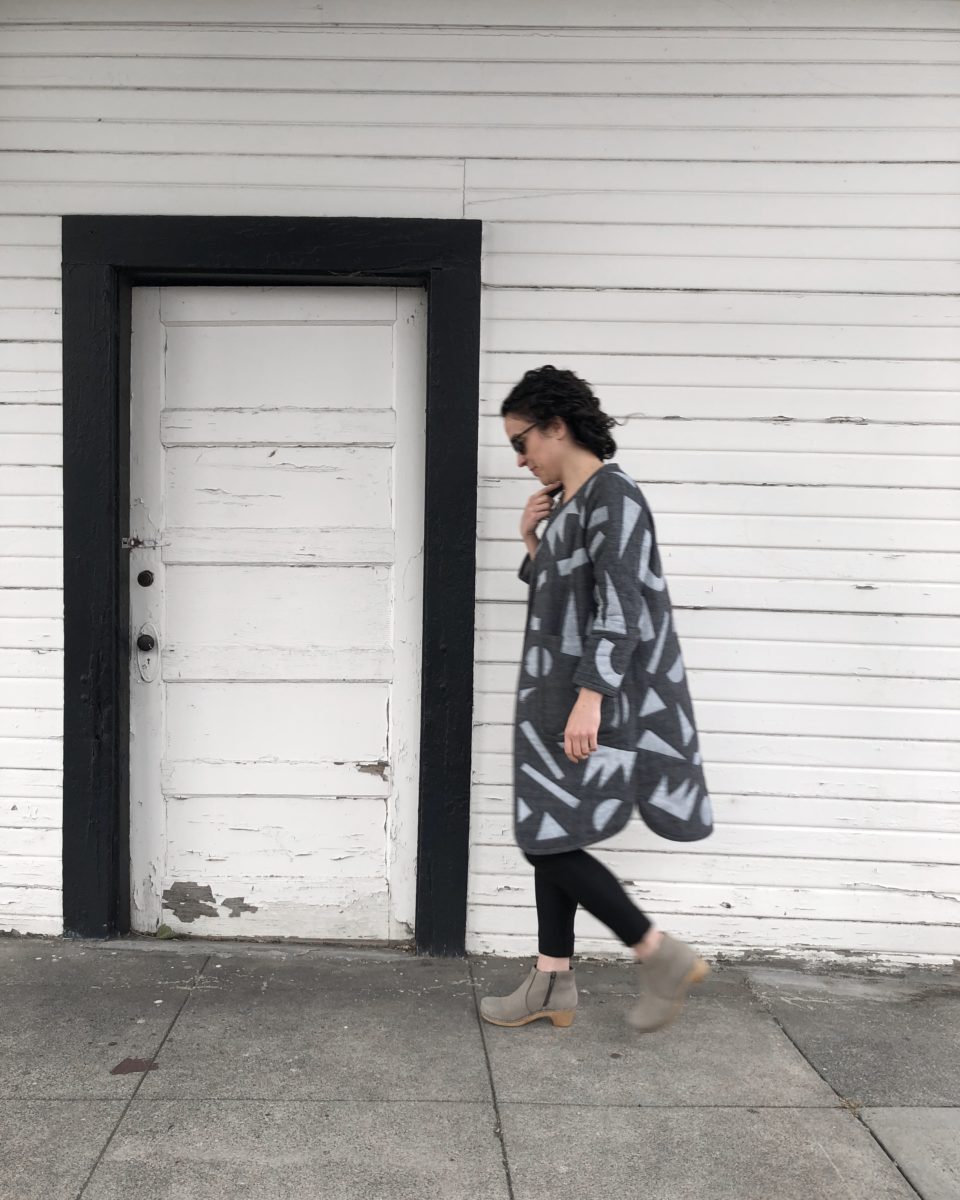
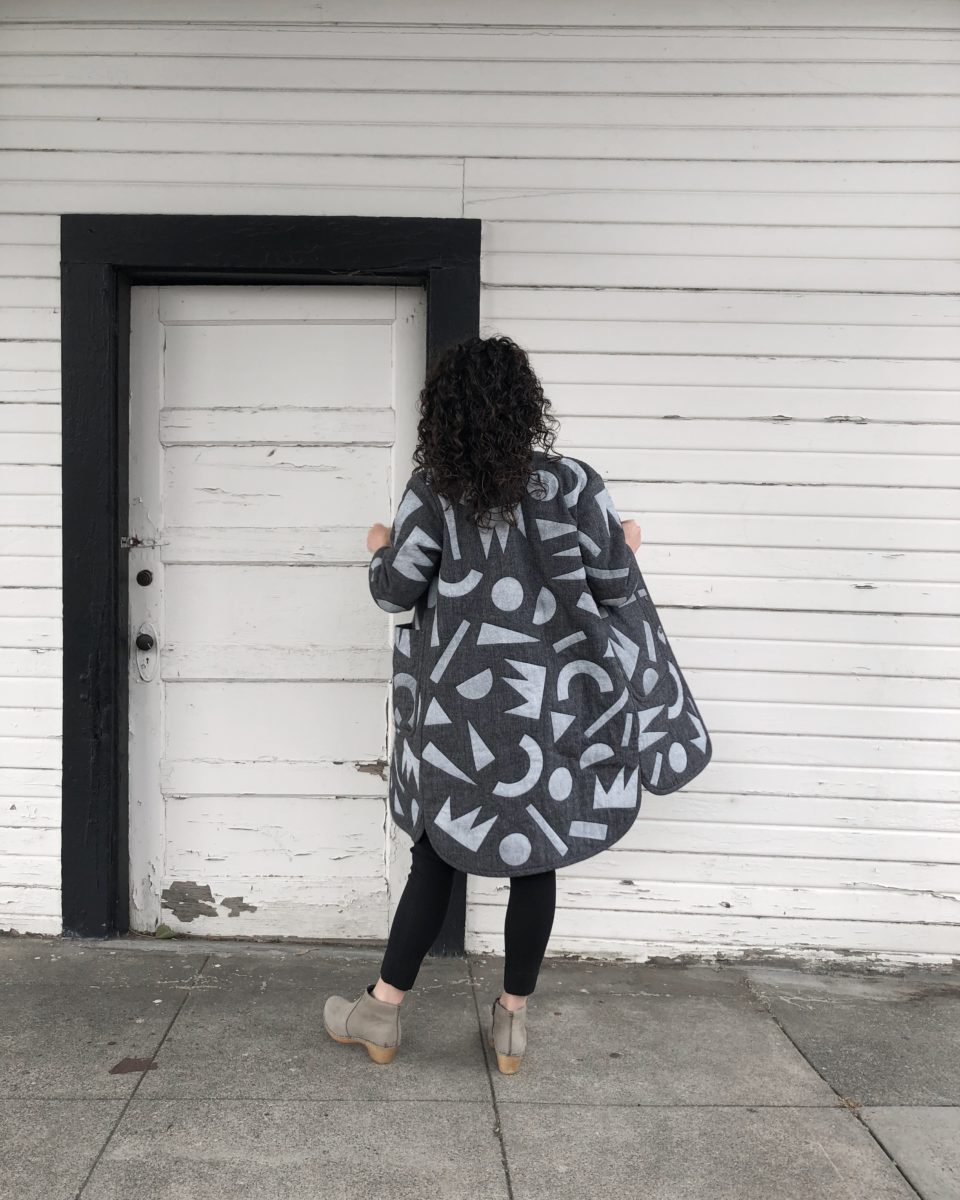
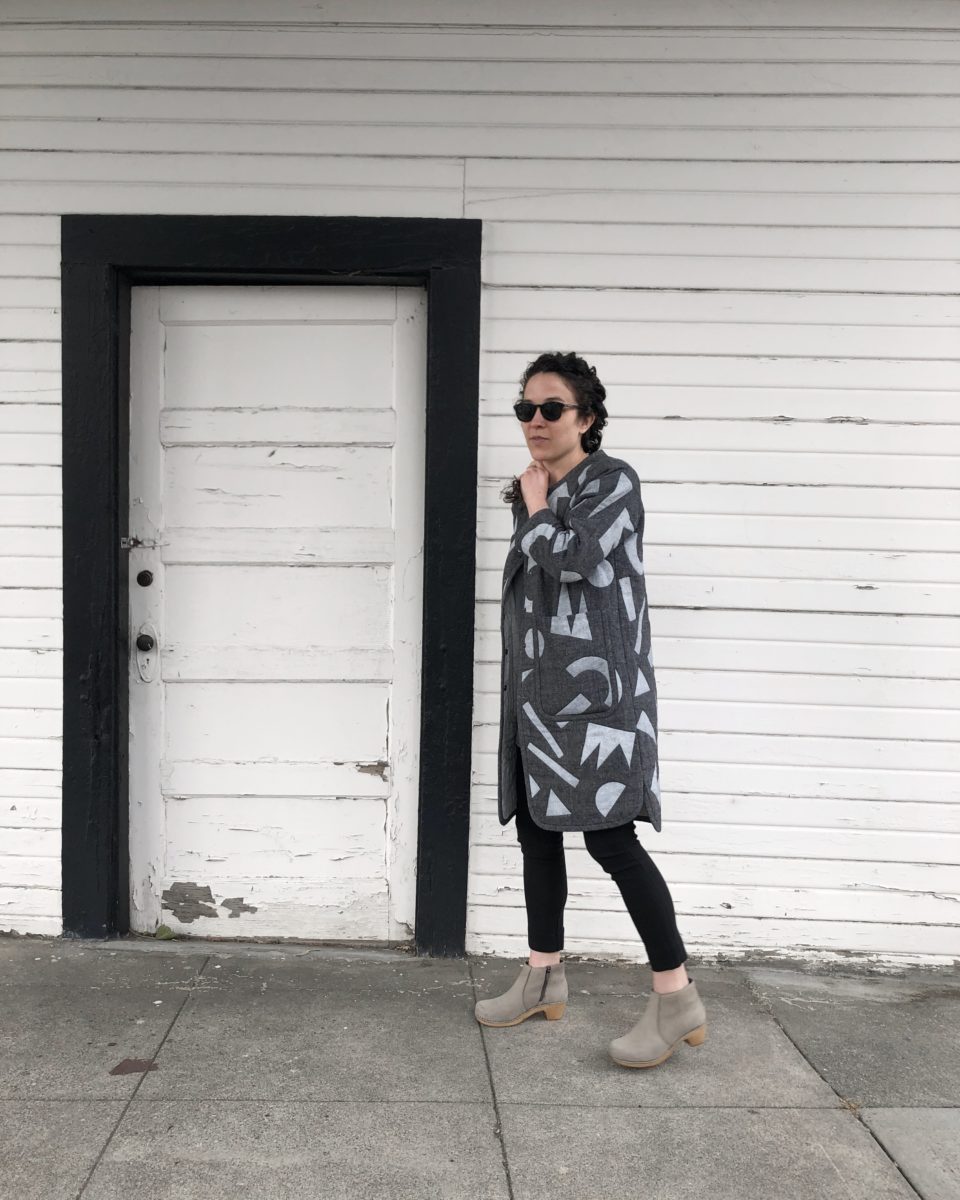
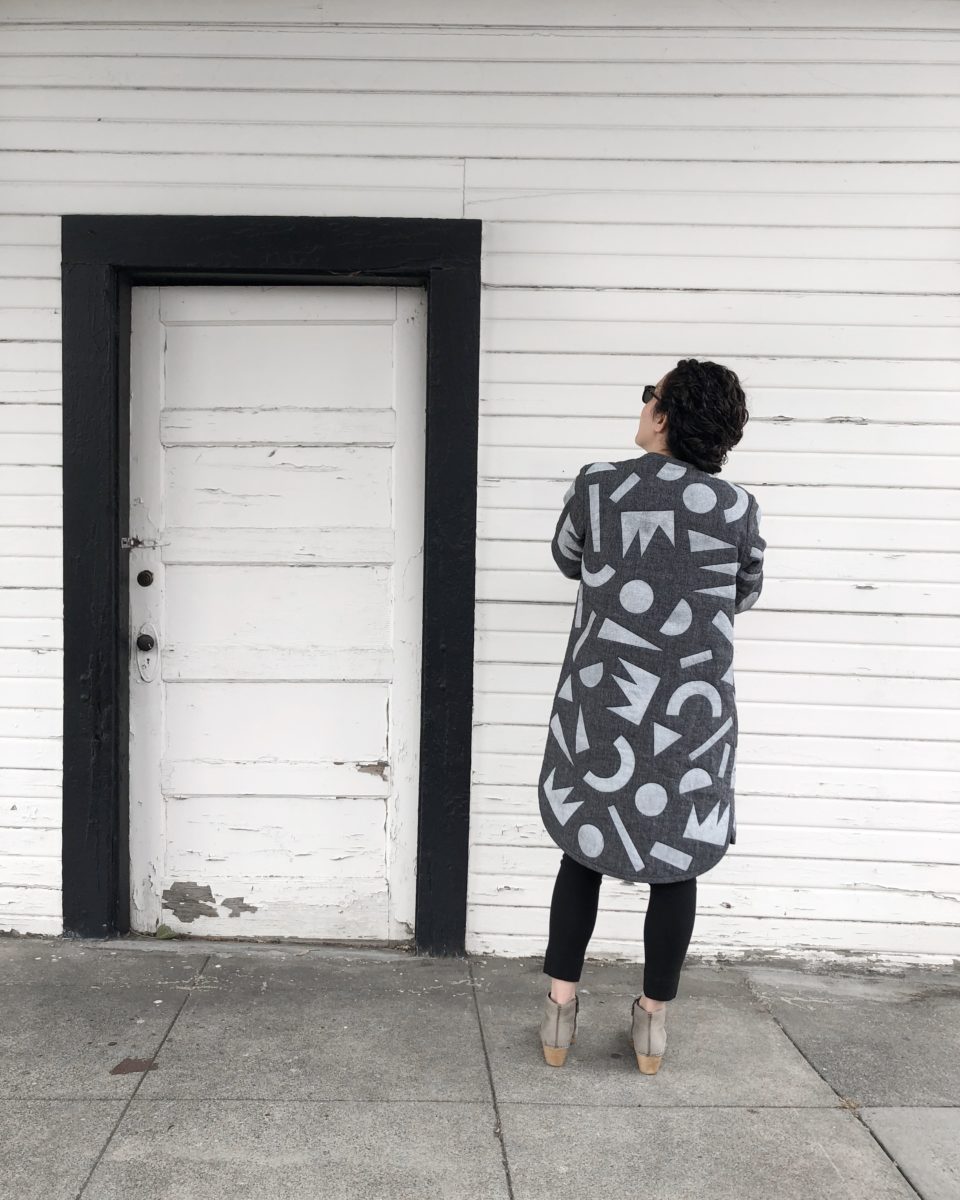
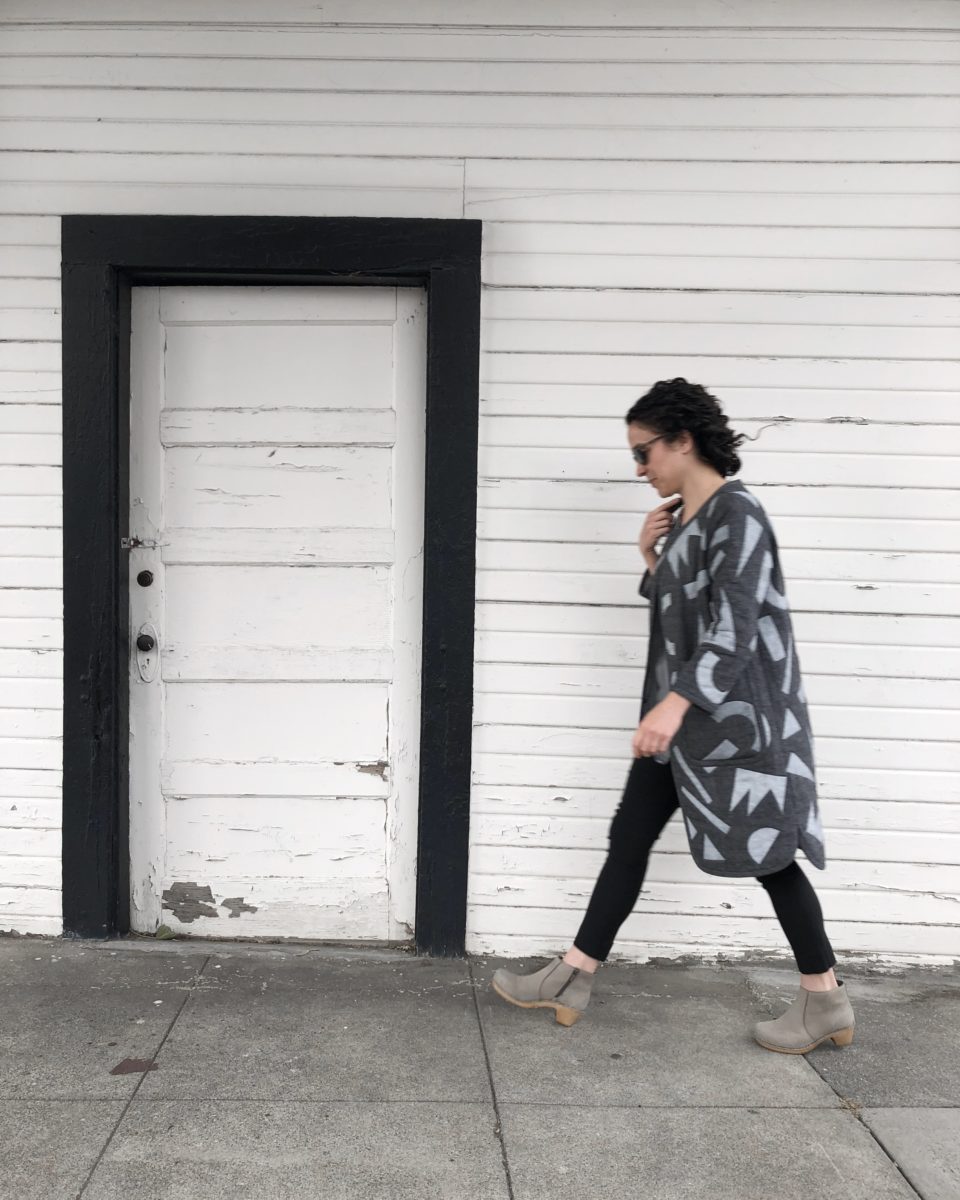
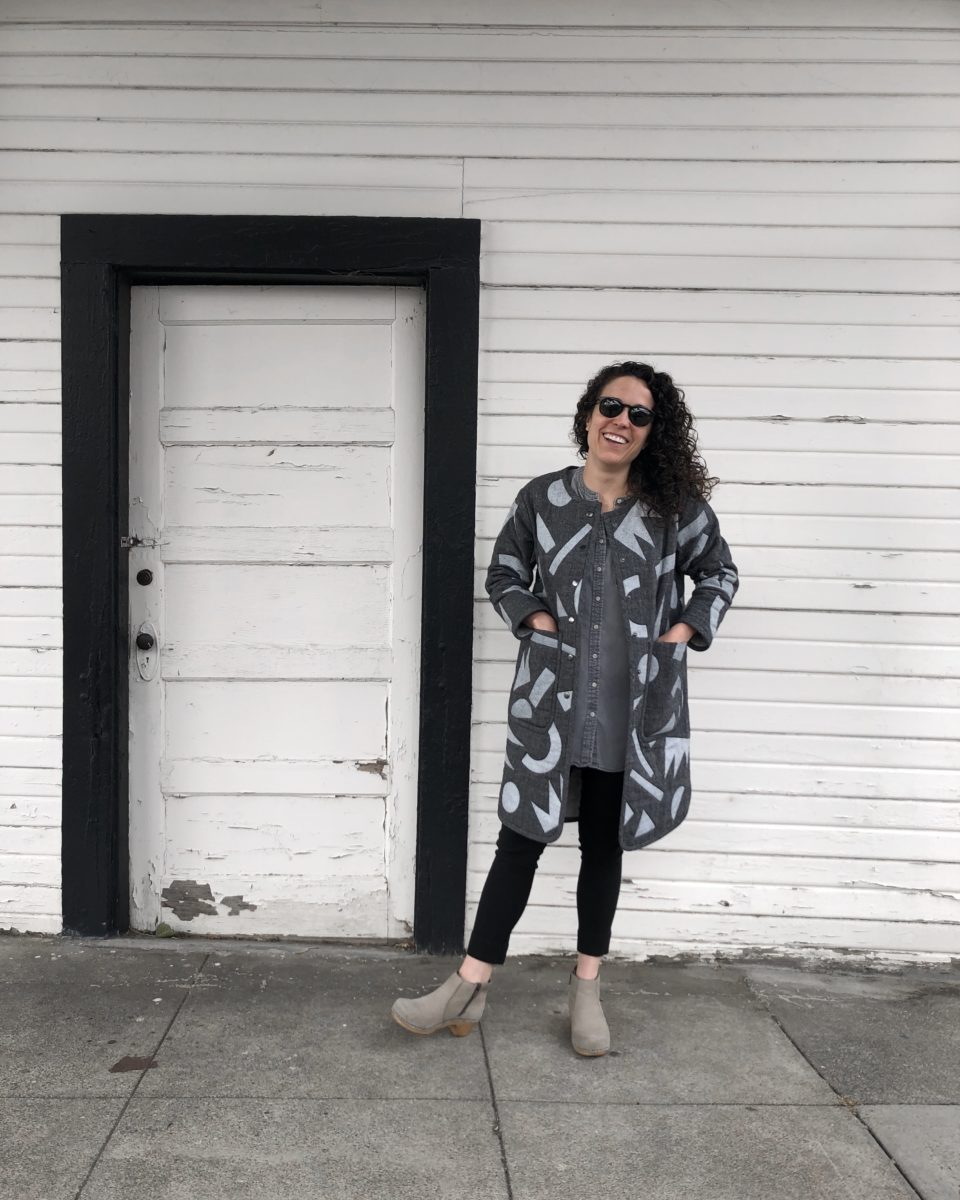
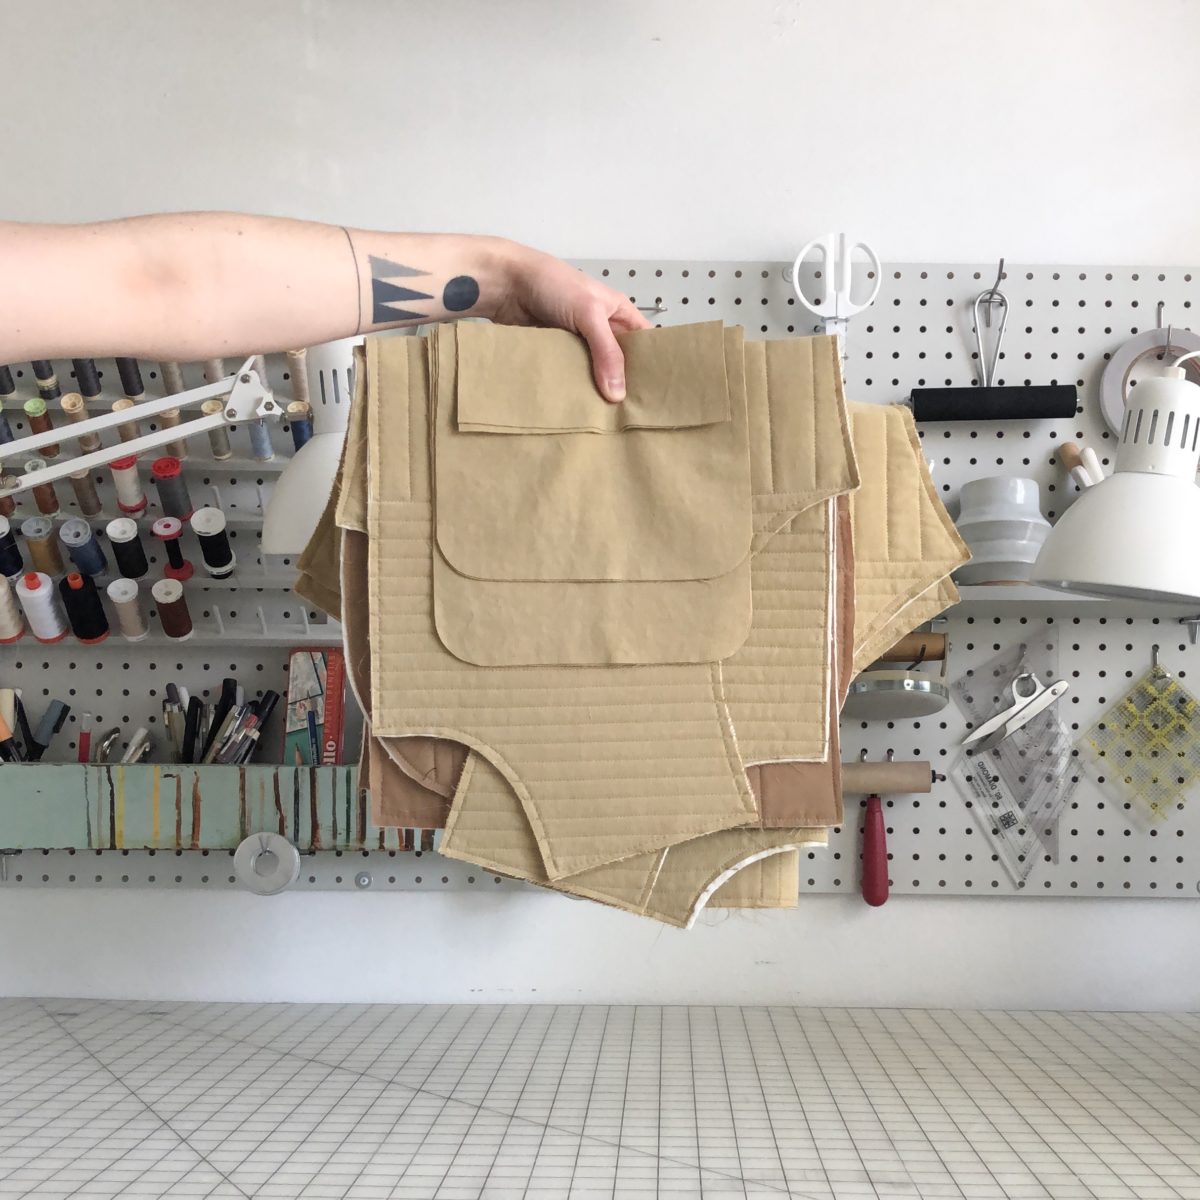
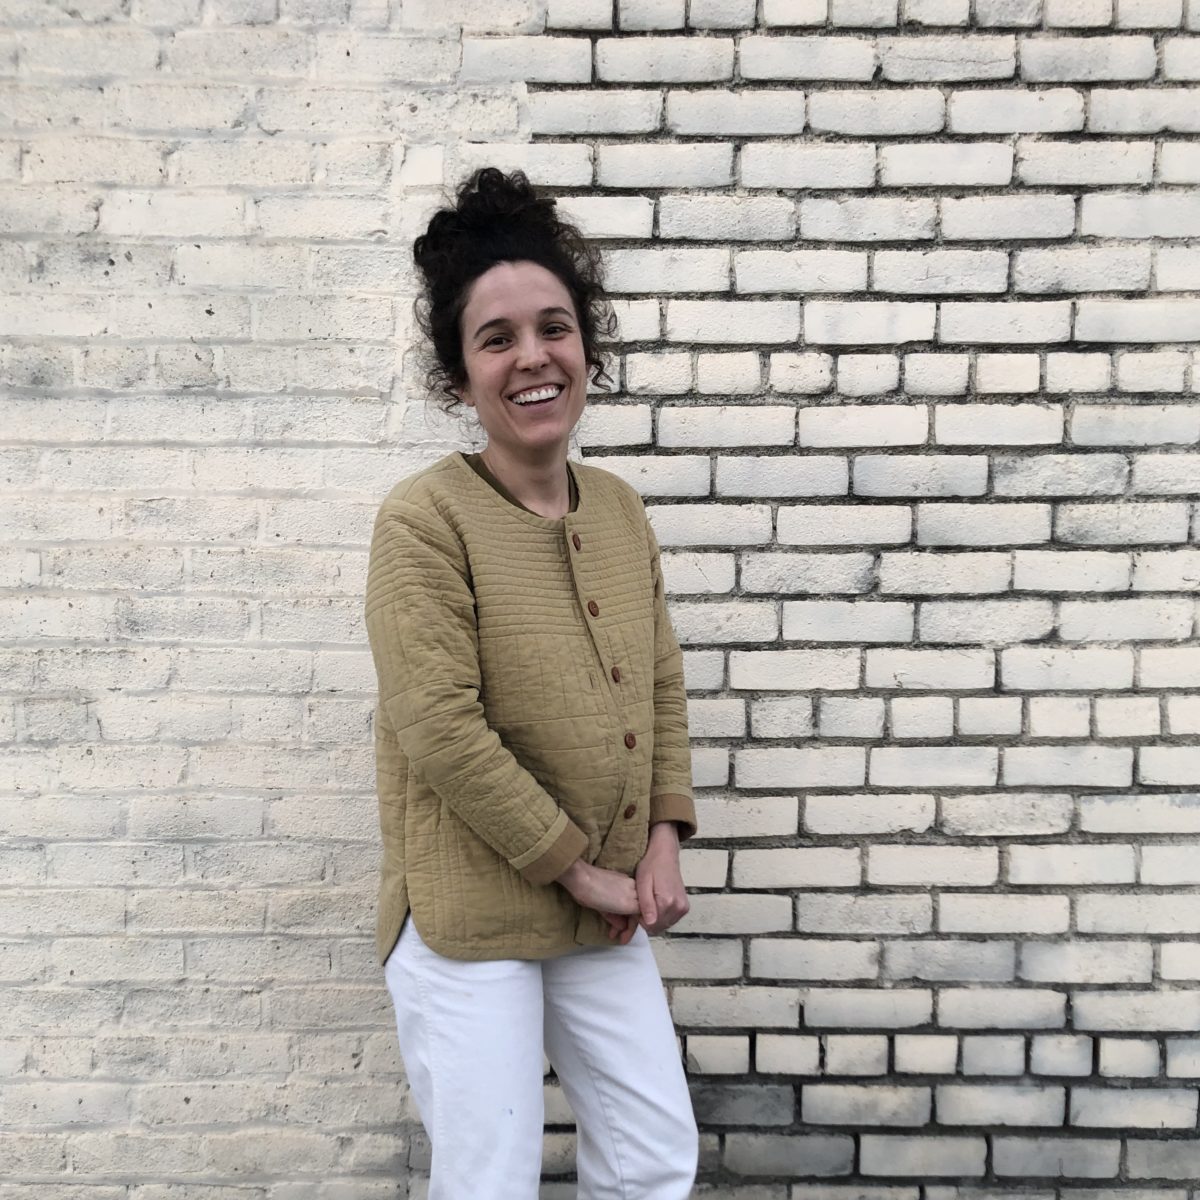
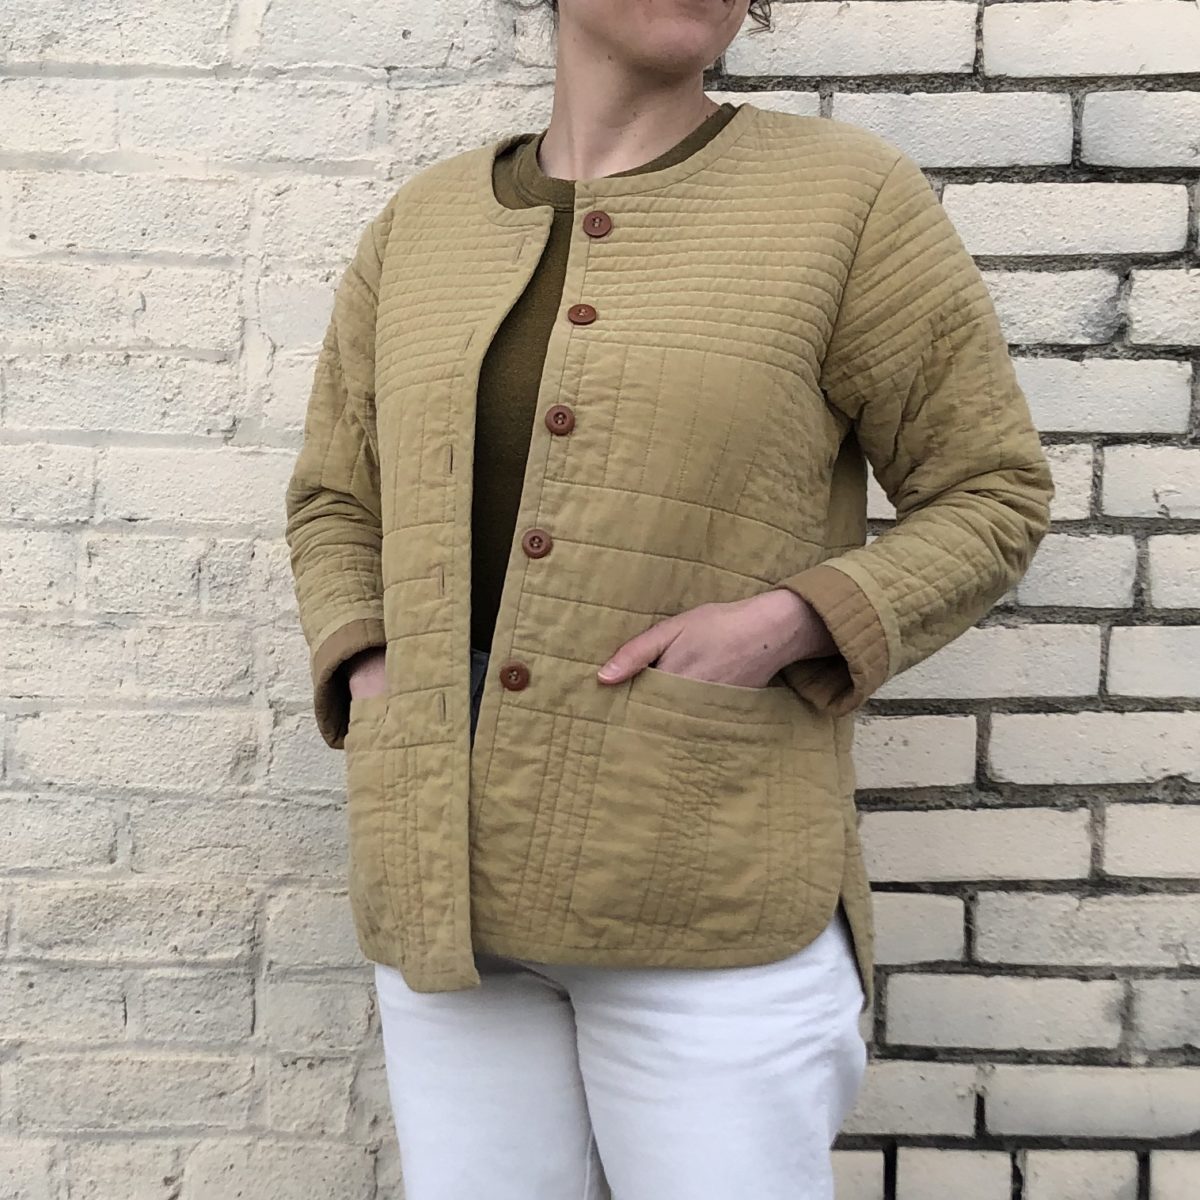
Anyway, here’s my write up and some process pics. As I mentioned above, the purpose of the article was Tamarack Jacket hacks. My twist on the pattern was more about the surface design and quilting pattern than big changes to the sewing pattern. I did do some basic mods like lengthen the body, shorten the sleeves, and use patch pockets in lieu of the pattern’s welt pockets.
Block printing is one of the easiest ways to alter the surface of just about any textile. With a few simple supplies, you have endless opportunities to customize fabric right from your home. In my at-home block printing kit, I like to use Speedball Speedy Carve Blocks, a Speedball brand linoleum cutter, a Testrite Foam Brayer, a baren to help apply even pressure, and water-based silkscreen ink for fabric. I prefer to use a foam brayer when block printing on fabric as it applies more ink to the blocks and prints more evenly than a rubber brayer. I also like to use water-based ink because oil-based is a little smelly. Whatever base ink you choose to use, make sure it’s designed to be applied to fabric, or your ink won’t ever fully adhere! Most importantly, remember to wash and dry your fabric to remove any sizing that might affect the ink.
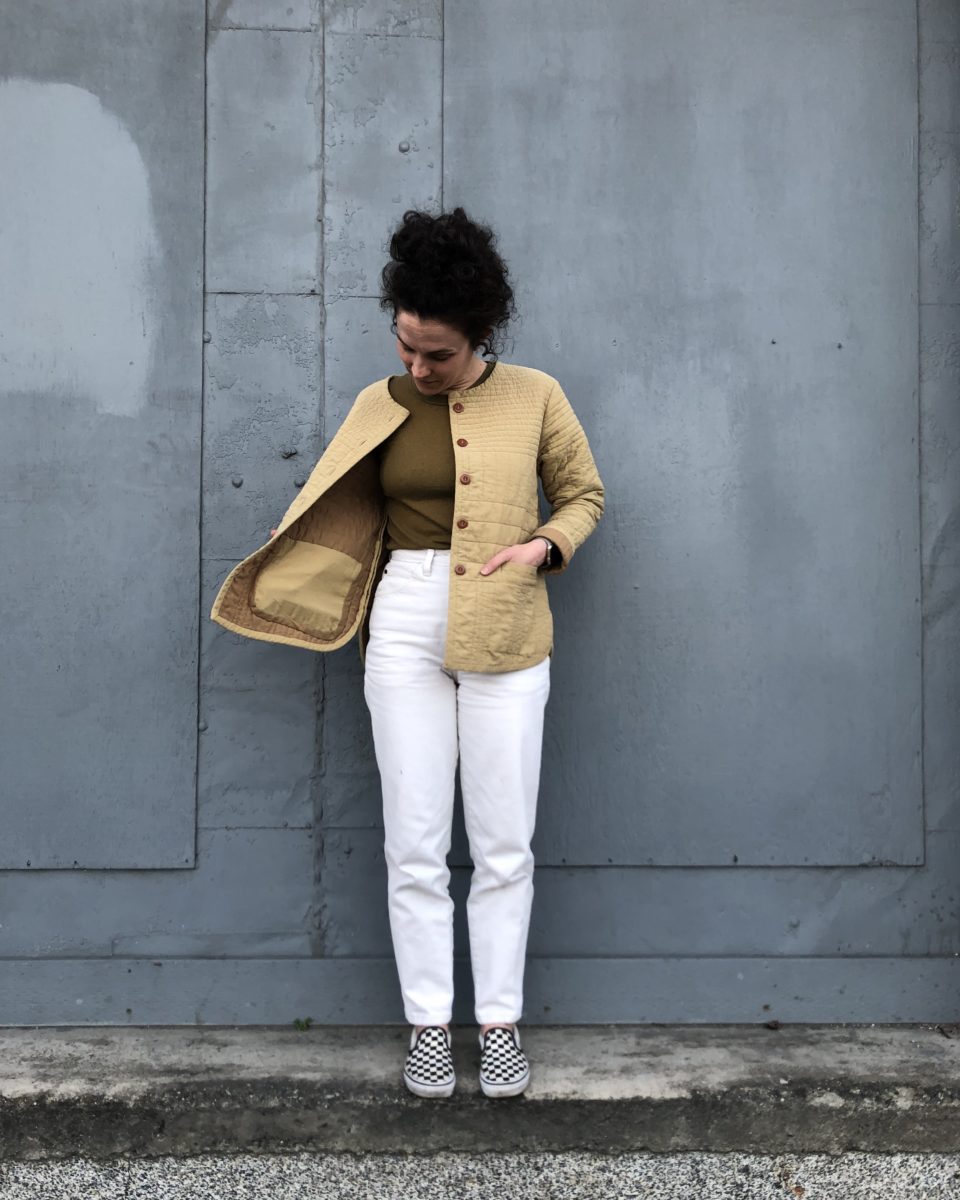
For the exterior fabric of my Tamarack, I chose Robert Kaufman’s Essex Yarn Dyed Homespun fabric in Pepper. This textile is a linen-cotton blend that I knew would quilt up beautifully. For the lining I used the same fabric in Charcoal. The bias binding is also Pepper to keep the emphasis on the block printed design. This was my first time block printing on a fabric with any visual texture (I usually keep to solid colors), and I just love the result. The weave shows through the print and also helps conceal the wonky, imperfect nature of block prints.
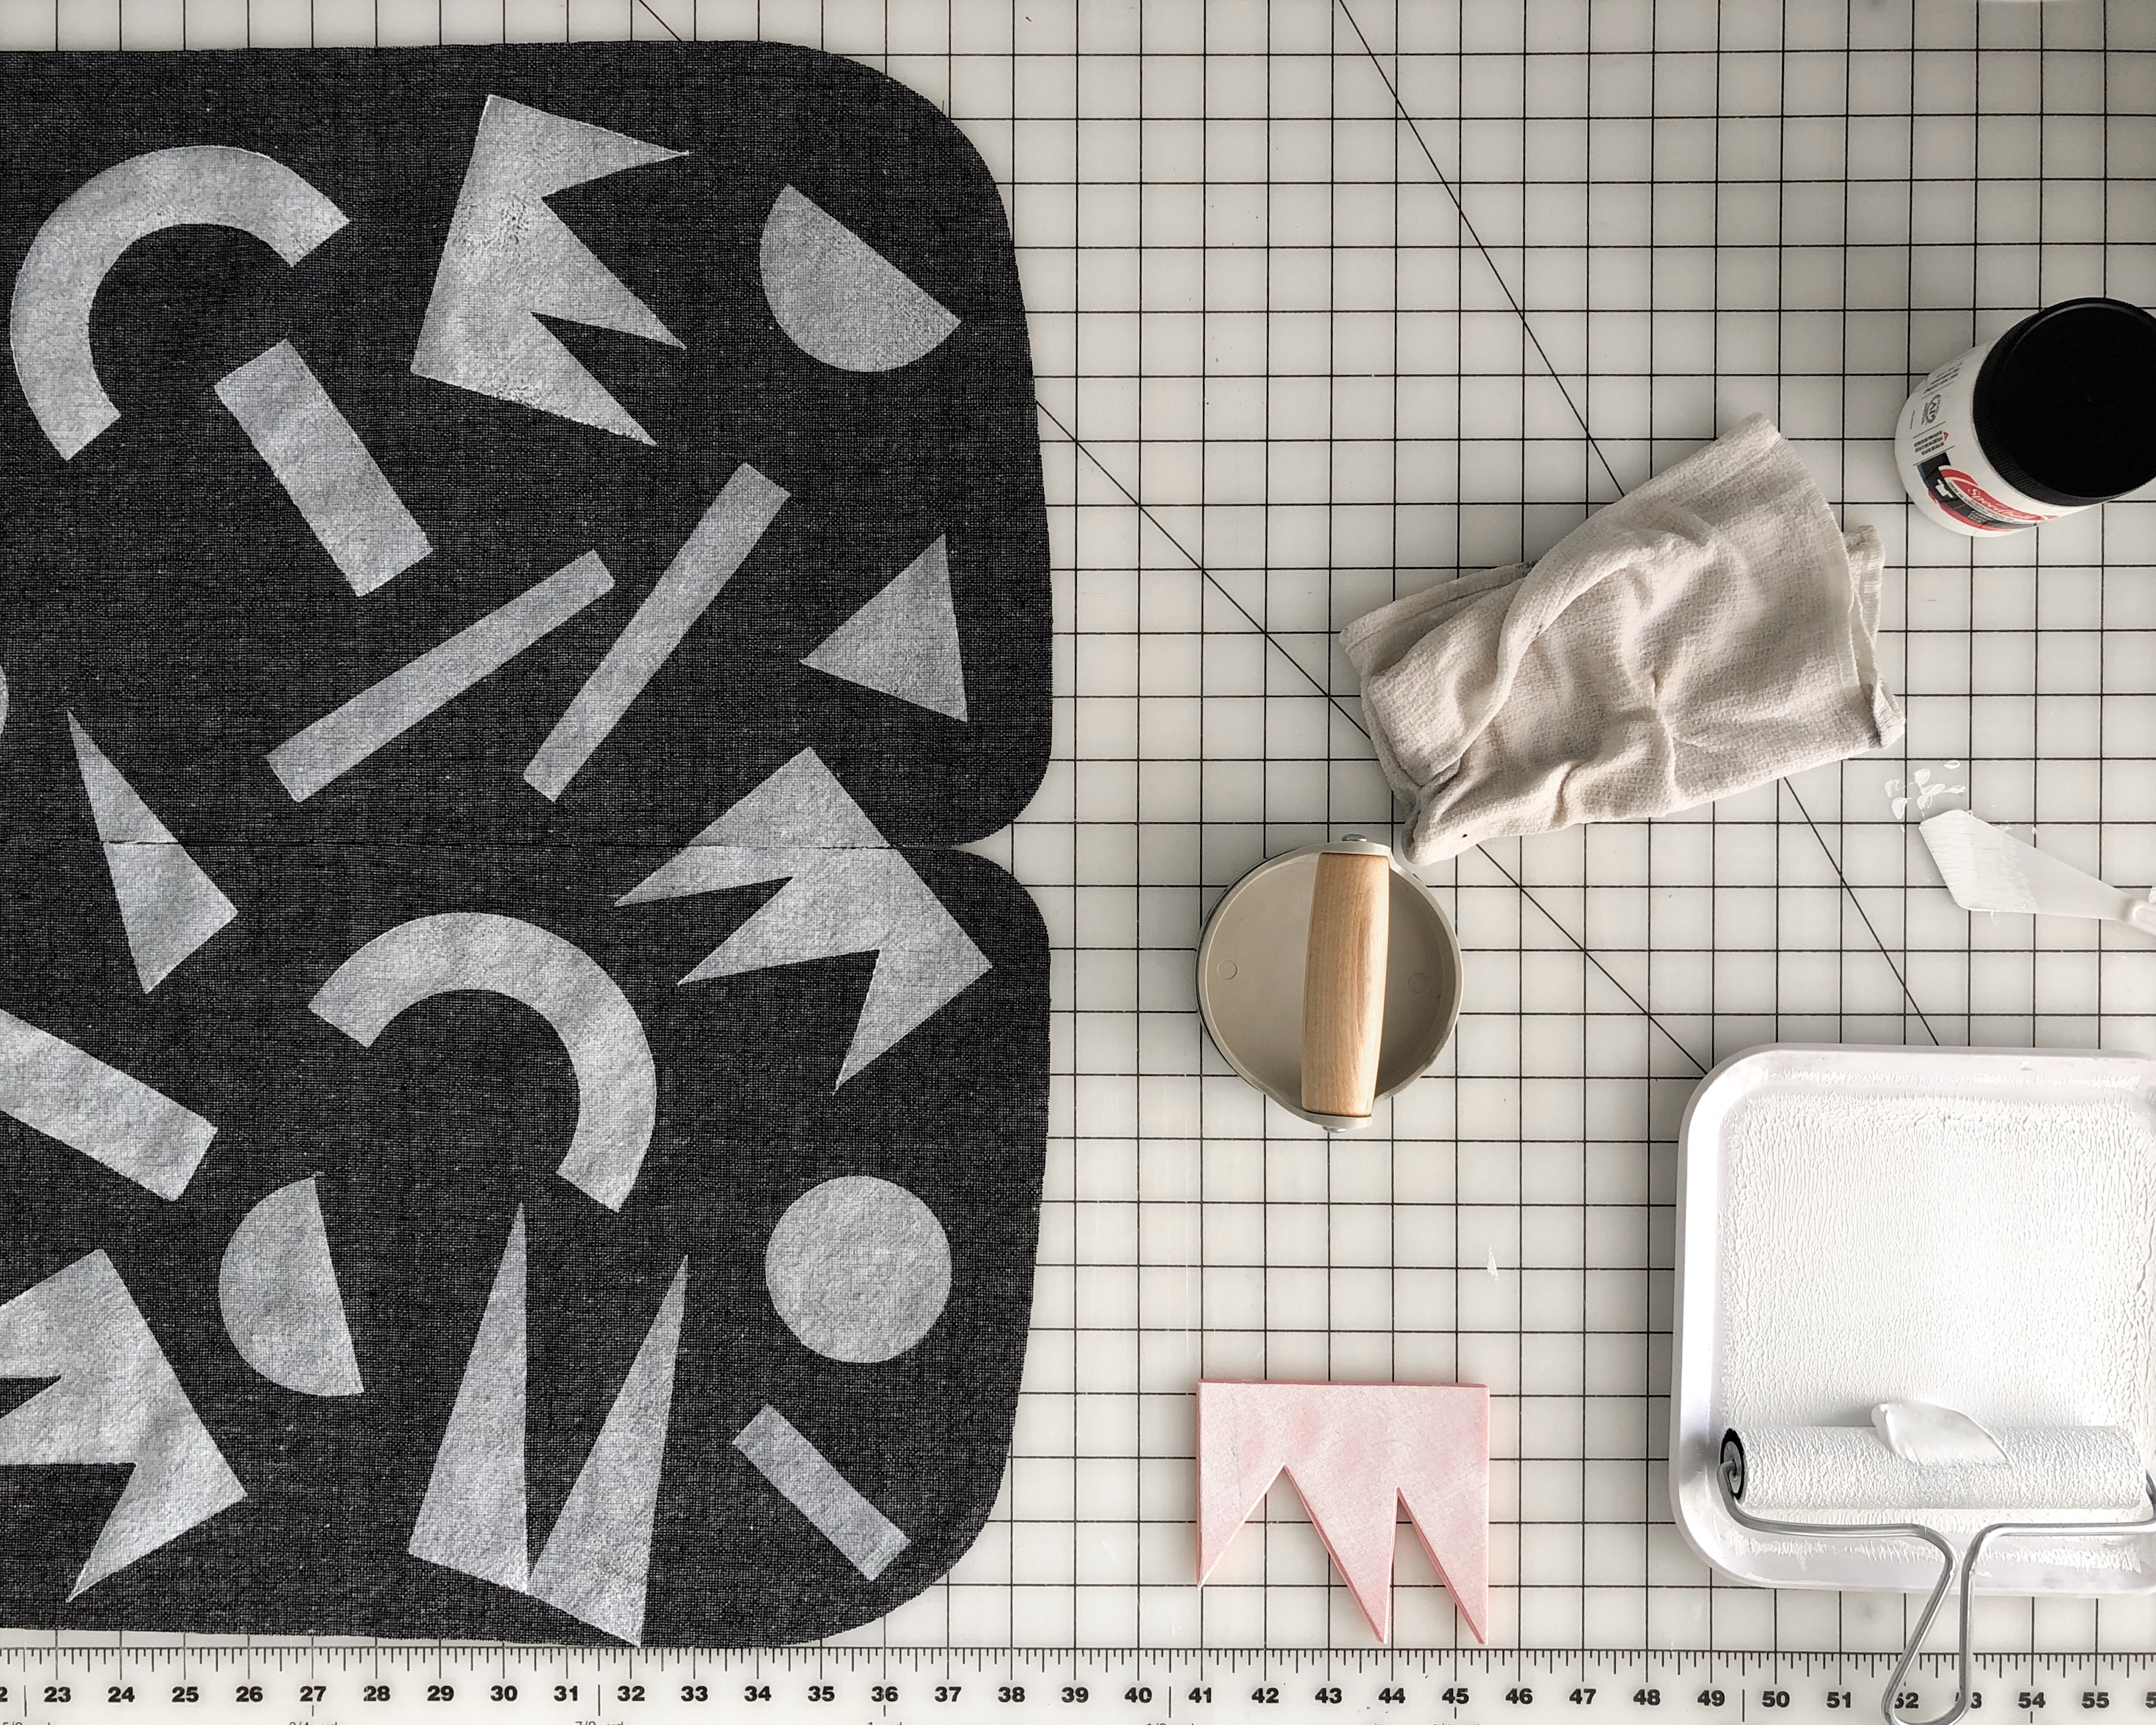
Block printing can be quite time consuming. I recommend cutting out your garment pieces before printing the fabric. There’s less waste, it requires less space, and you have more control over the print’s placement. With all of your pieces cut out, it’s easy to find a printing groove. I also recommend doing a few test prints on scrap fabric before committing to block printing your cut out pieces.
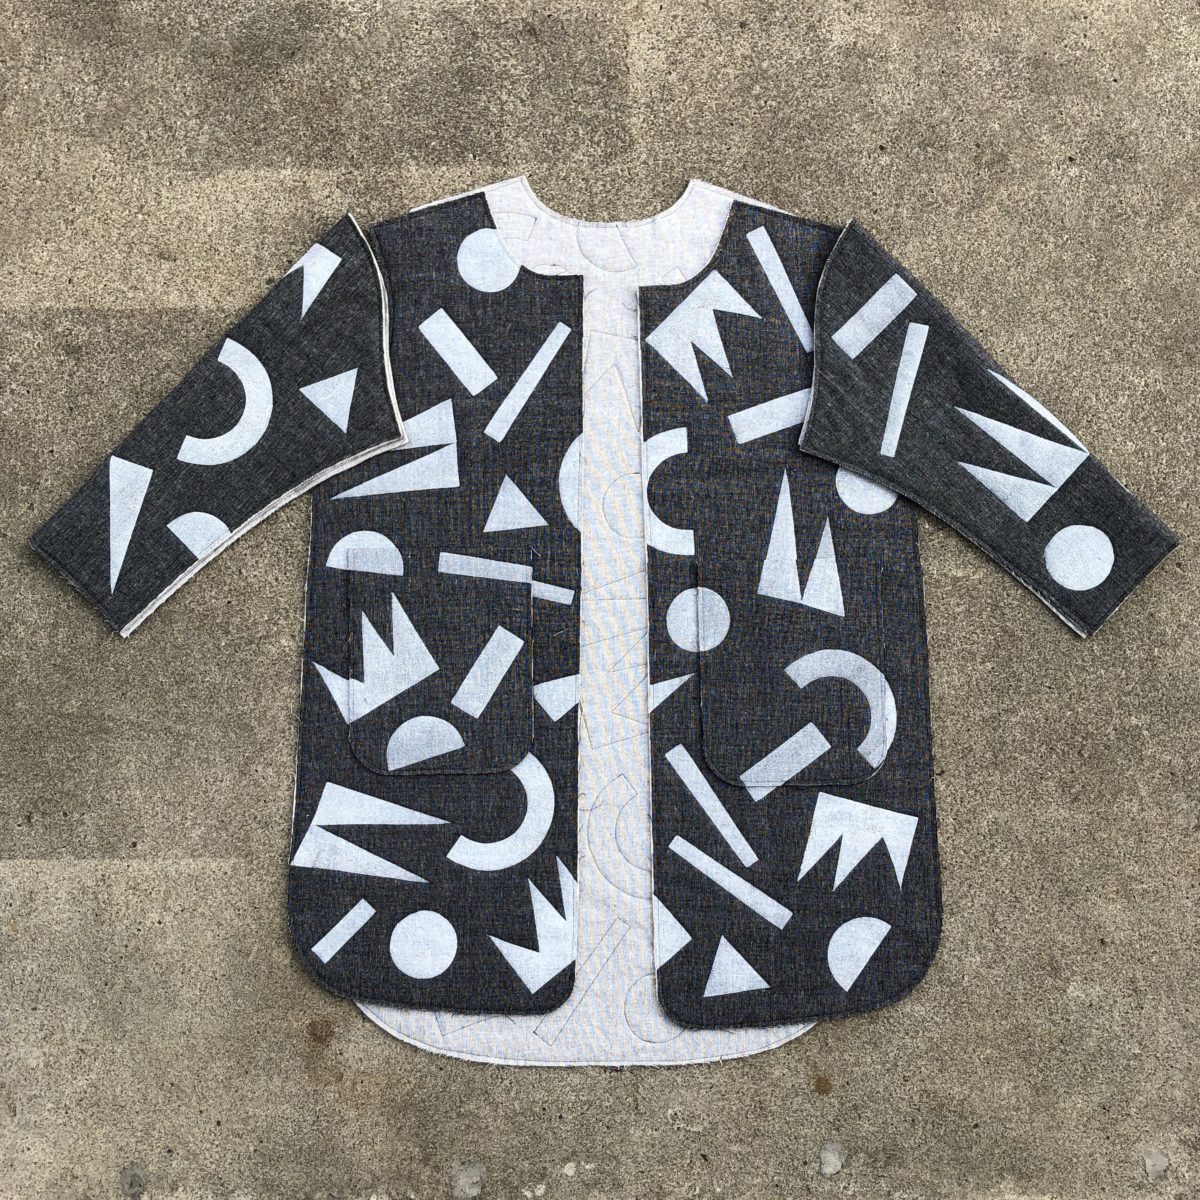
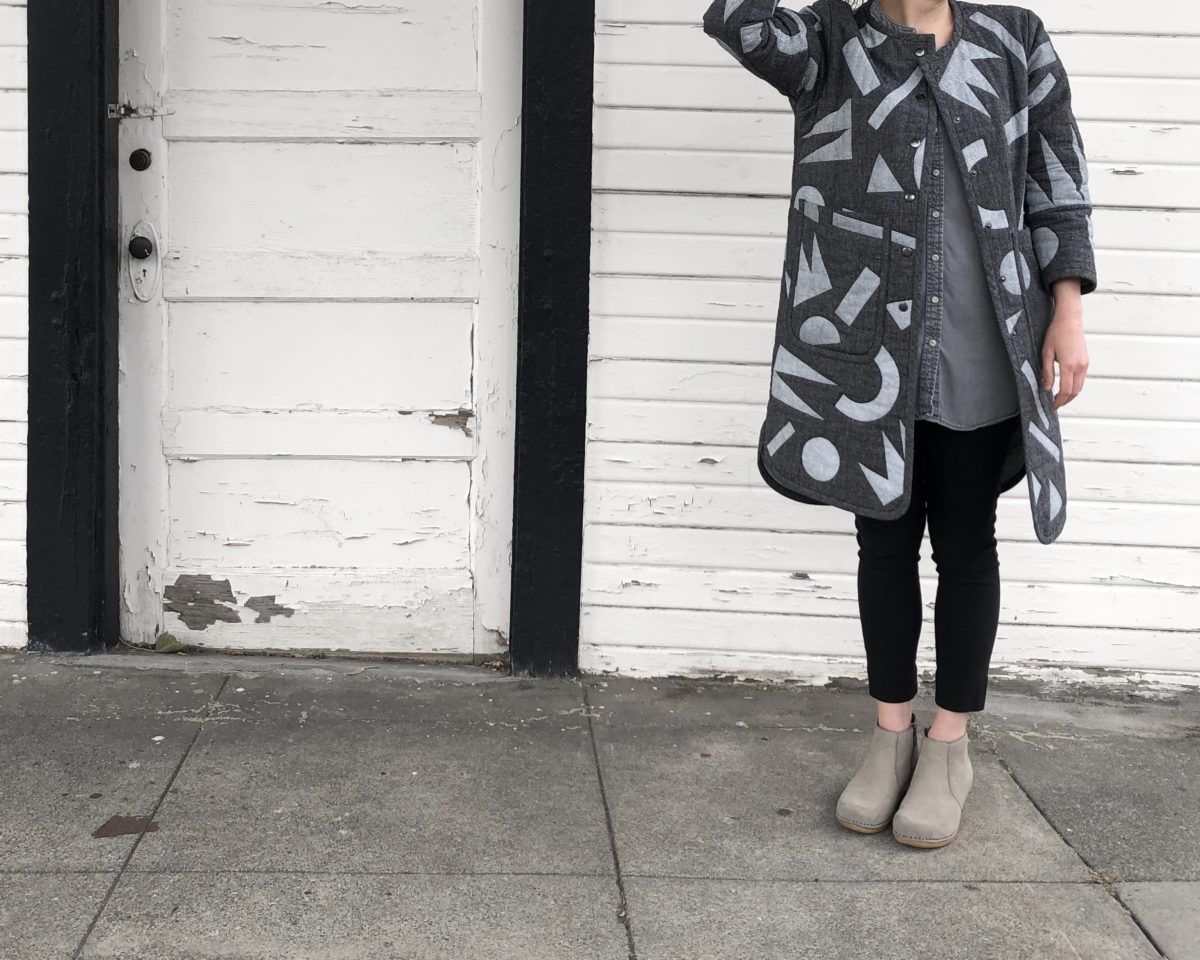
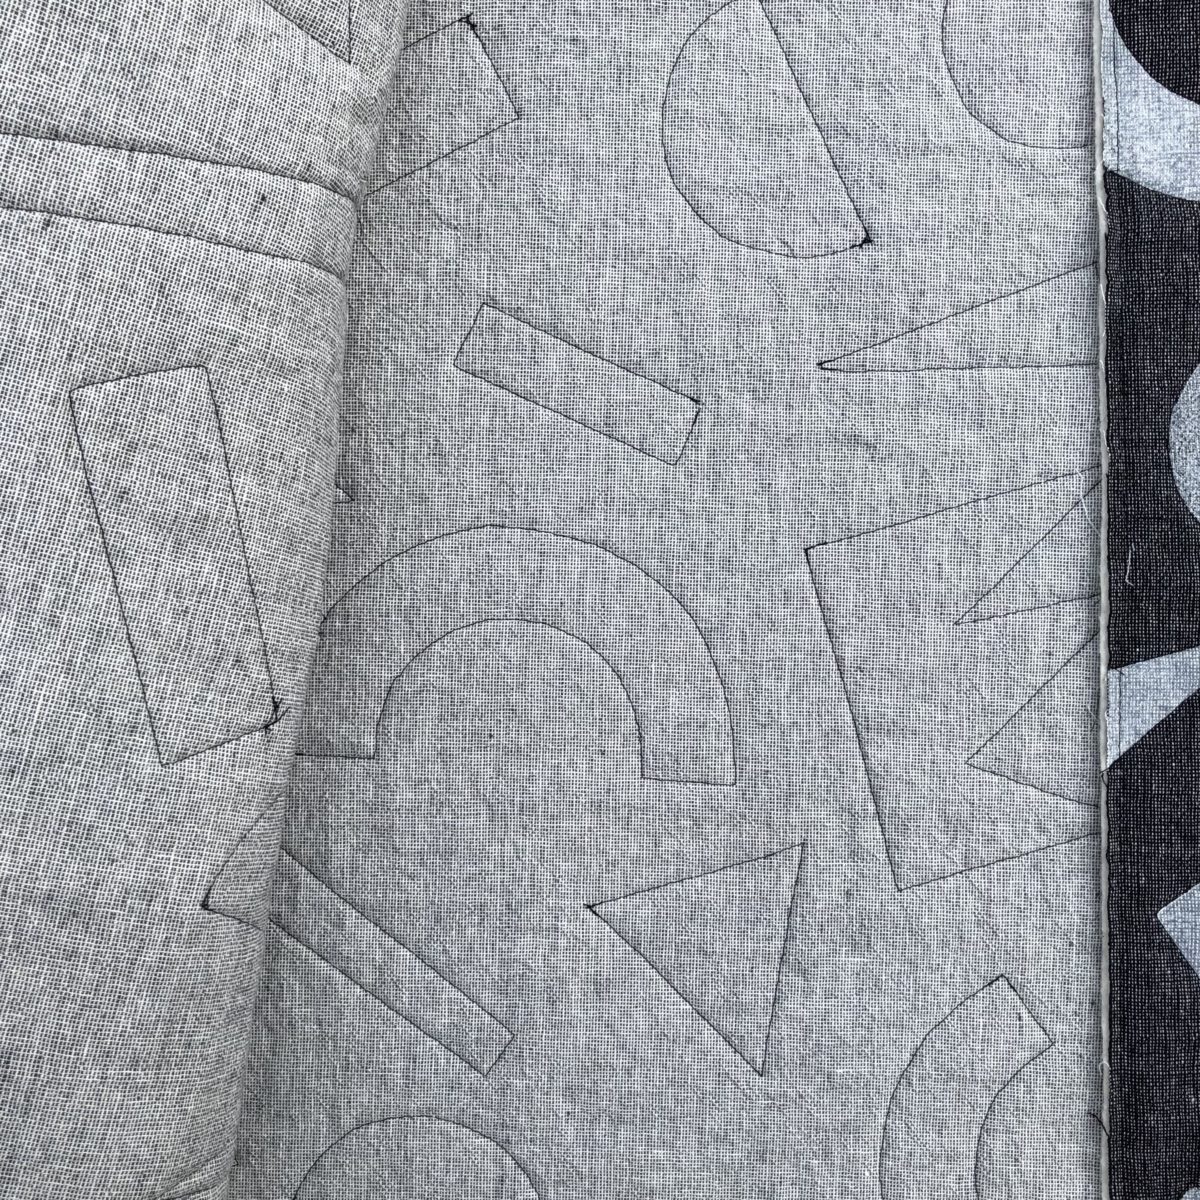
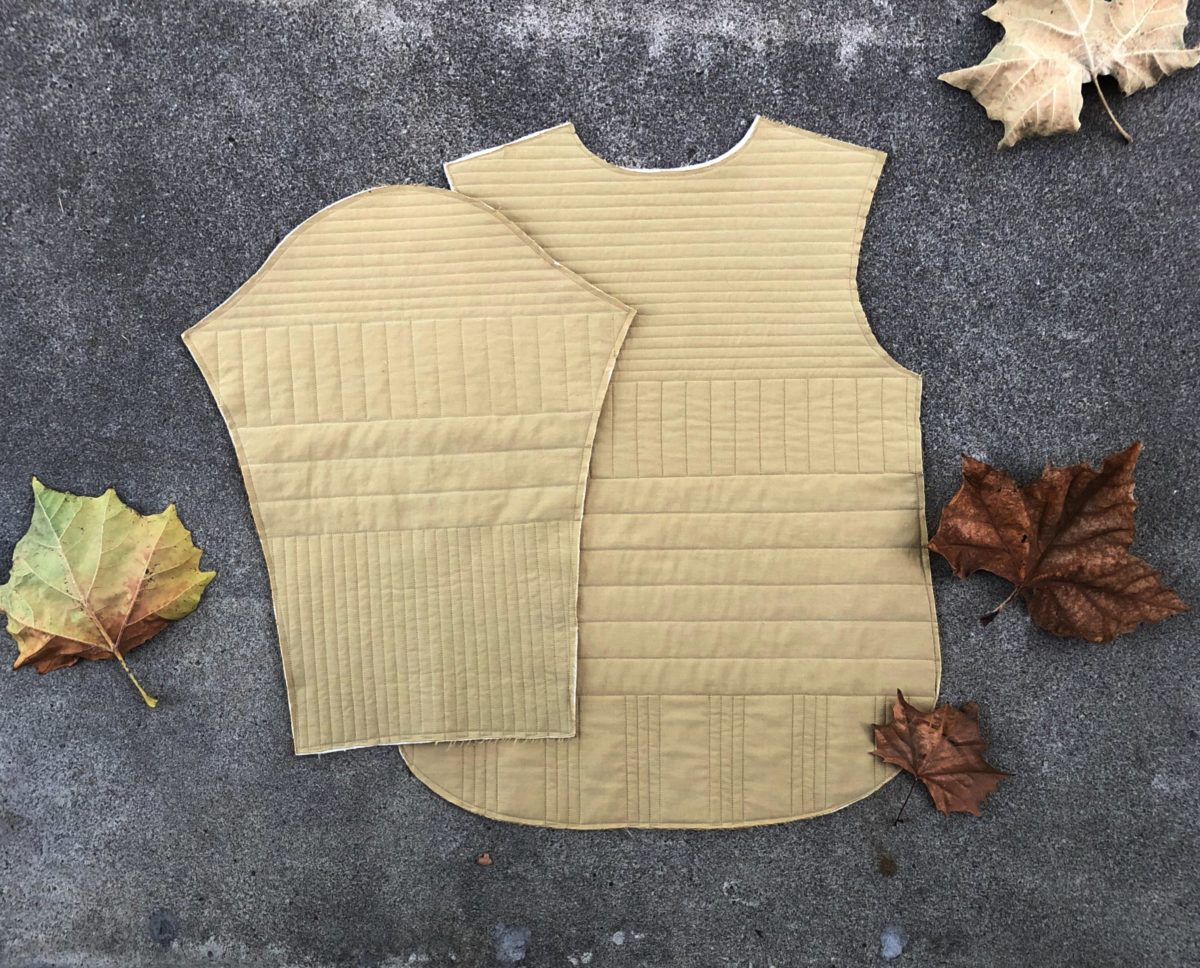
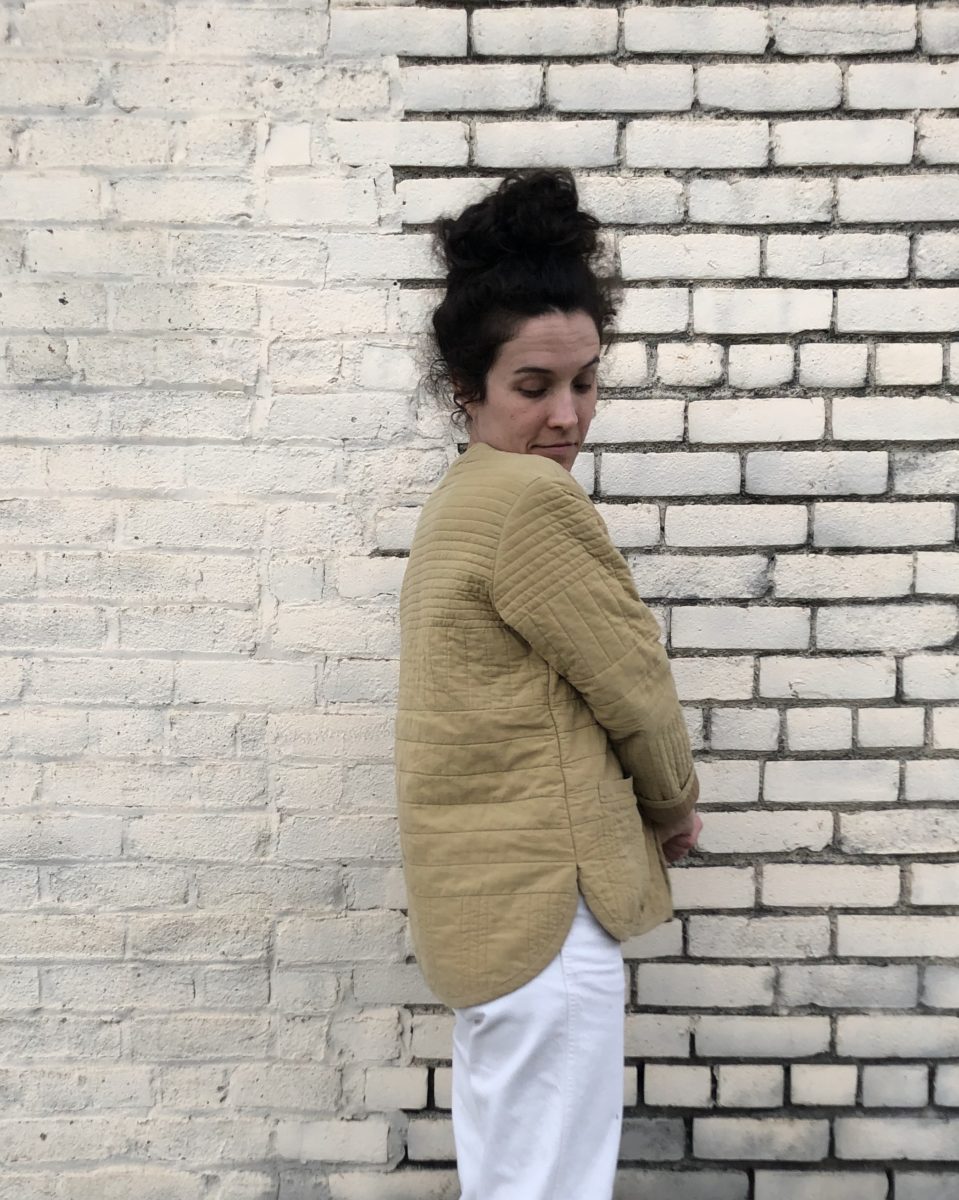
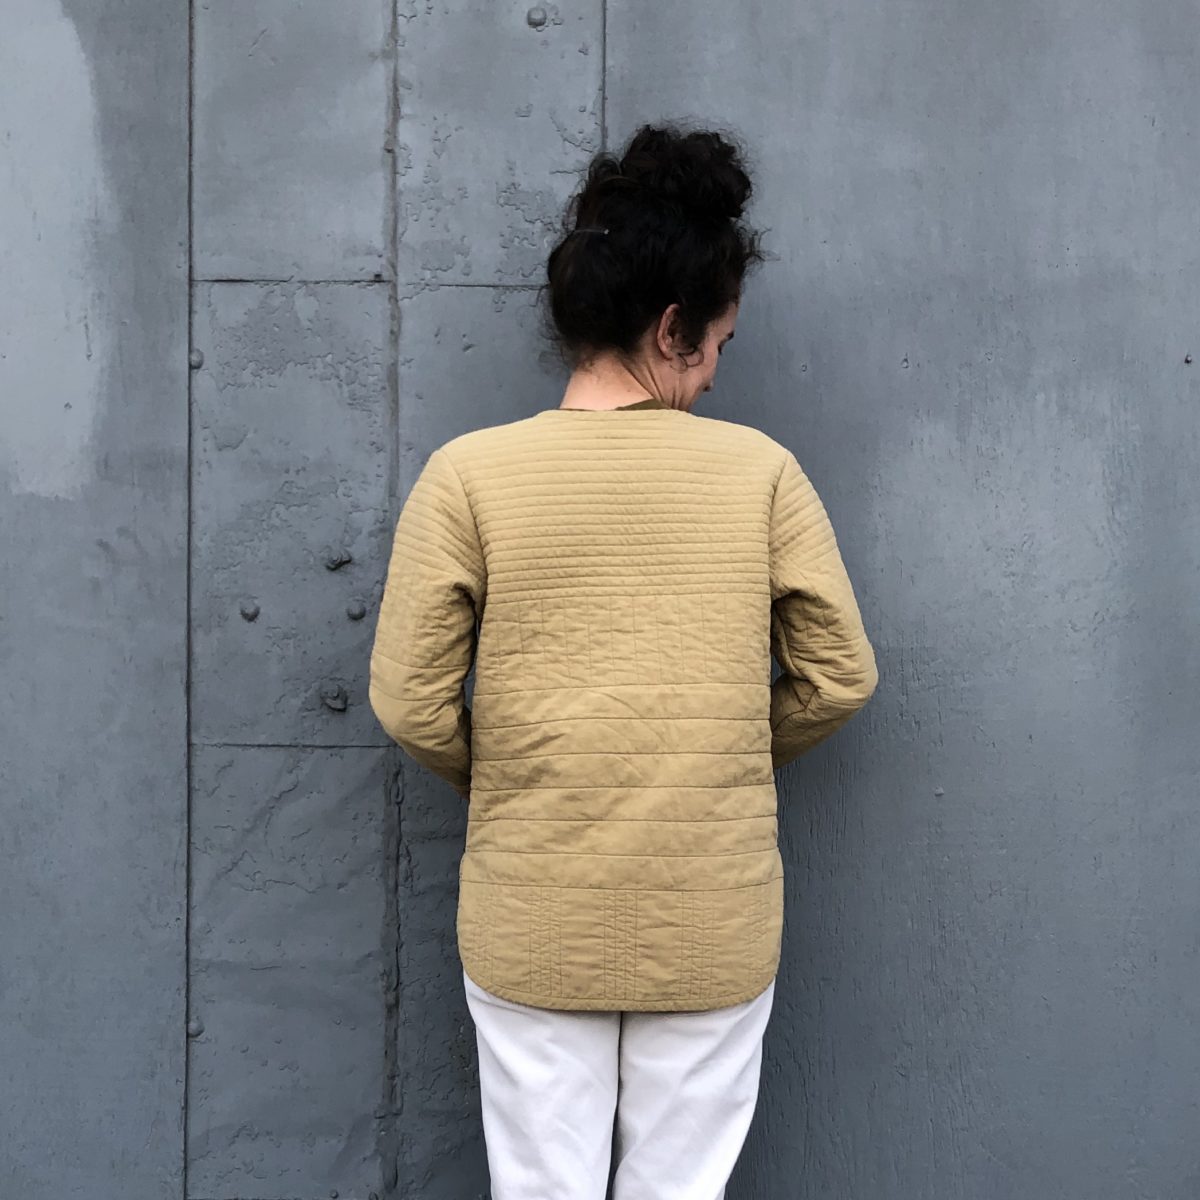
After your fabric is printed, it will need to dry for a minimum of 24 hours. It’s hard to wait, but I’ve found if I rush this step, the ink tends to smear. After it’s dried, be sure to heat set the ink with a hot iron too. While I was allowing my printed pieces to dry, I decided my quilting pattern would also emphasize the geometric shapes. I quilted around each shape instead of using a standard line quilting pattern. I used black thread in the bobbin and I love how the quilted shapes look on the inside.
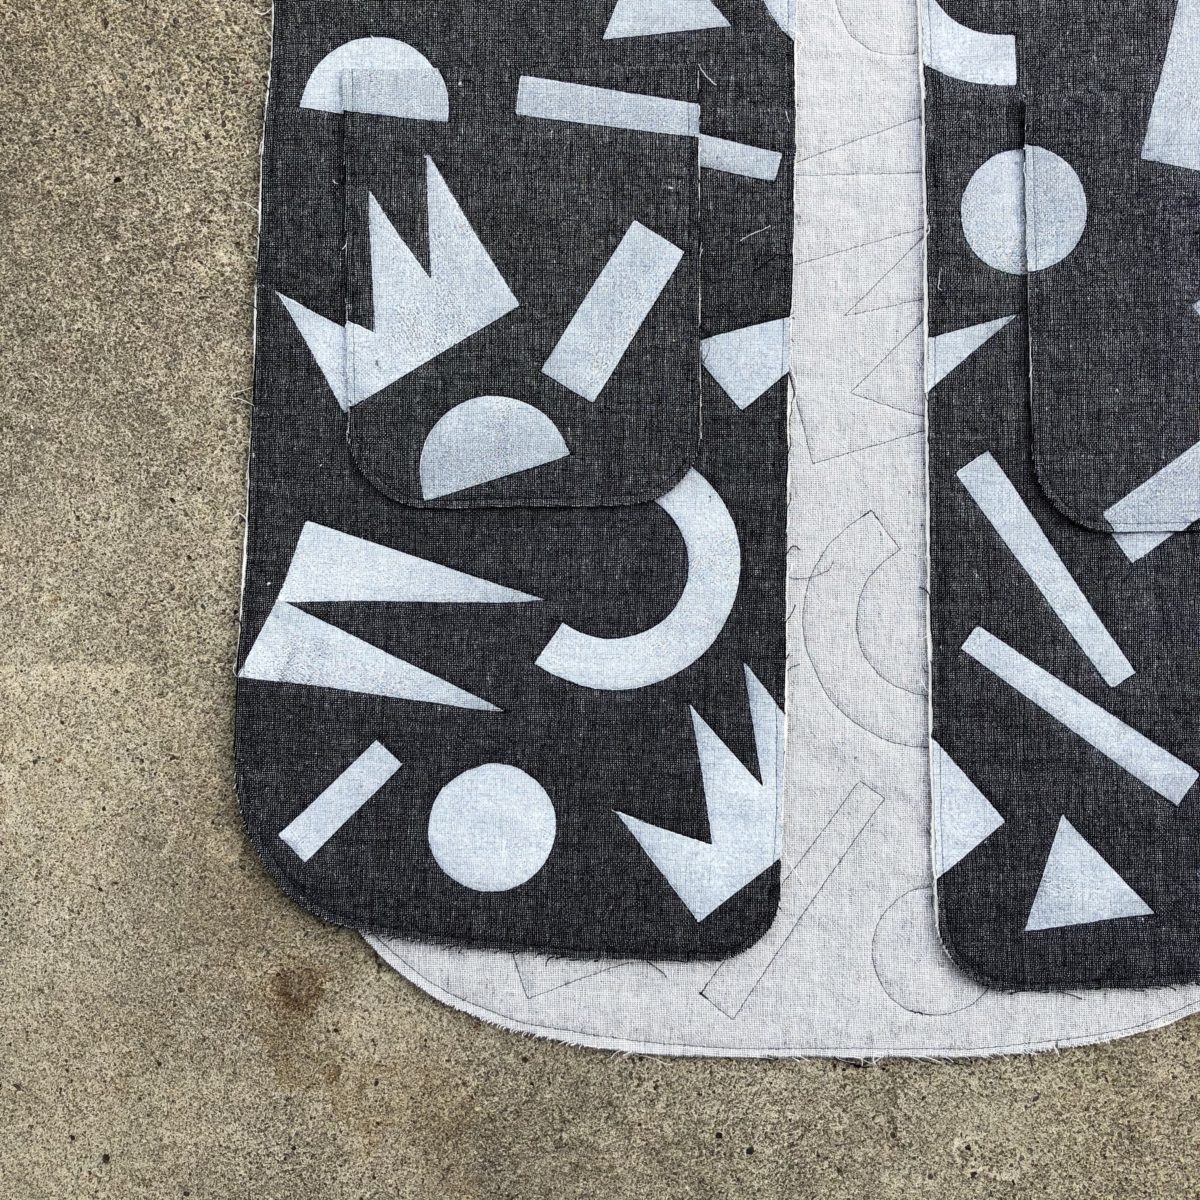
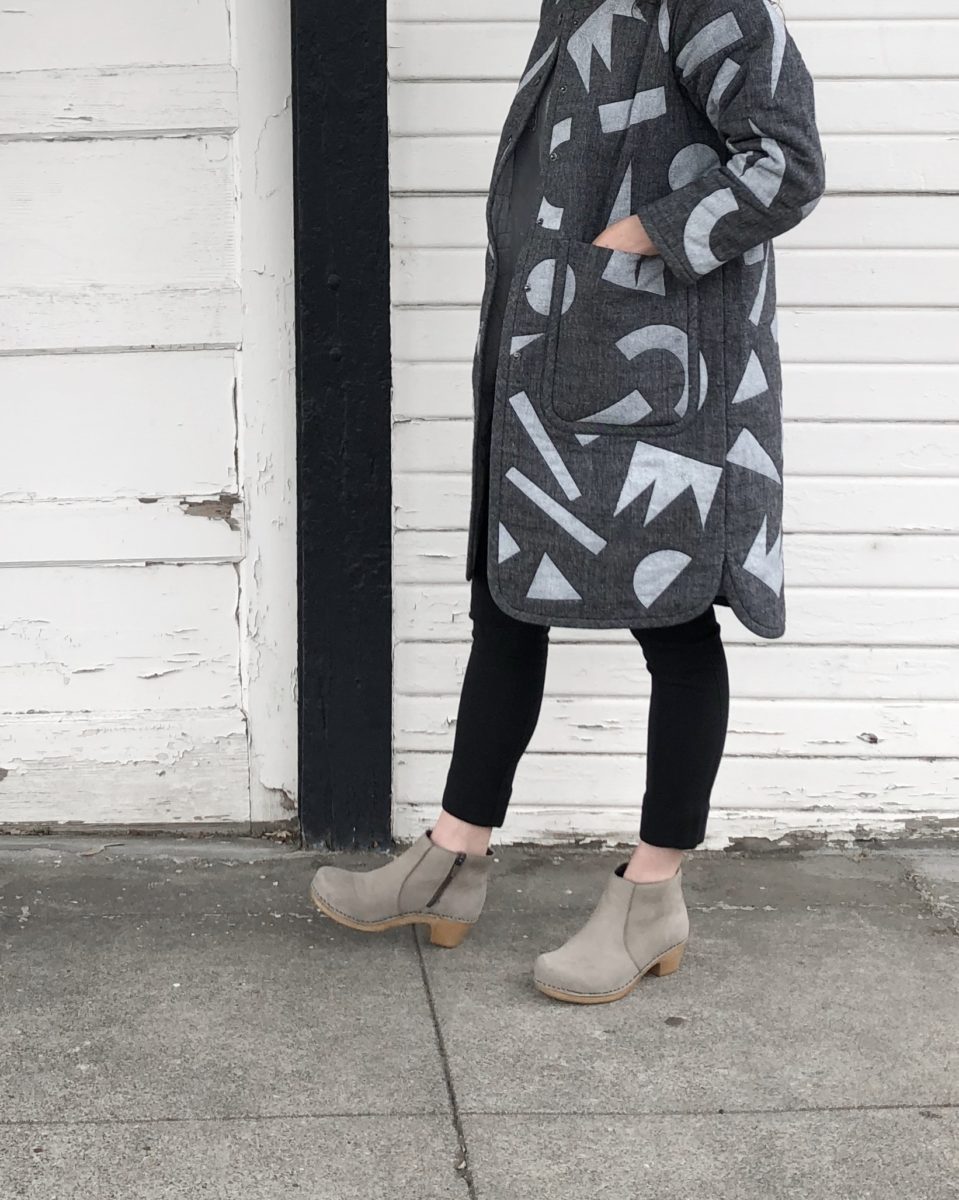
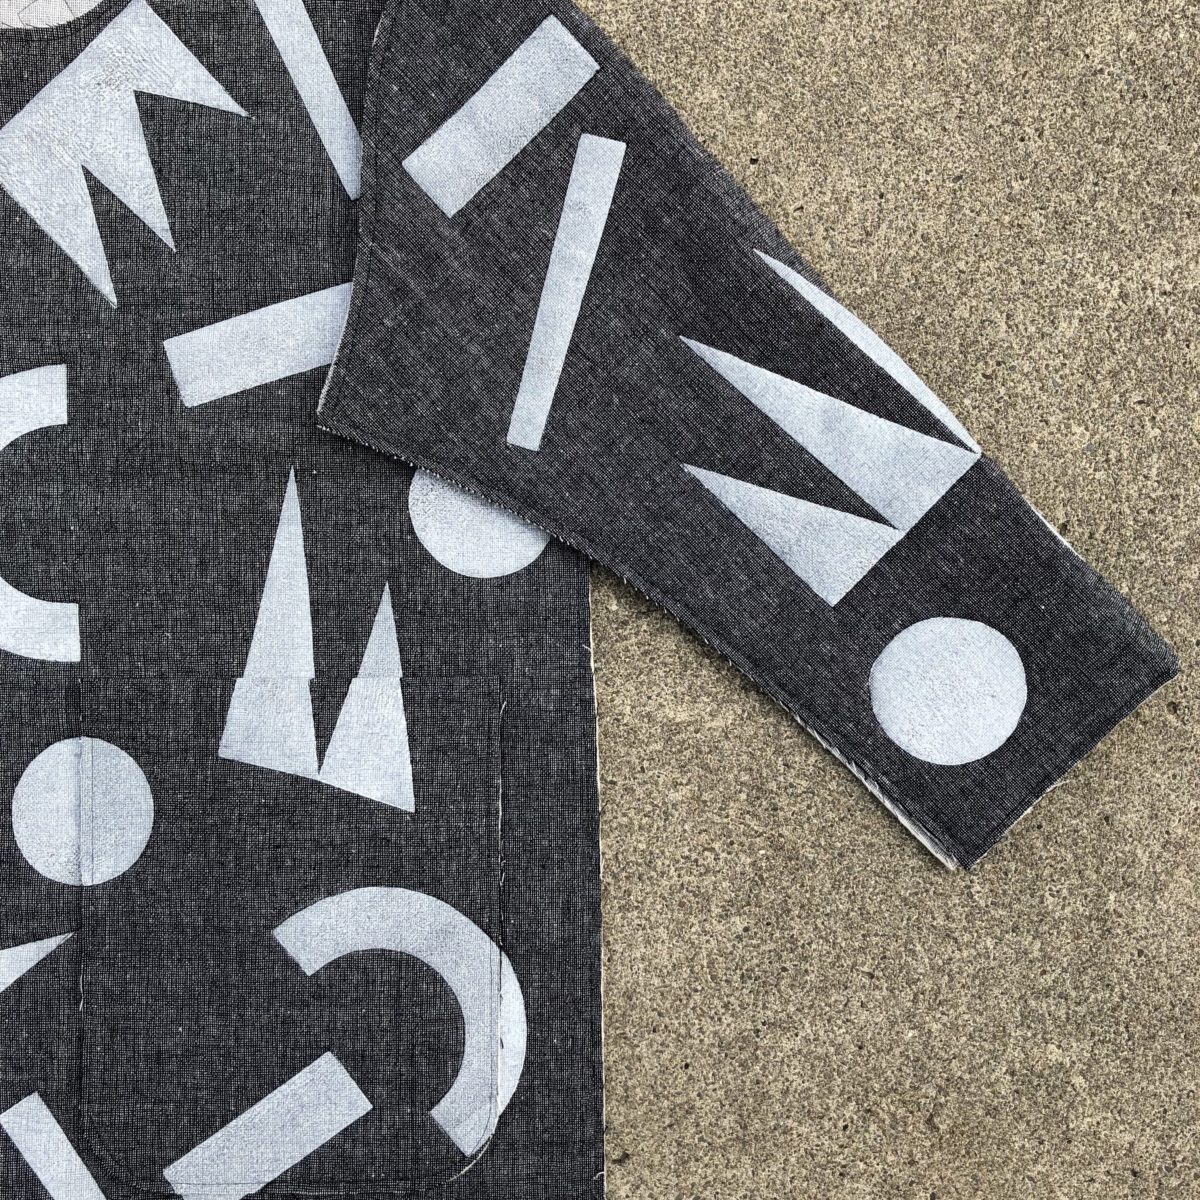
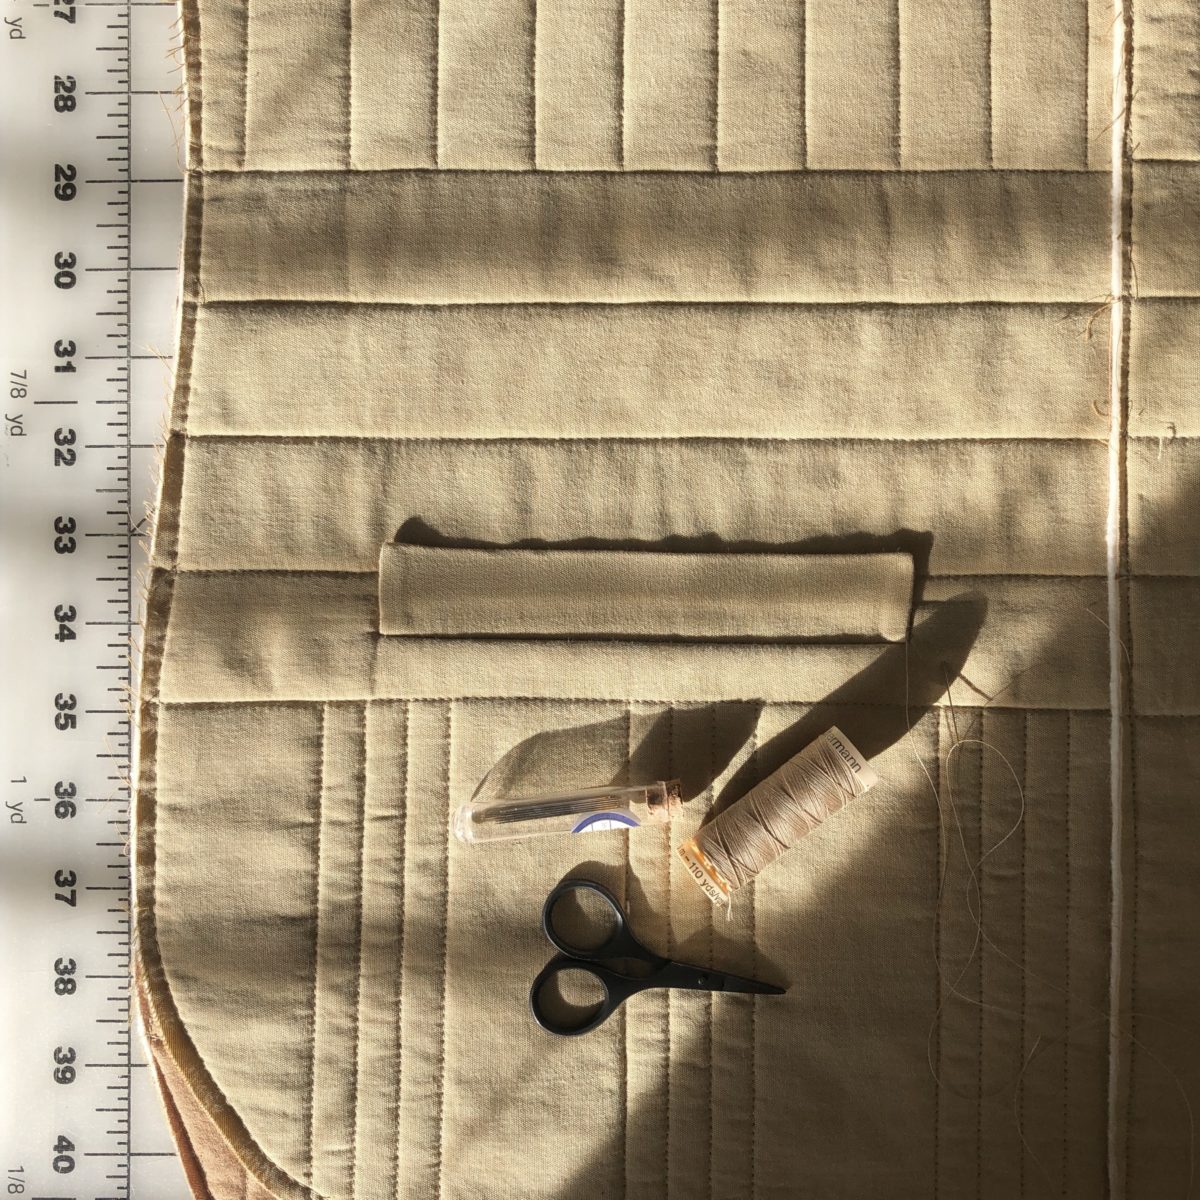
Since I decided to use large scale geometric shapes to create a surface pattern, I lengthened the body by 10 inches. Although many Tamaracks look great with a rolled cuff, I wanted the surface pattern on mine to be the focal point. I shortened the sleeves by three inches and added about half an inch to the cuff opening. Additionally, I chose to round the bottom front opening to mimic the rounded corners of the patch pockets.
A lot of RTW quilted jackets feature patch pockets and I thought it would be an opportunity to puzzle out how to print an uninterrupted pattern. I cut the pocket pieces so that the top edge is on the fold, sandwiched batting in between, quilted around the shapes, and finished the sides and bottom with the same bias binding. It didn’t turn out perfect, but it’s pretty close! Instead of attempting to pin the pockets in place, I used Wash Away Wonder Tape to stitch in the ditch and edgestitch the pockets in place.
Initially I had planned to use Hong Kong seams to finish the inside of the jacket, but it ended up being too bulky. Instead the seams were serged and pressed open. The finishing touch was a block printed label. I like to add these to all my me-mades, or print directly onto the garment with my NOT A PRIMARY COLOR block.
The Tamarack Jacket has been on my ‘To Make’ list for forever. I first planned it in early 2017.
Originally I had planned to modify the sides, but then decided to make the pattern as is to prepare for another Tamarack I’d been asked to make for a magazine (won’t be able to share that one for a while).
My motivation kinda pooped out after I finished machine quilting all the pieces and it sat in my WIP pile for a couple months.
The welt pockets felt like a big hurdle to overcome, which might be why I set the whole thing aside once I got to that step. But Grainline’s Inserting the Welt Pockets post made it really easy to understand.

The lining was leftover from my Timber Quilt. Its former life was a Calvin Klein bed sheet and I think it’s the perfect greenish brown. The exterior fabric is also a thrifted sheet.
I was inspired by Bella Zilber to use buttons instead of snaps. Her monochrome version is perfection! I was nervous that my machine wouldn’t be able to make the buttonholes through so many layers, but I added them before the bias finish (so everything could evenly feed under the foot) and they turned out great! I also used a ton of Fray Check and didn’t cut the holes open for a few days. They’re really sturdy now!
I really wanted every seam to be encased in bias tape, but once the side seams were sewn up, I discovered the underarm seam was too bulky to comfortably wear. I took off the bias tape from the shoulder seams and serged the sleeve top and sleeve opening, which drastically reduced the bulk. I think the silhouette is just a little too fitted to have a complete bias finish on the inside.
I’m pretty pleased that even though each piece was quilted independently, it all sorta lined up in the end. I also can’t tell that I accidentally made one section on the sleeve a half inch longer than every other piece.
This project made me understand the pleasure that can be found in hand sewing. It also made me want to take off the binding on my Timber Quilt and redo it (we’ll see if that actually happens). When you hand sew you can get near perfect corners!
I need to reassess if hand sewing the welt pockets to the jacket is the best option because after a week of wear, both pockets have come undone. Otherwise, even with the weird Frankenstein finishes on the inside, I’m so proud of this make! I wore it every day this week and know even after its novelty wears off, it’ll get a lot of use.
I doubt I’ll get around to this anytime soon, but I’m envisioning making a slightly cropped denim version with straight side seams, a 1″ grid quilting pattern, a zipper, patch pockets, and a collar.
I love a good bag pattern, and boy does Klum House have some bags. Not only do they have a variety of awesome patterns, they also carry different levels of kits. A Maker Kit comes with EVERYTHING you need, even the fabric. And it’s pre-cut! And marked! A Finishing Kit comes with all the hardware and pre-cut/punched leather needed to finish a bag, eliminating the challenge of sourcing all those bits and bobs. Or just the pattern of many Klum House designs are available to purchase for ultimate customization options. All of the kit materials are high quality and there are so many colors to choose from. One thing to note is that all of the zippers appear to be brass, so take that into consideration when choosing the other hardware options!
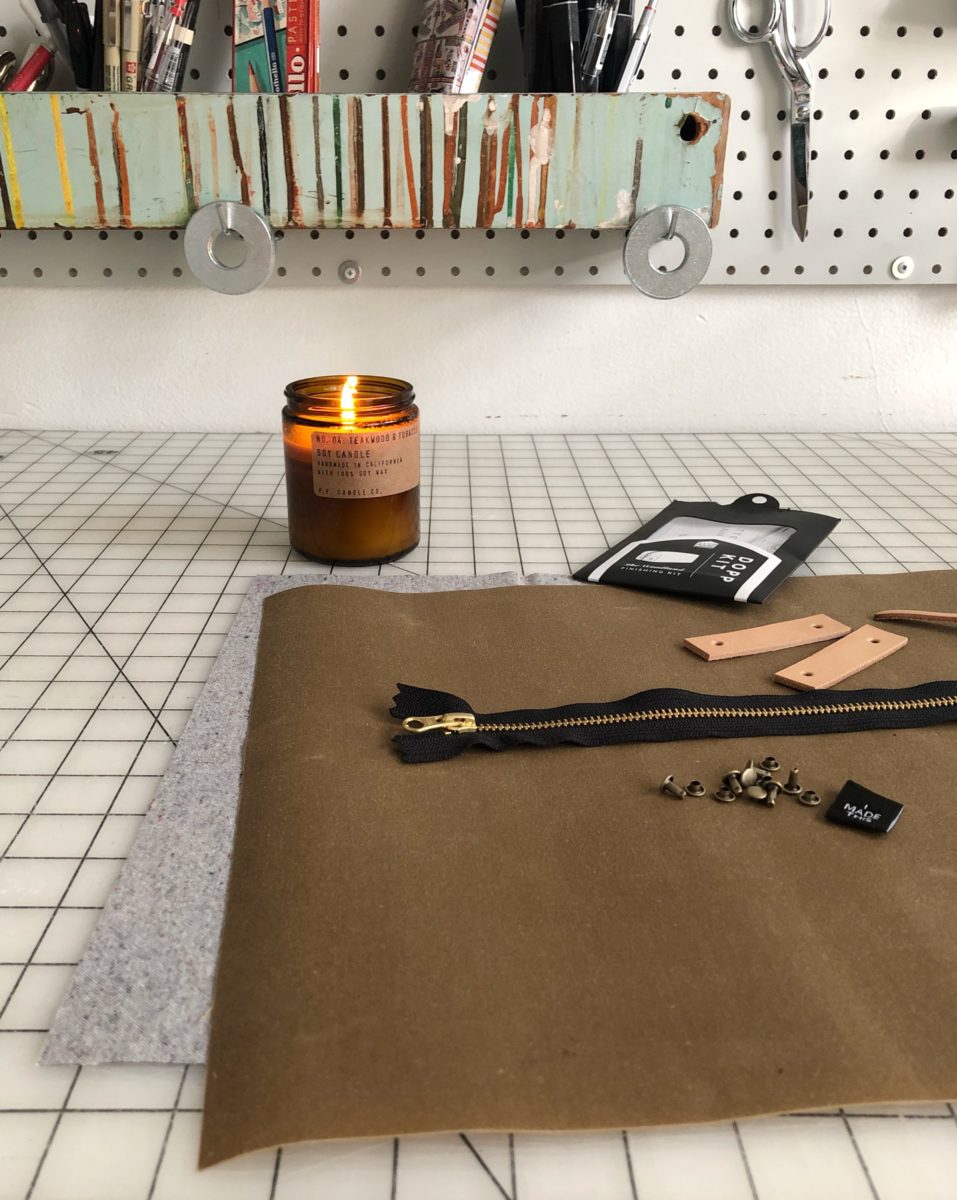
Way back in October, I was excited to see Klum House was getting ready to release a dopp kit pattern. Late October is when I start to fret over the task of finding (and sometimes making) both a Christmas gift and a birthday gift for my husband. He’s a minimalist and doesn’t want for much, so it’s an annual struggle. The Woodland Dopp Kit was a perfect fit! For years he’s been using an old Kinkos lunch box to hold his beard trimmer. The Woodland felt like a project I could commit to making in time and would serve as a nice update for the lunch box.

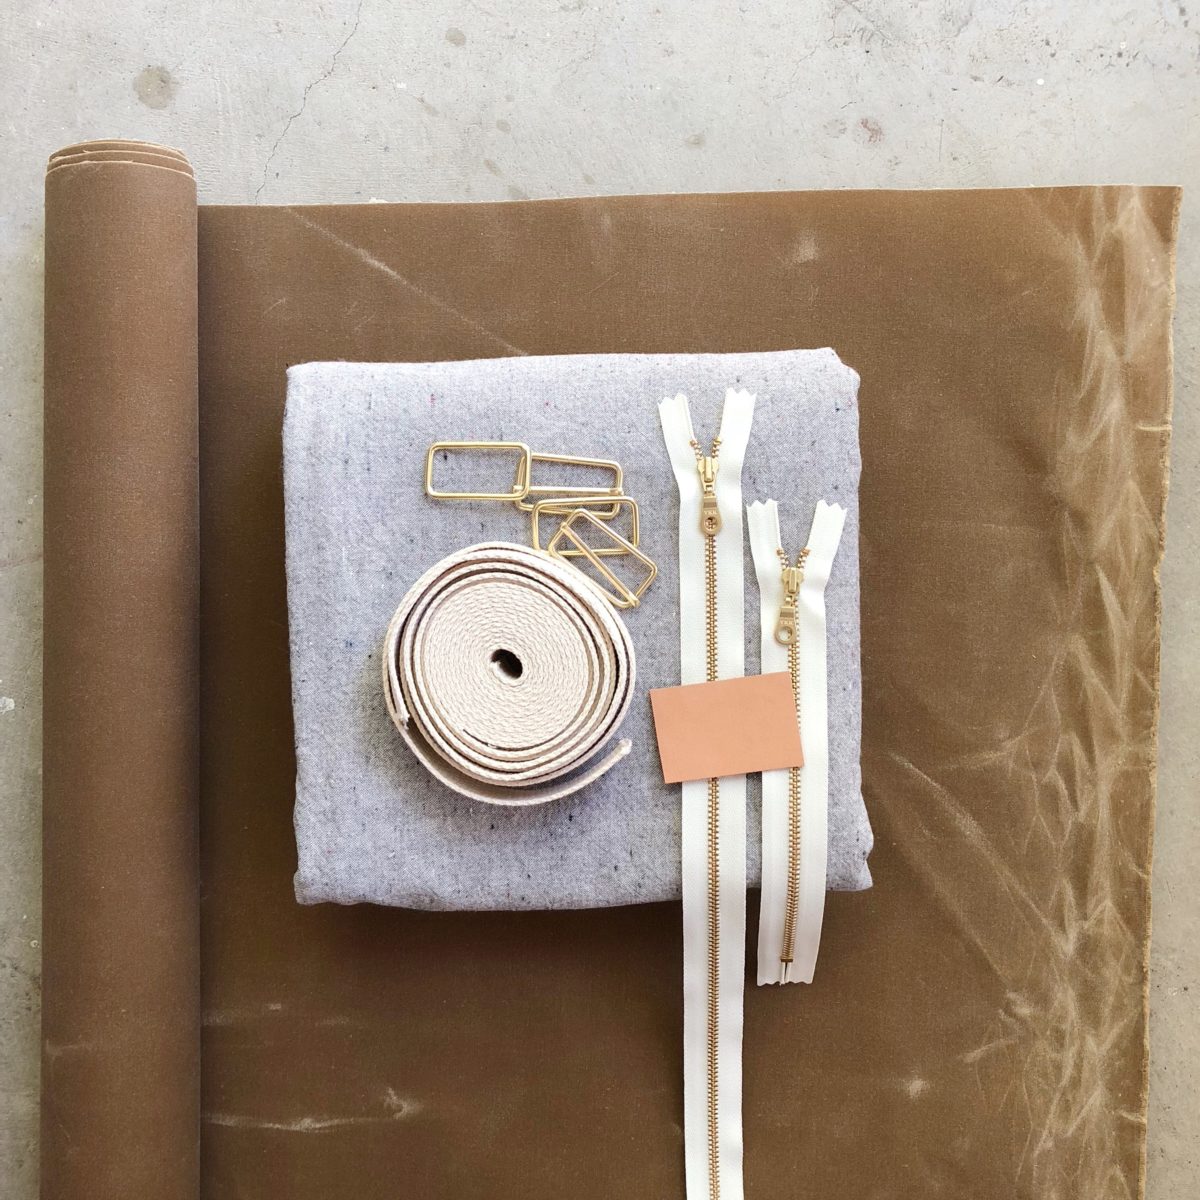
I can’t keep a gift secret to save my life (plus I wanted his input) so once the pattern/kits were released I had him take a look at the Woodland Finishing Kit. He settled on using leftover waxed canvas and lining from my Making Backpack, a black zipper, antique brass hardware, and tan leather. Klum House packs and ships orders at lightning speed, so I had everything I needed well before I was ready to start sewing.

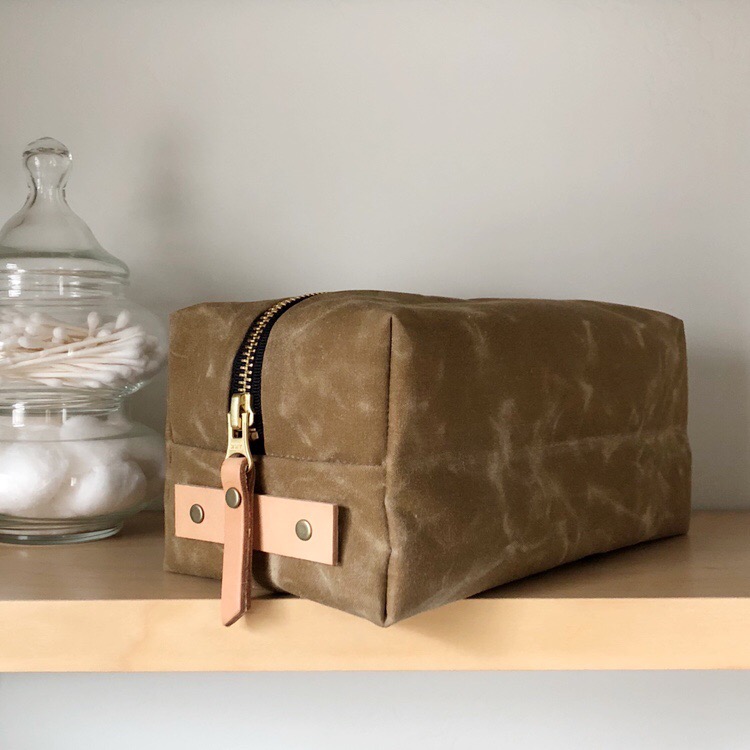
It came together really quickly, in fact I think the sewing took less than an hour. The instructions and illustrations are great and they even remind you take a snack break. Installing the hardware took maybe ten additional minutes. It was a little challenging to hammer the rivets in, but the end result is totally worth the effort.
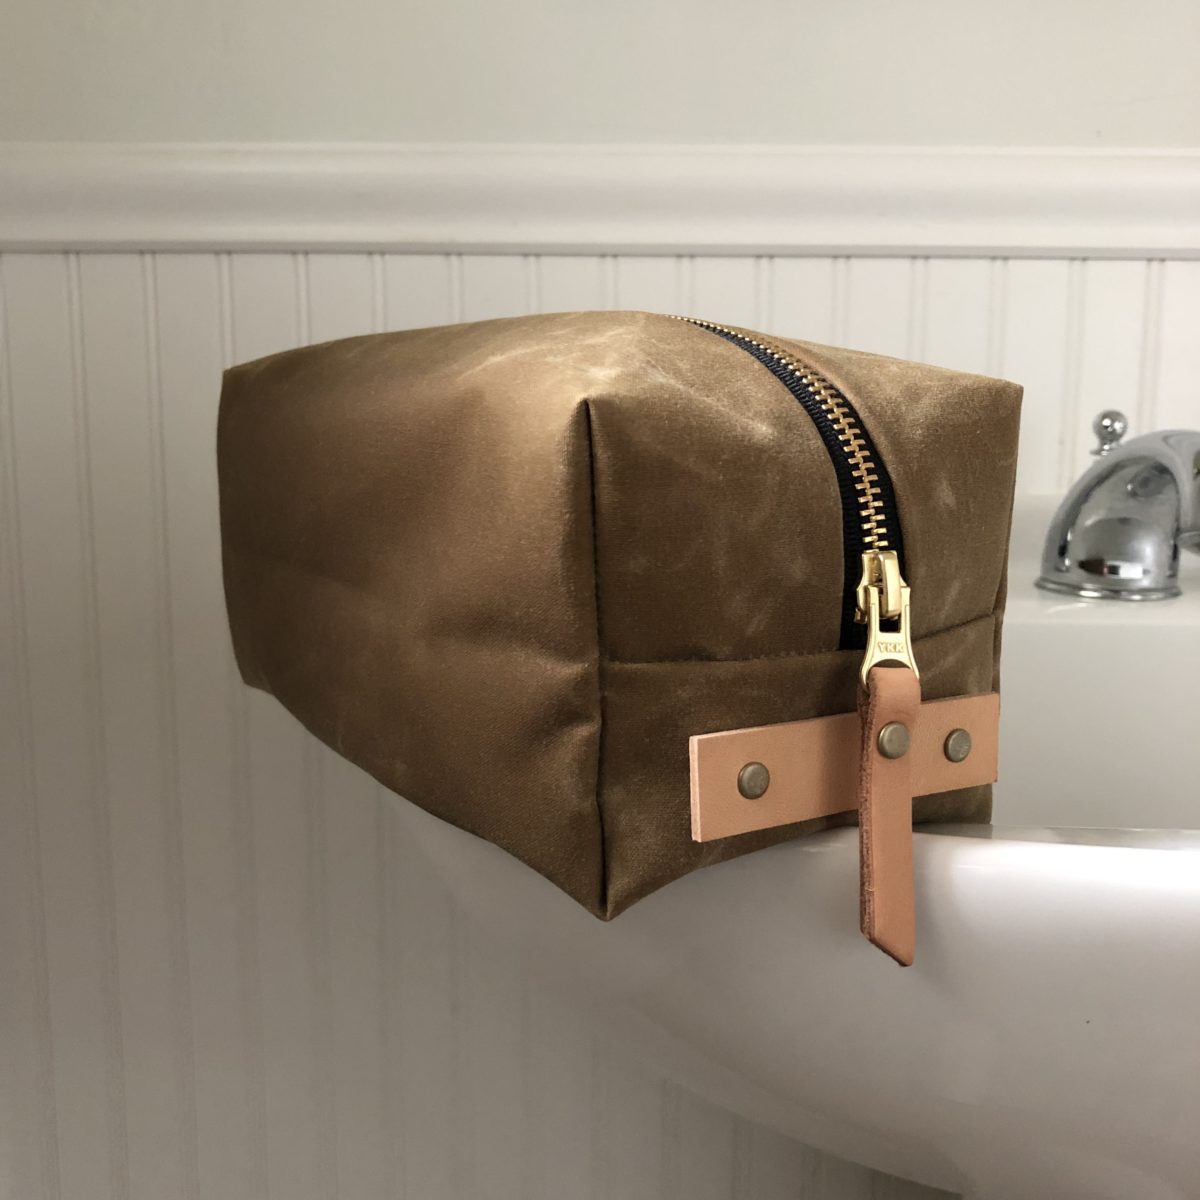
One thing I’d like to puzzle out on the next Woodland is how to conceal the raw edges inside the lining. I’m sure there’s a way to do this, but I decided to make one as the pattern is written before making any modifications. My serger really struggled to get through all of the layers and I just prefer the look of clean, concealed seams. Another mod I’d like to make is a more functional handle. I love the look of the leather, but I can’t really grab it.
One tip I have for working with waxed canvas is hitting it with a hot blow dryer. It melts the wax and helps get rid of the creases you make during construction.
I’ve already ordered another Finishing Kit from Klum House – the Maywood Totepack and I’m patiently waiting for the Slabtown Rolltop Backpack pattern to be released. Yes, both would be for me… like I said, I just love a good bag pattern.
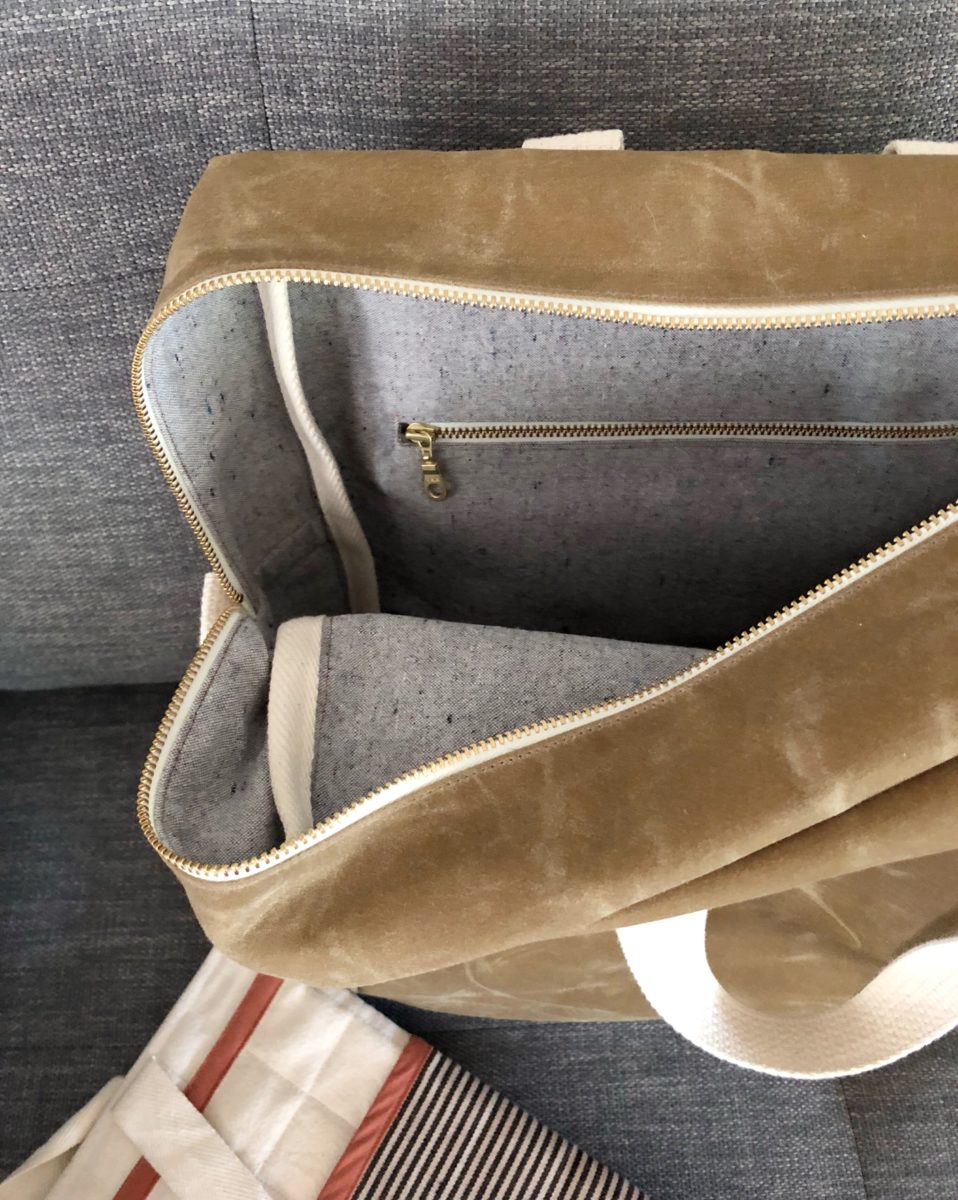
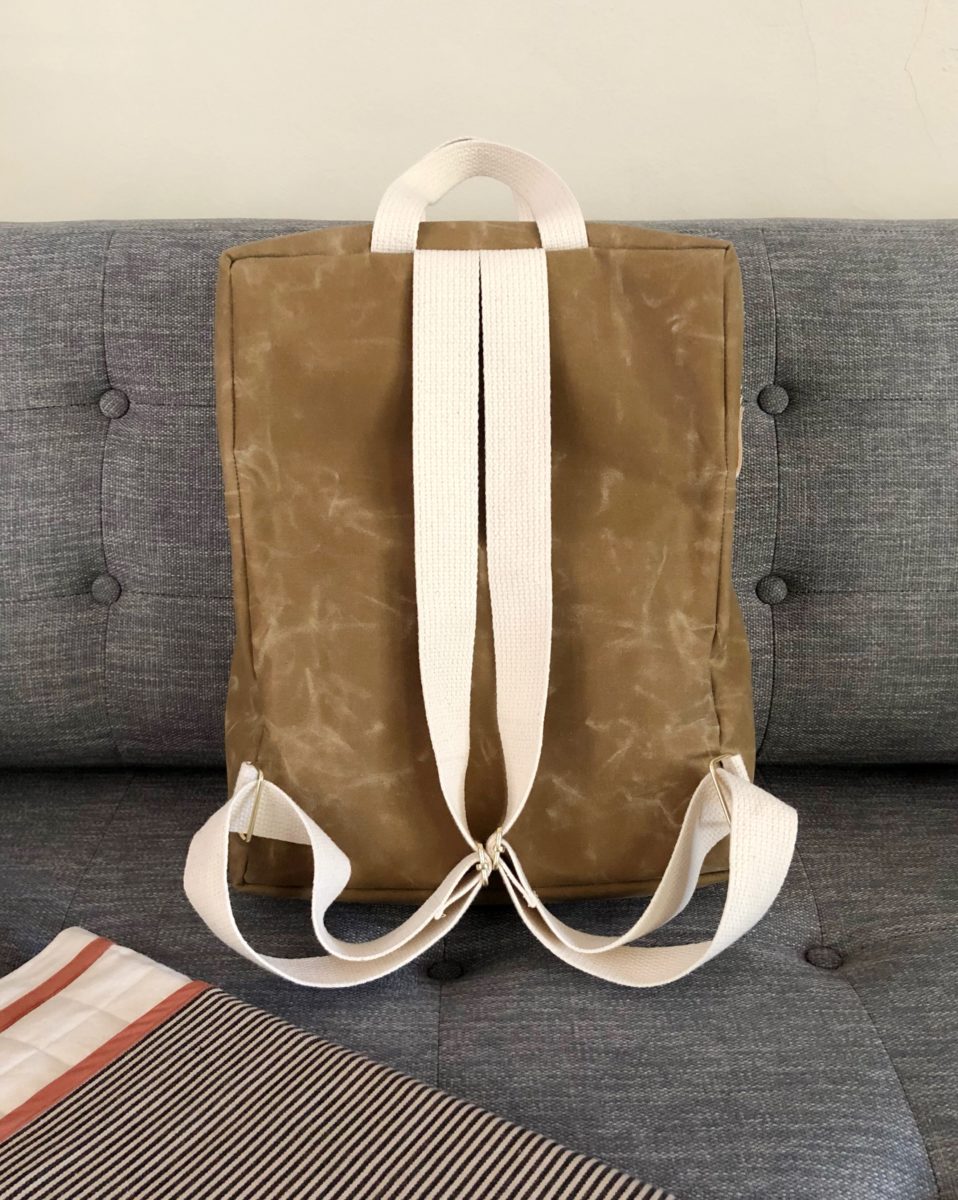
Sometimes you make a thing and although you love it, there’s just something not quite right about it. While making the Making Backpack, I KNEW it needed an additional pattern piece for the straps, but my desire to finish it quickly got the best of me.
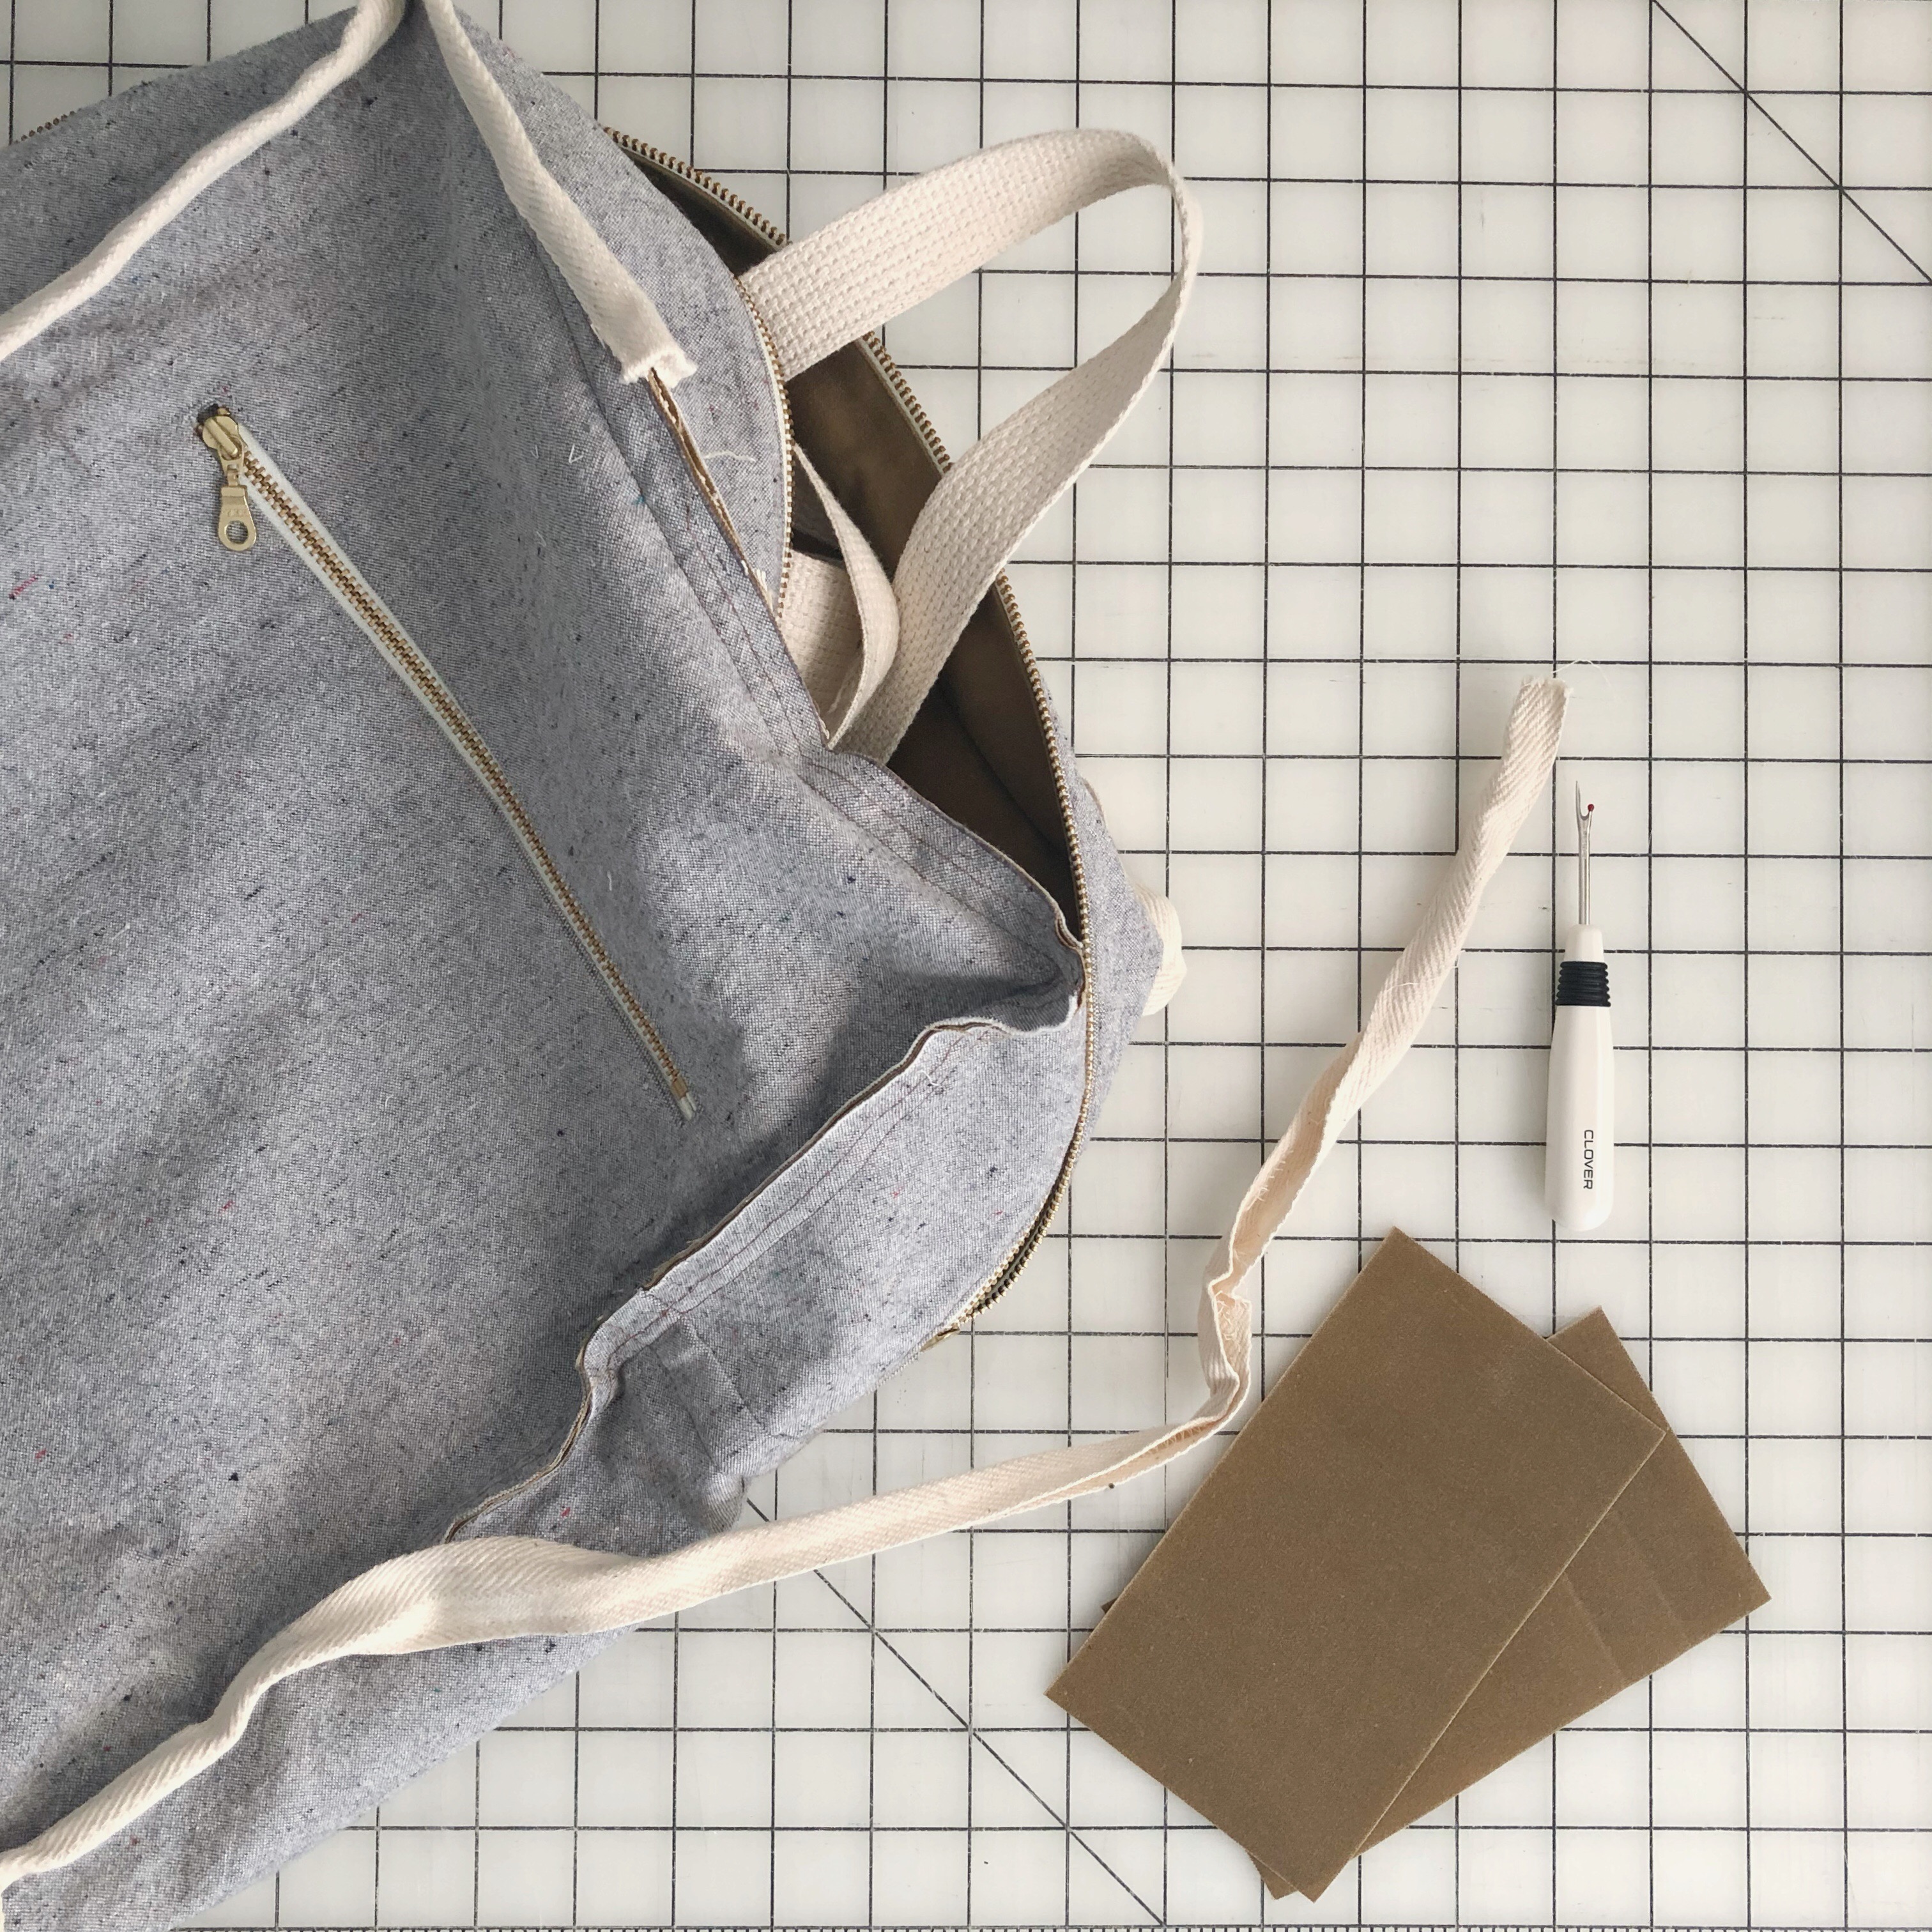
So about two weeks ago I decided to fix it. I used the pattern pieces from the Noodlehead Range Backpack and followed the steps to sew. The construction was different than what I thought it would be, and was much easier to sew! I’m glad I referenced this pattern instead of making it up.
I thought I would need to seam rip both the sides and the top to make the straps work, but I ended up only needing to take apart the sides.
It ended up being a really easy fix. I’m glad I pushed through the fear of taking the finished backpack apart. I was really nervous!
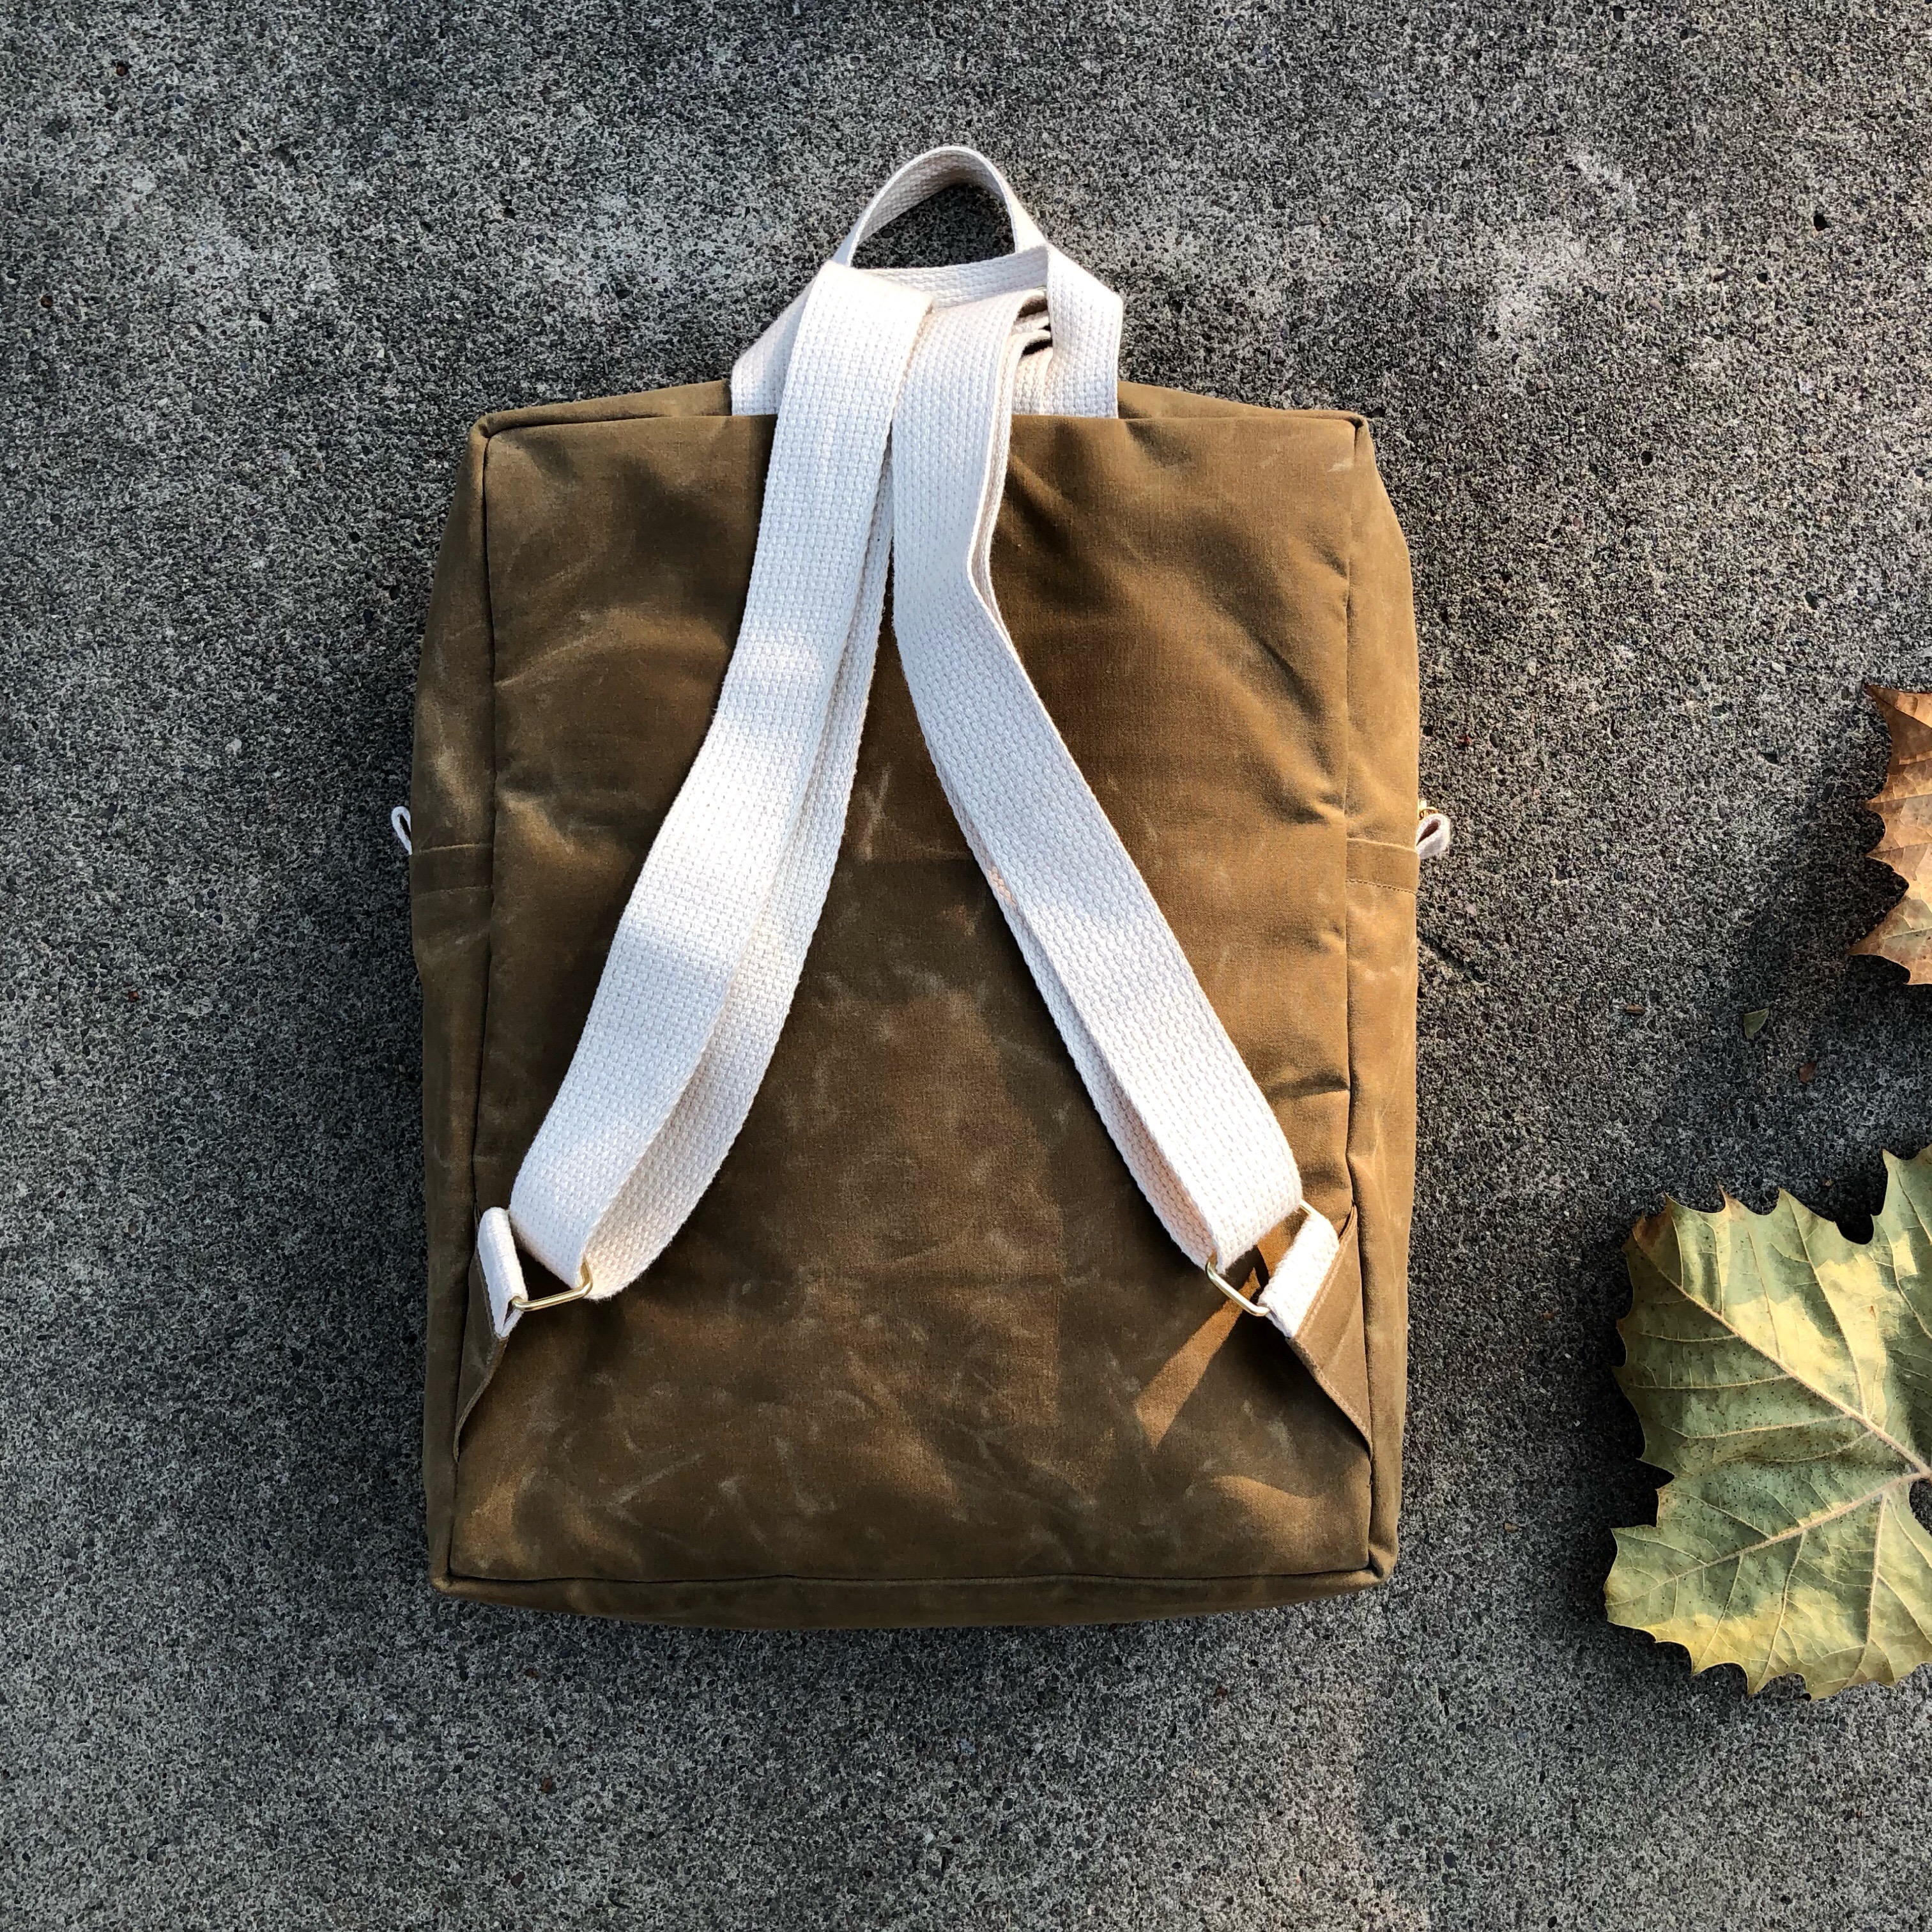
The Making Backpack pattern was originally available in Making Magazine, but Anna has updated her pattern to include these triangle connectors. You can find the updated pattern in her shop!
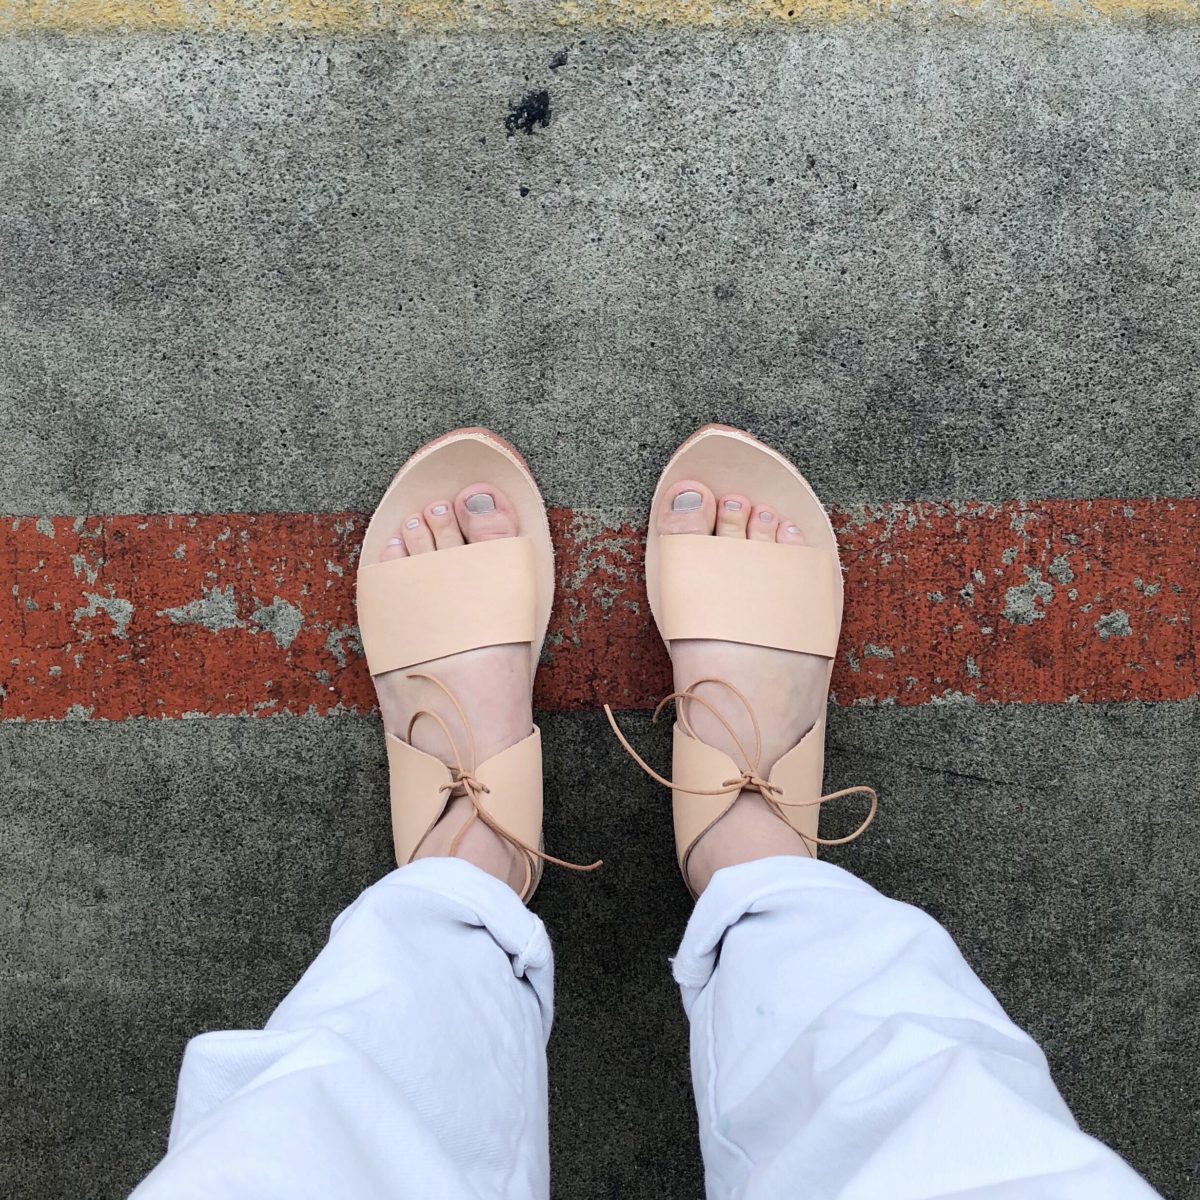
I bought this sandal making kit shortly after discovering Rachel Sees Snail Shoes on Instagram. At the moment of purchase, I felt entirely up for the challenge, but once it arrived, it stayed boxed up in a closet for probably two years.
I’m unsure of where that ‘can do’ attitude disappeared to, but the longer I waited, the more intimidating the project started to feel.
Then, Summer of Basics 2018 rolled around and I thought “just fricking do it, Sienna.” I then declared to the world of Instagram that handmade leather sandals would be my 4th make for the challenge. These were added as a fourth project because technically it’s a sewing and knitting/crochet challenge.
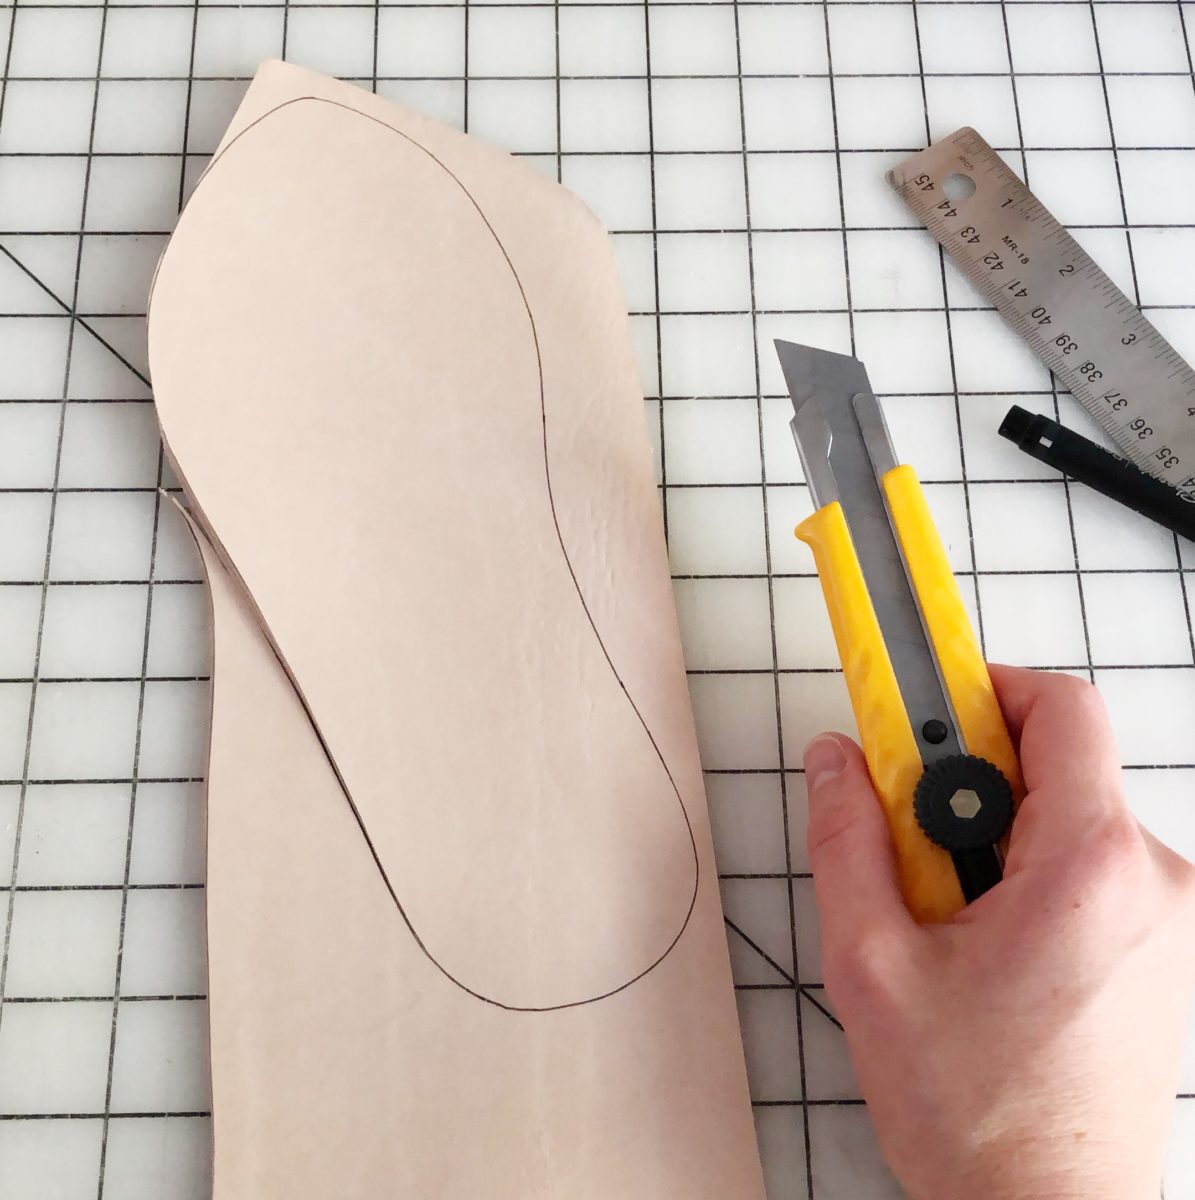
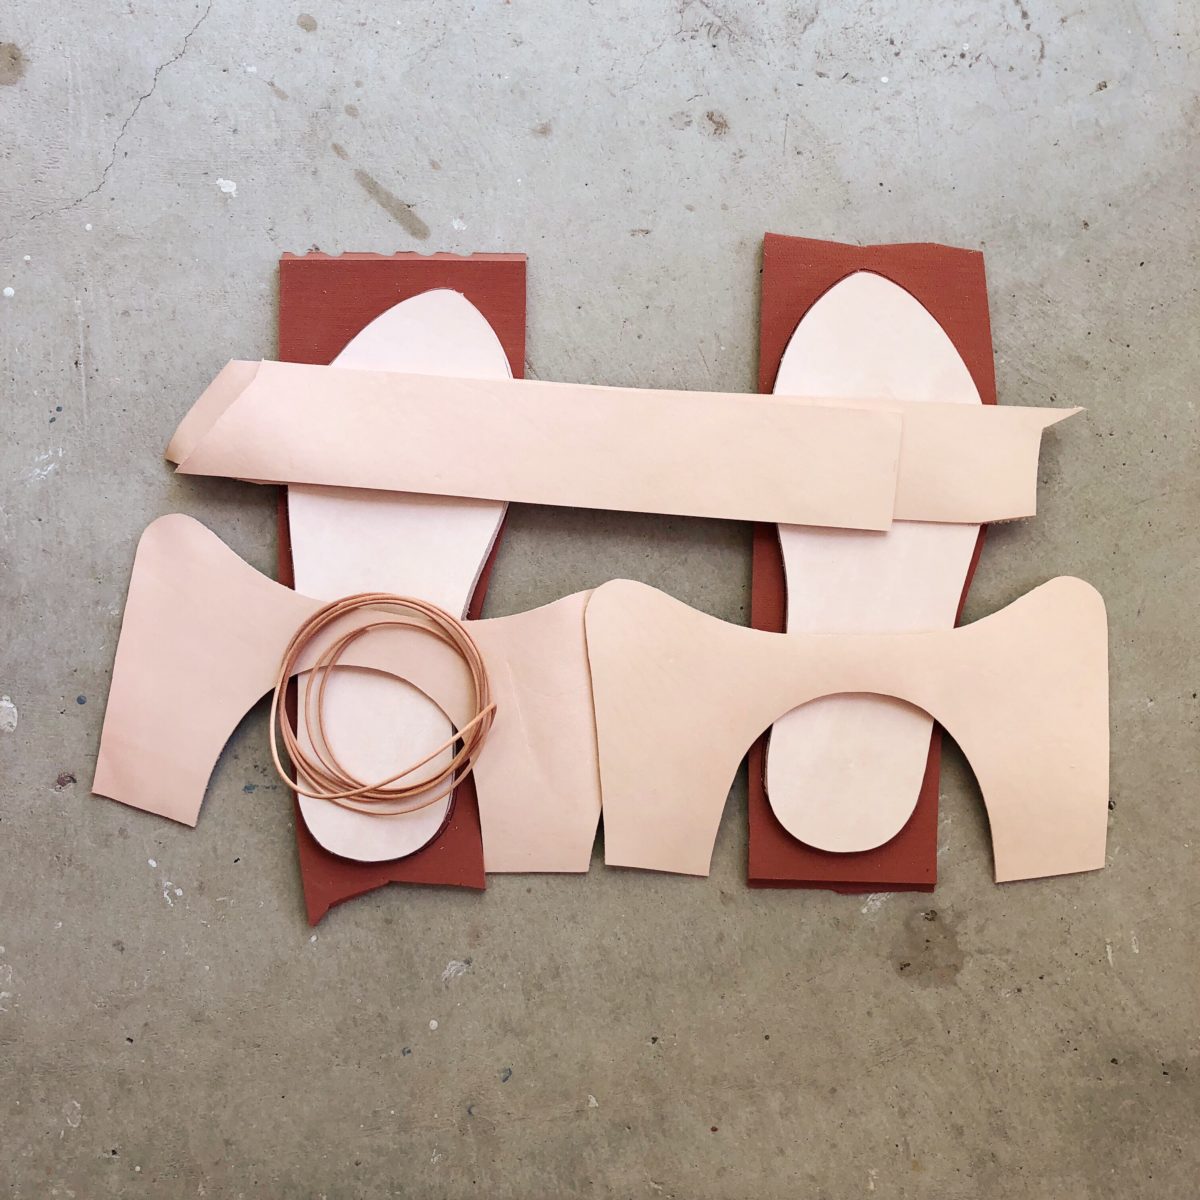
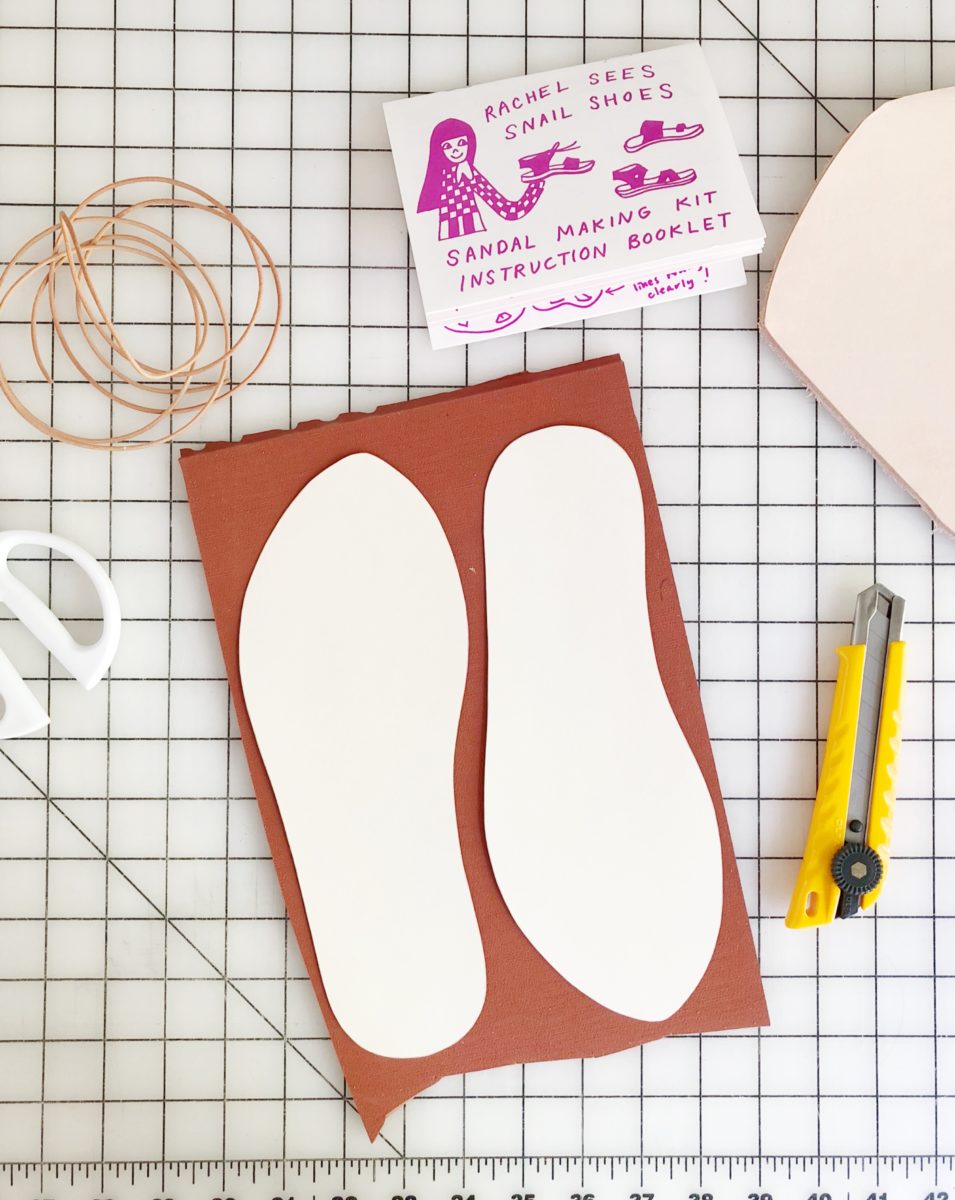
I blew through my three other planned makes and was feeling pretty good about tackling these shoes I’d put off for years. I cut everything out, did the fitting, marked everything, and felt great. The kit comes with pretty much everything you need including pattern pieces and thorough instructions. If you’ve ever made anything, I’m pretty sure you too could make these sandals.
![]()
Then we went on a week long trip abroad and immediately after I started the 2018-19 school year. So productivity plummeted and they sat partially assembled for weeks.
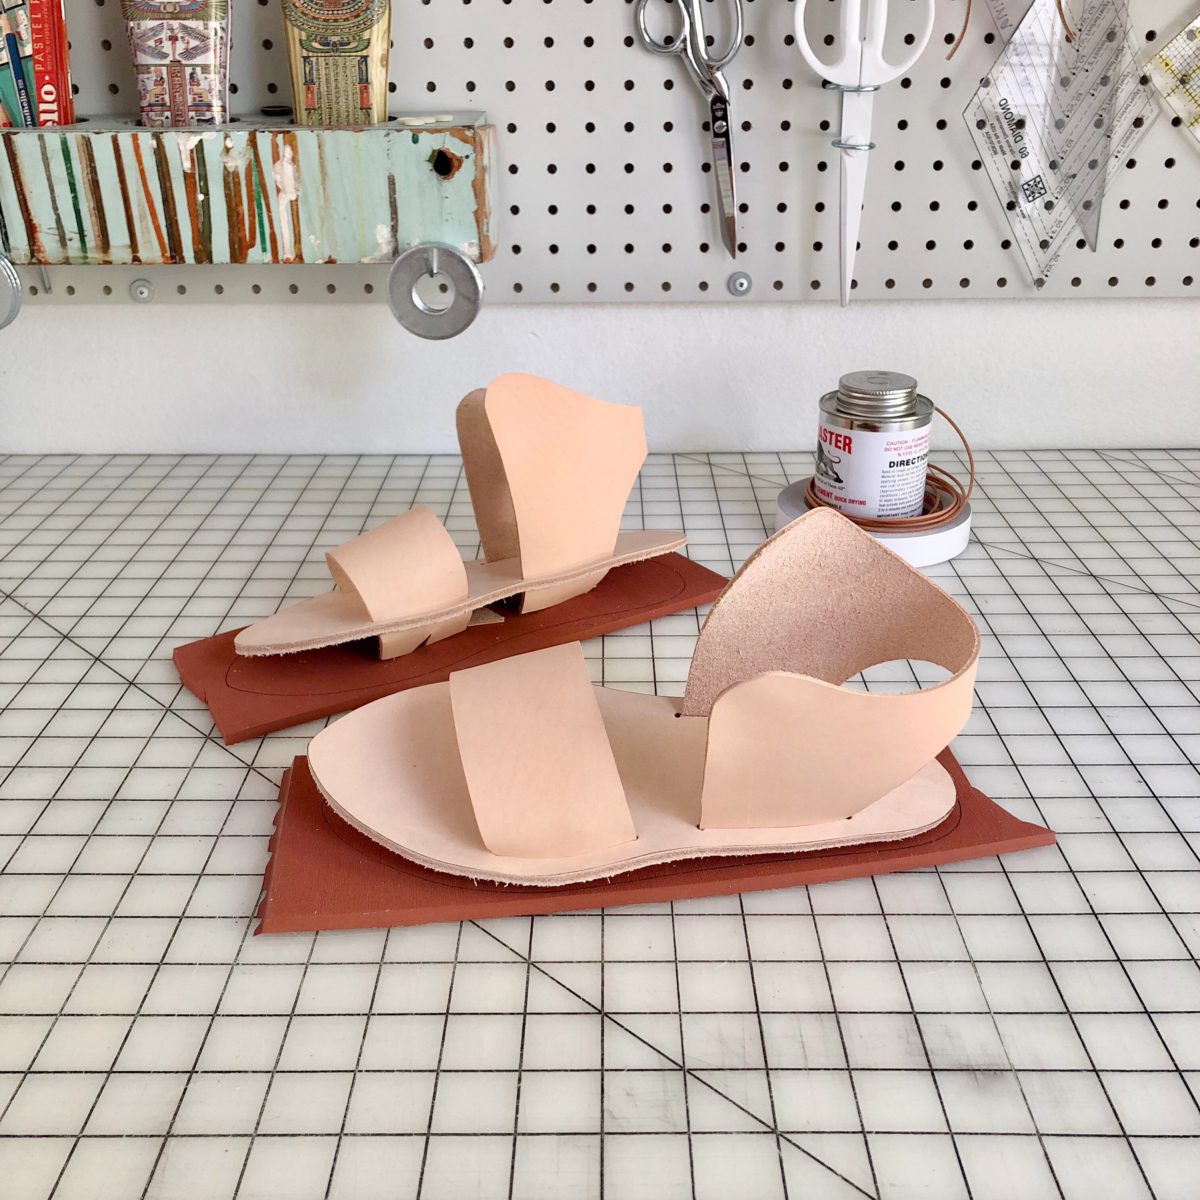
Finally, last week I plowed through the last few steps of gluing, skiving, attaching the foam soles, trimming, and adding laces. I don’t have the ability to sand down the edges (elbow grease just doesn’t cut it) so the foam bases are a little choppy, but whatever.
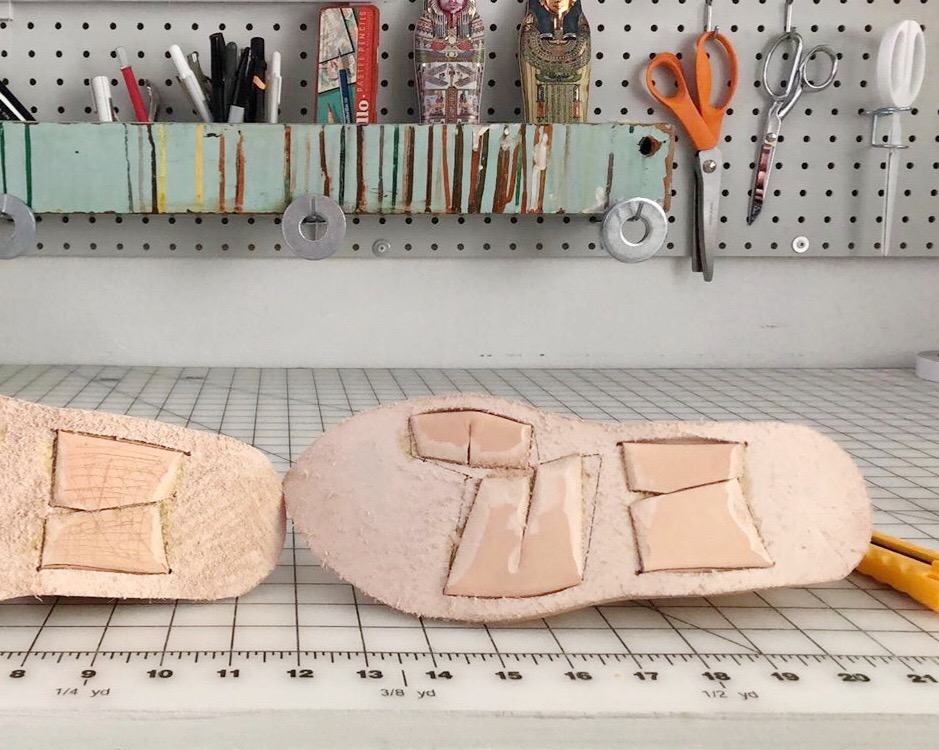
Each step is truly doable, it just takes a little slowing down and some foresight. The kit comes with contact glue, so it differs from sewing in that once the glue-y parts connect, it can’t be ripped off (easily anyway). And there are no do overs with leather.
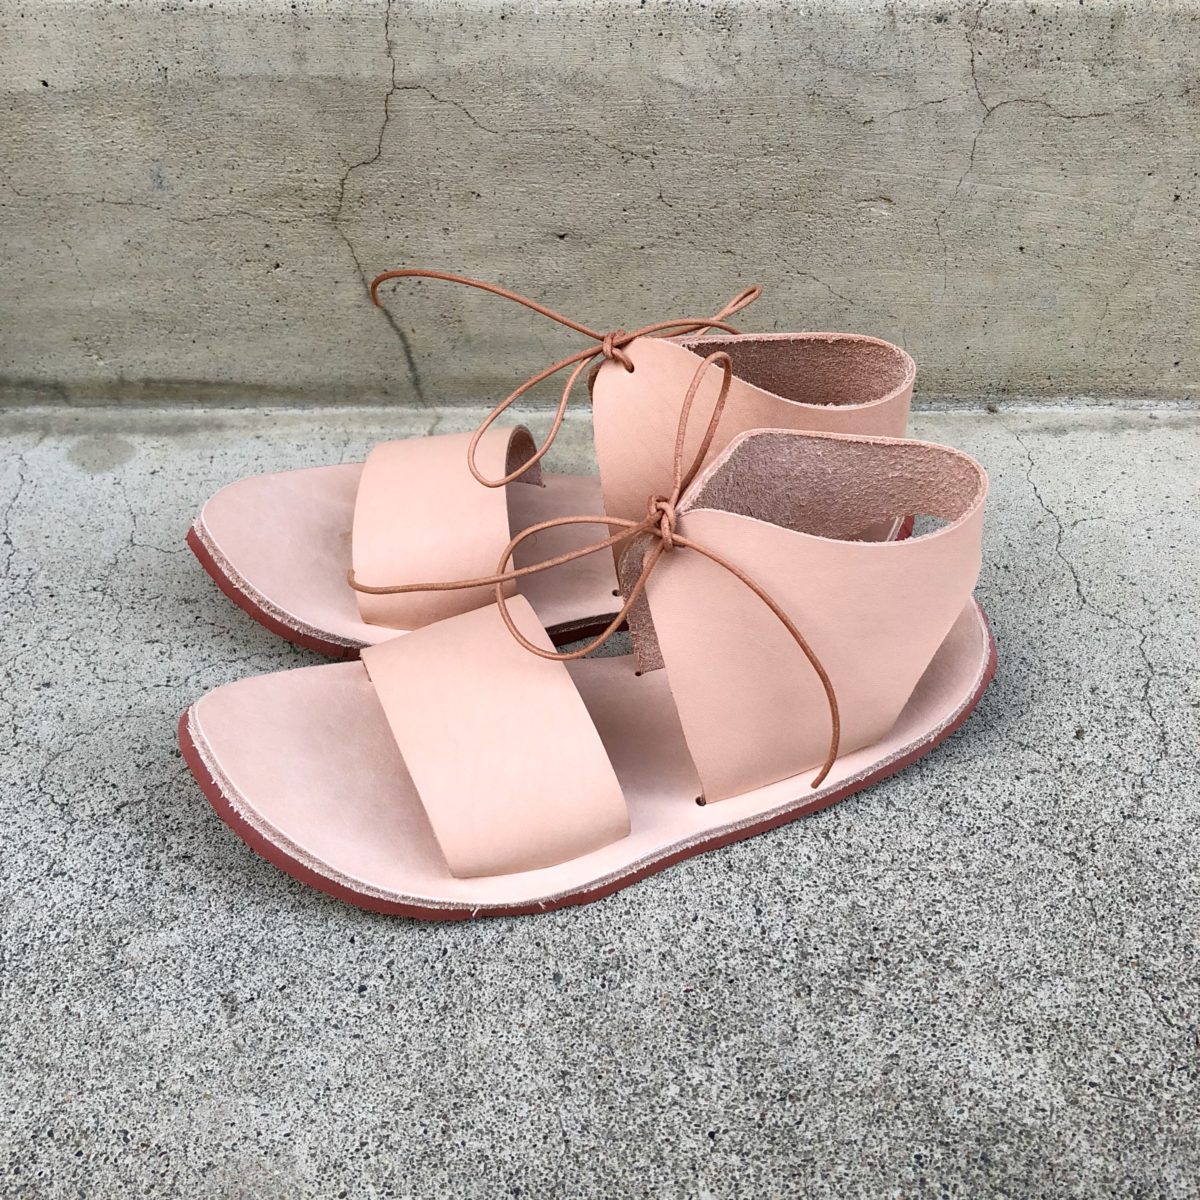
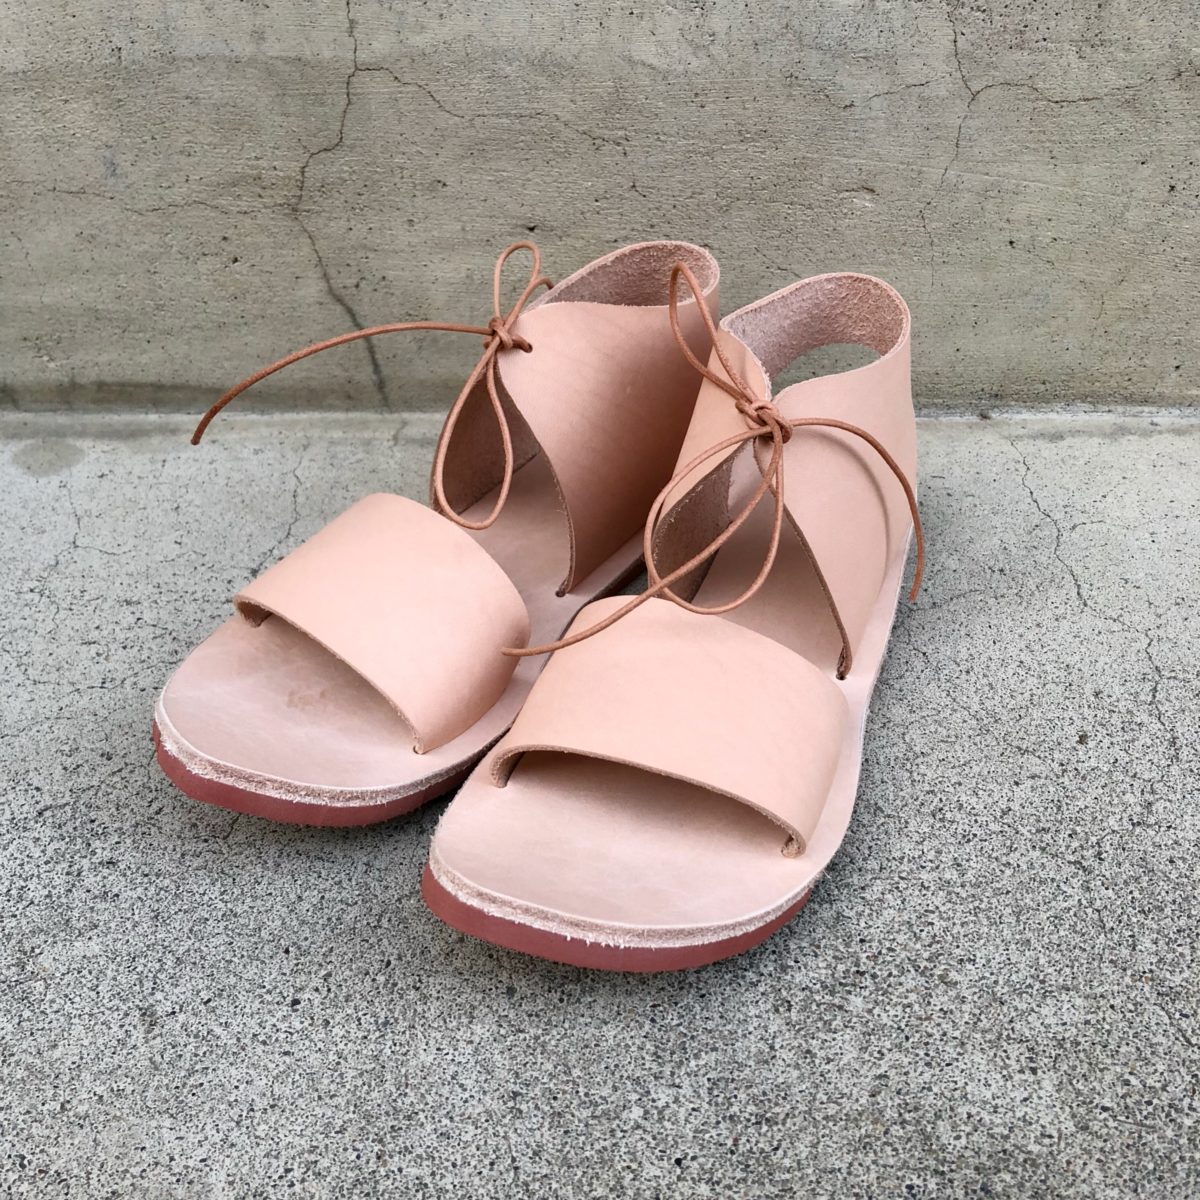
Next time, I will size down. I compared a pair of sandals I wear often and the pattern pieces seemed like a match, however, these are definitely too large.
Have you ever wanted to make your own shoes?
I attempted the Summer of Basics challenge last year and it was a total flop. I was in a bad place professionally and summer break ended up being all about recovering. After a much better school year, I was feeling super productive and up for a challenge.
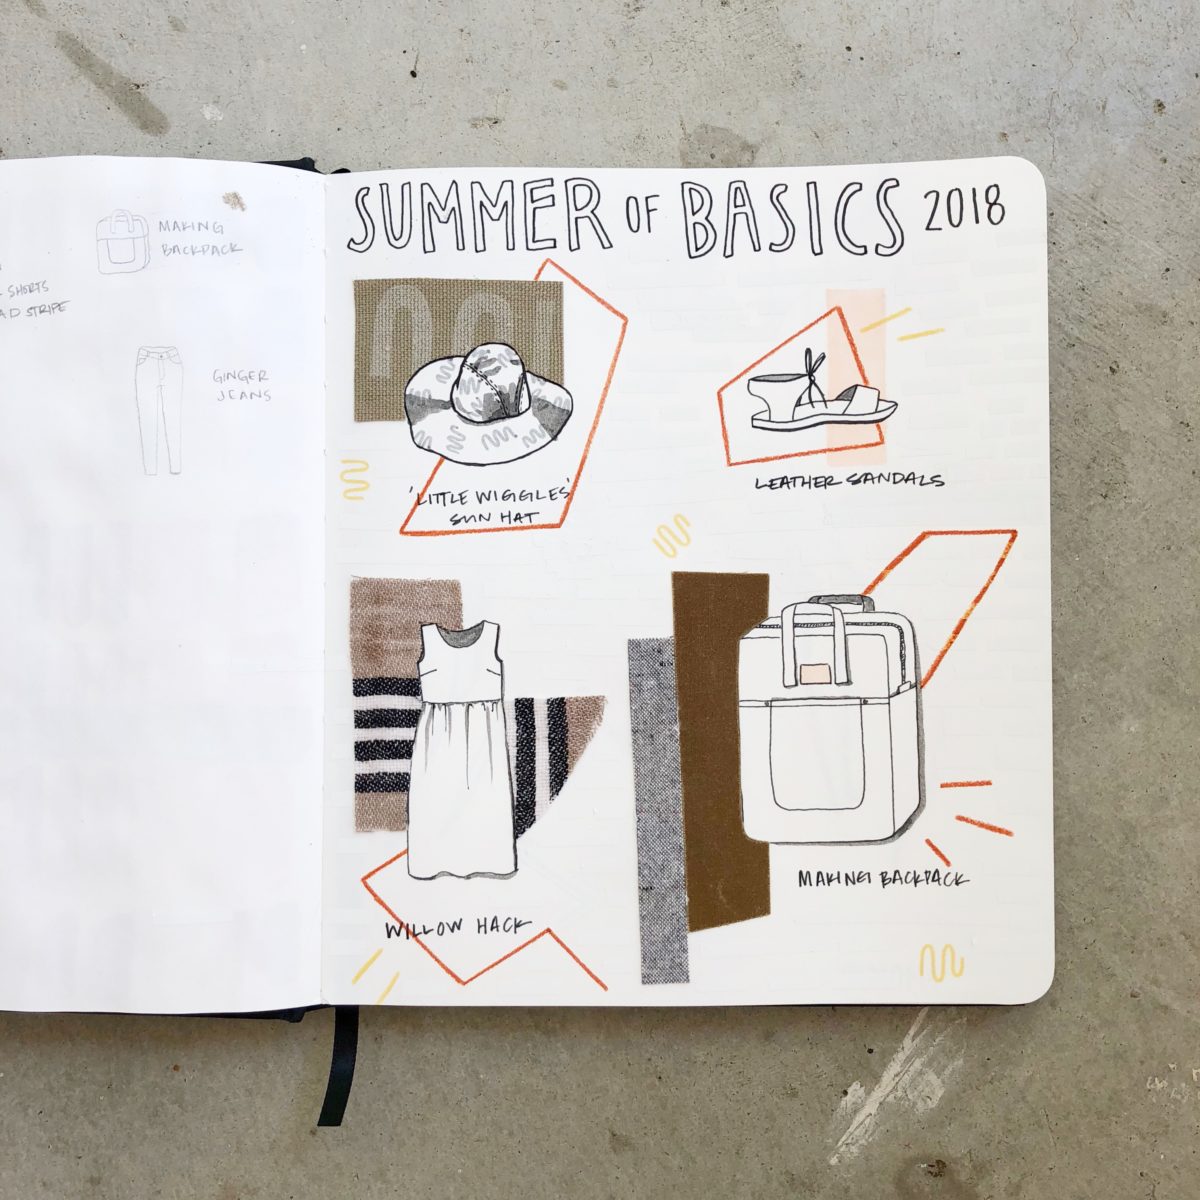
Summer of Basics is hosted by Fringe Association and its only parameters are that you create 3 workhorse garments between June 1 and August 31. I chose 4 projects because as a teacher I have time off and can handle it.


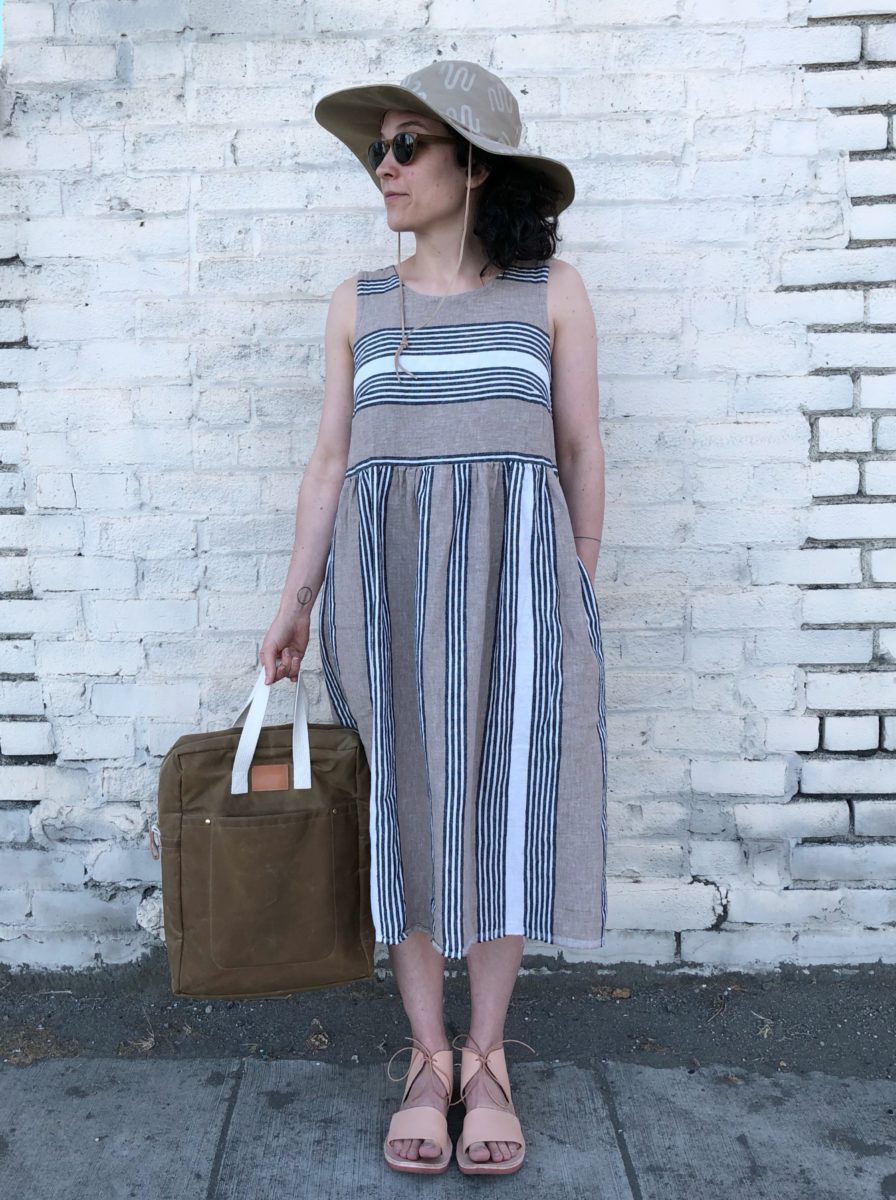
1. Willow Hack – My first make was a Willow Tank / gathered skirt mash up. I’m super pleased with this make and think it’ll be one of the few dresses I wear often. You can read more about it on its original post here. Finished: June 29th.
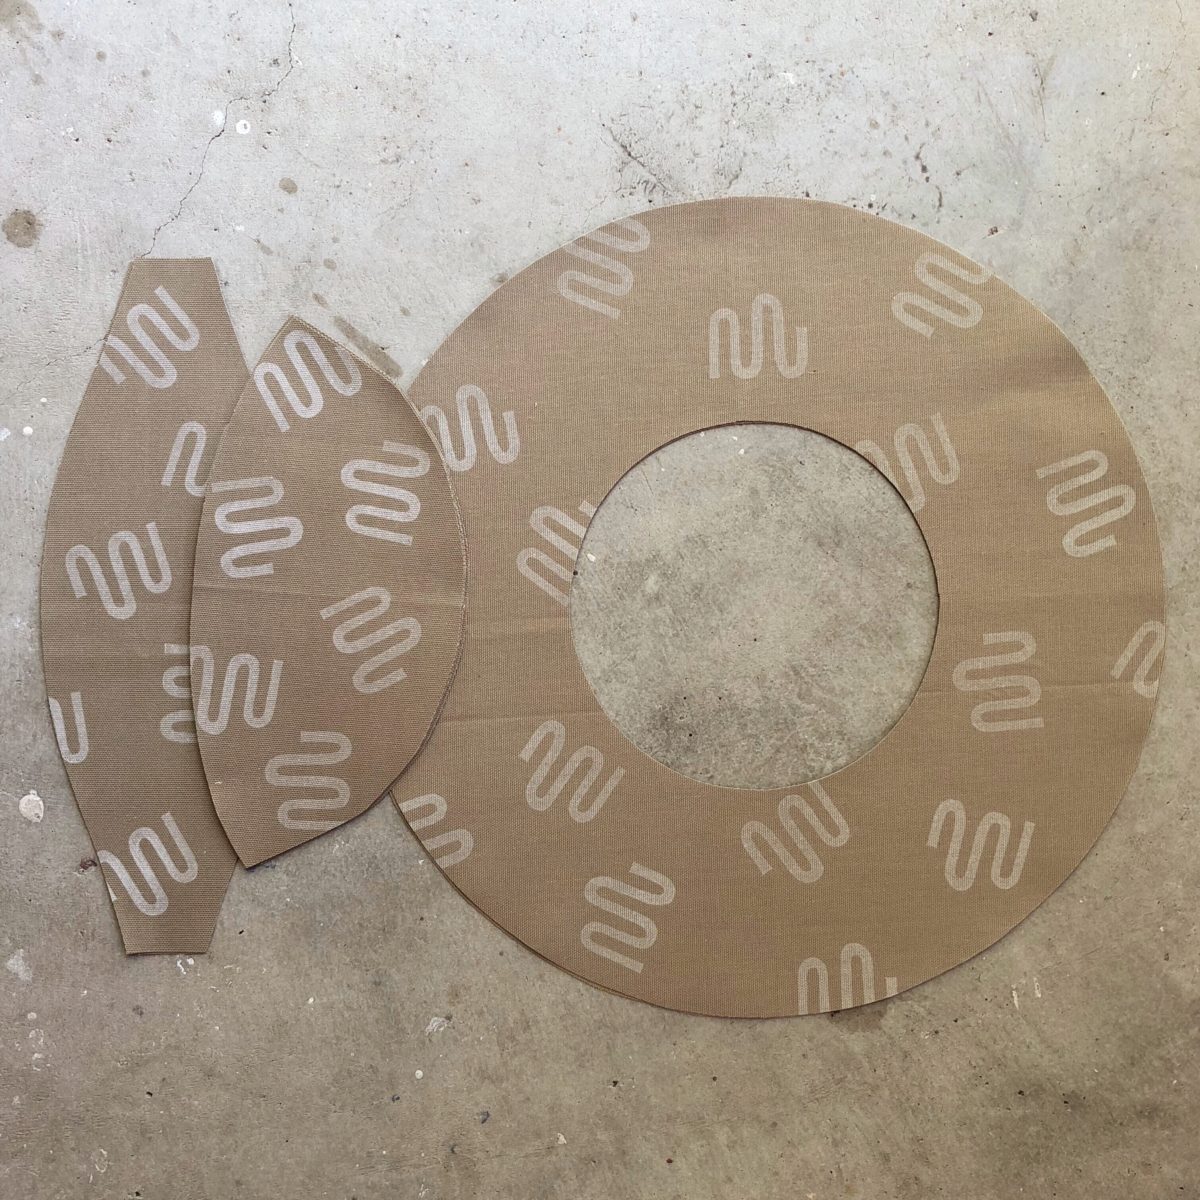

2. Little Wiggles Sun Hat – My second make was the ‘Little Wiggles’ Sun Hat. Sun hats are just a silly, albeit sometimes necessary accessory so I thought I’d lean in and make it a little extra with a fun block print. I added two grommets and a leather strap for even more utility. You can read more about it here. Finished: July 2nd.
3. Making Backpack – Bag making is so satisfying and Noodlehead is a pattern genius. The Making Backpack is Anna’s contribution to the Making Magazine No. 5 / Color issue. You can read more about it here. Finished: July 8th.
4. Sandals – I made sandals using this kit from Rachel Sees Snail Shoes. This was an intimidating project I had put off for years, but after each step I thought “Oh. That wasn’t that bad.” The kit comes with everything you need except for a belt sander, so my edges are a little rough and the size is a wee bit too big but I MADE SHOES. Finished: August 26th.


I had a huge boost in sewing productivity this summer break. Once I’d cranked out a few pieces, the idea to create an entire summer travel capsule for our honeymoon overwhelmed my time off.
Day 1 | Thursday/Friday | SFO to Paris to Brussels
Modified Shirt No. 1 with sash and Making Backpack.

Day 2 | Saturday | Brussels
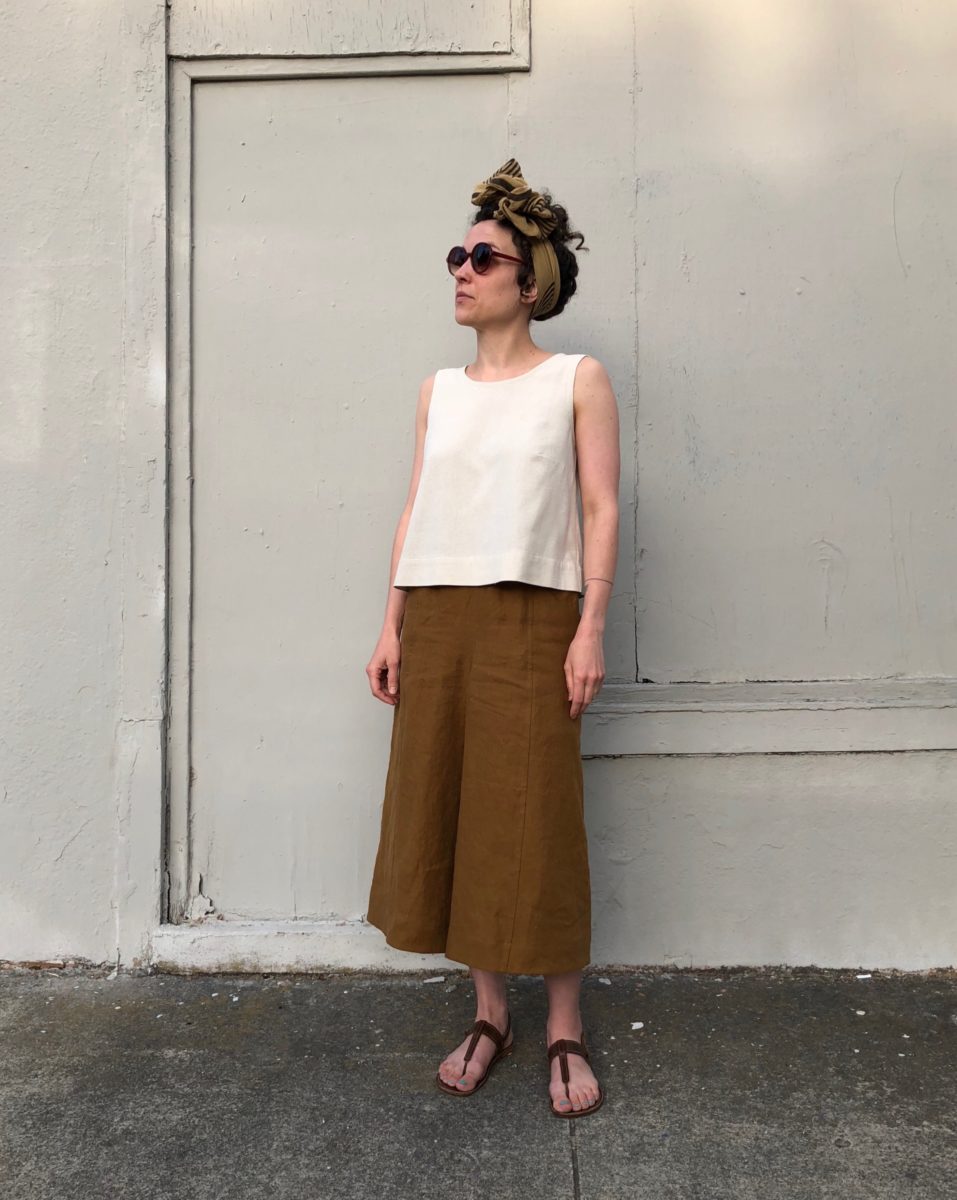
Maya Top with cuffs, self-drafted linen culottes, and Making Backpack.
Day 3 | Sunday | Brussels
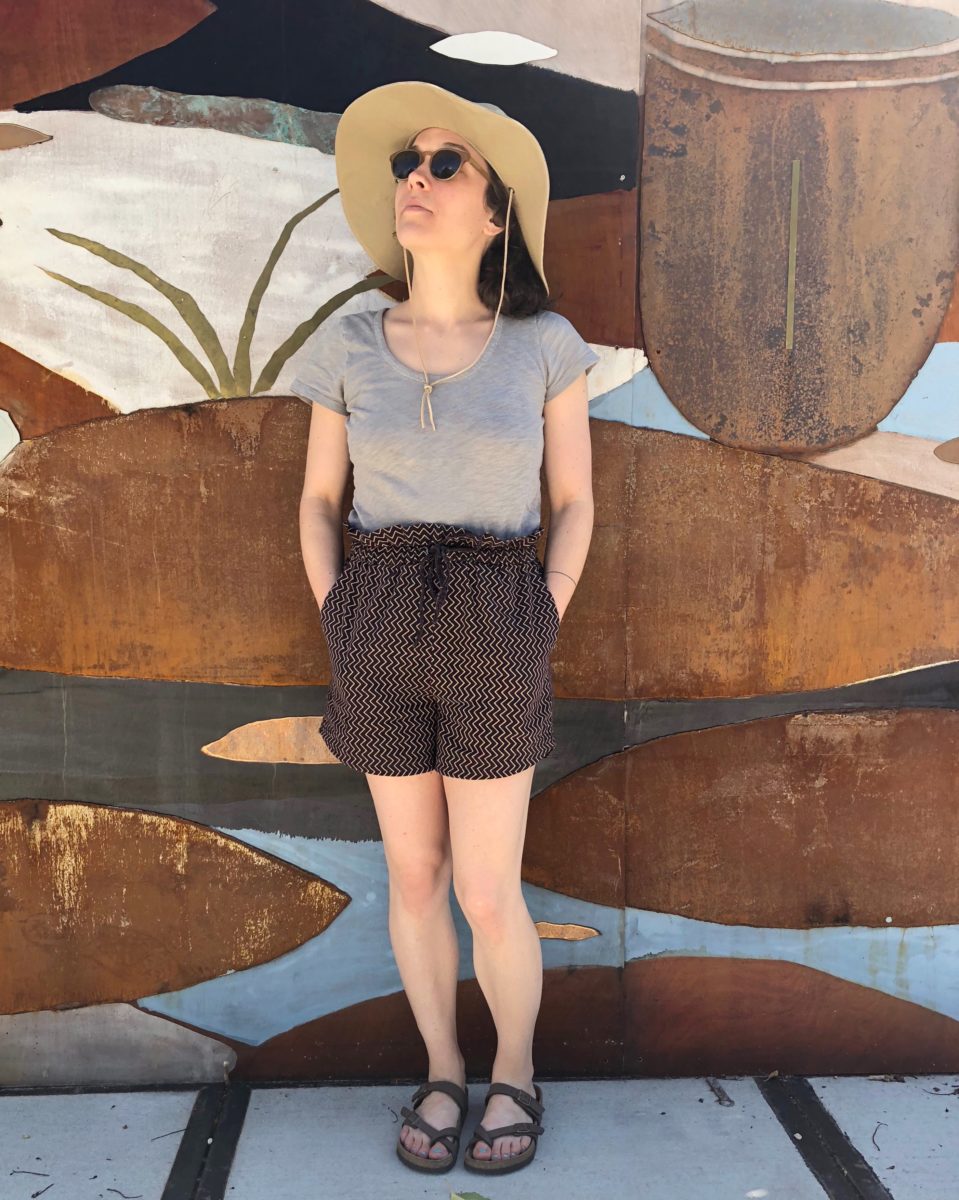
Peppermint Magazine Drawstring Shorts and Set Sail Hat.

Day 4 | Monday | Bruges
Modified Shirt No. 1 dress and Making Backpack.
Day 5 | Tuesday | Brussels to Paris
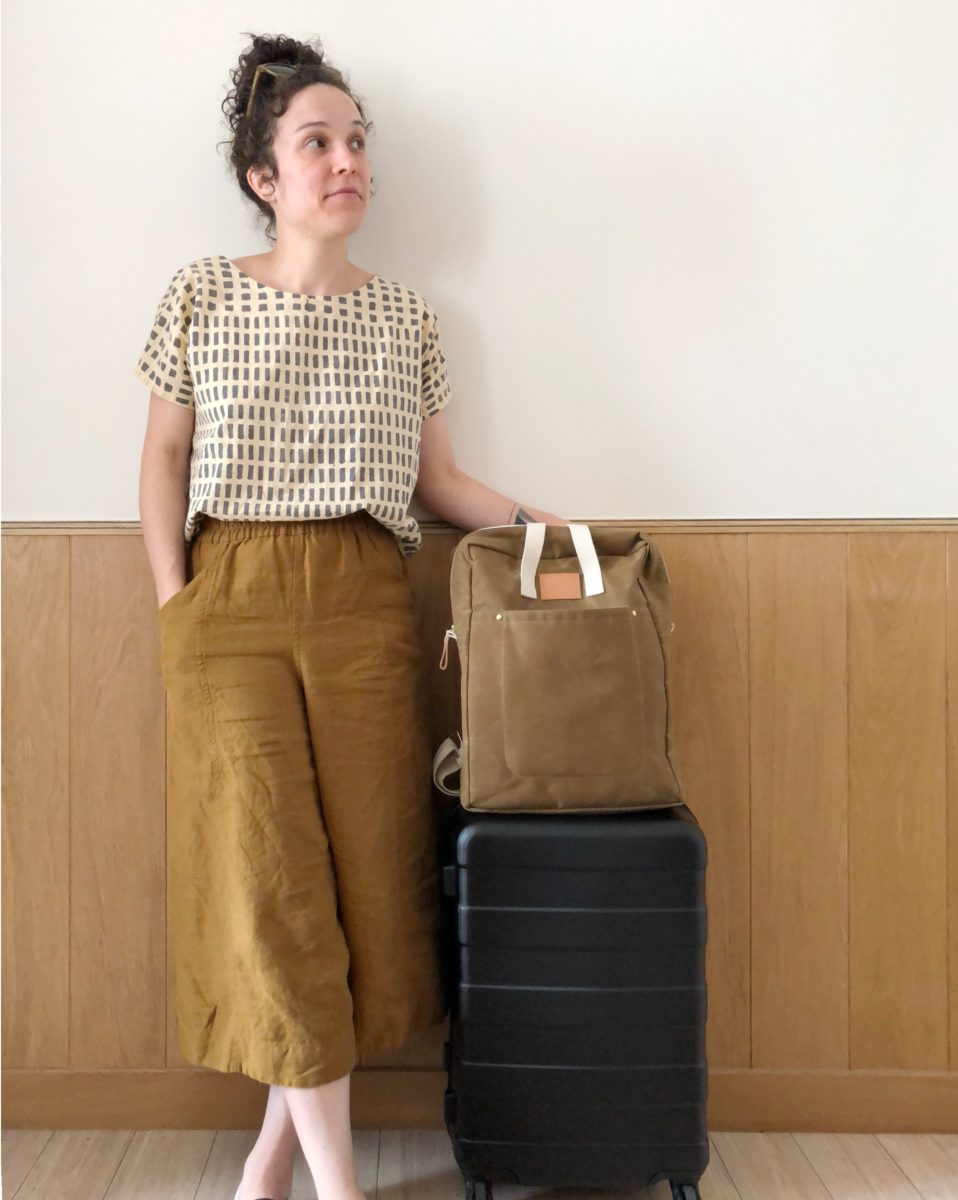
Shirt No. 1, self-drafted linen culottes, and Making Backpack.
![]()
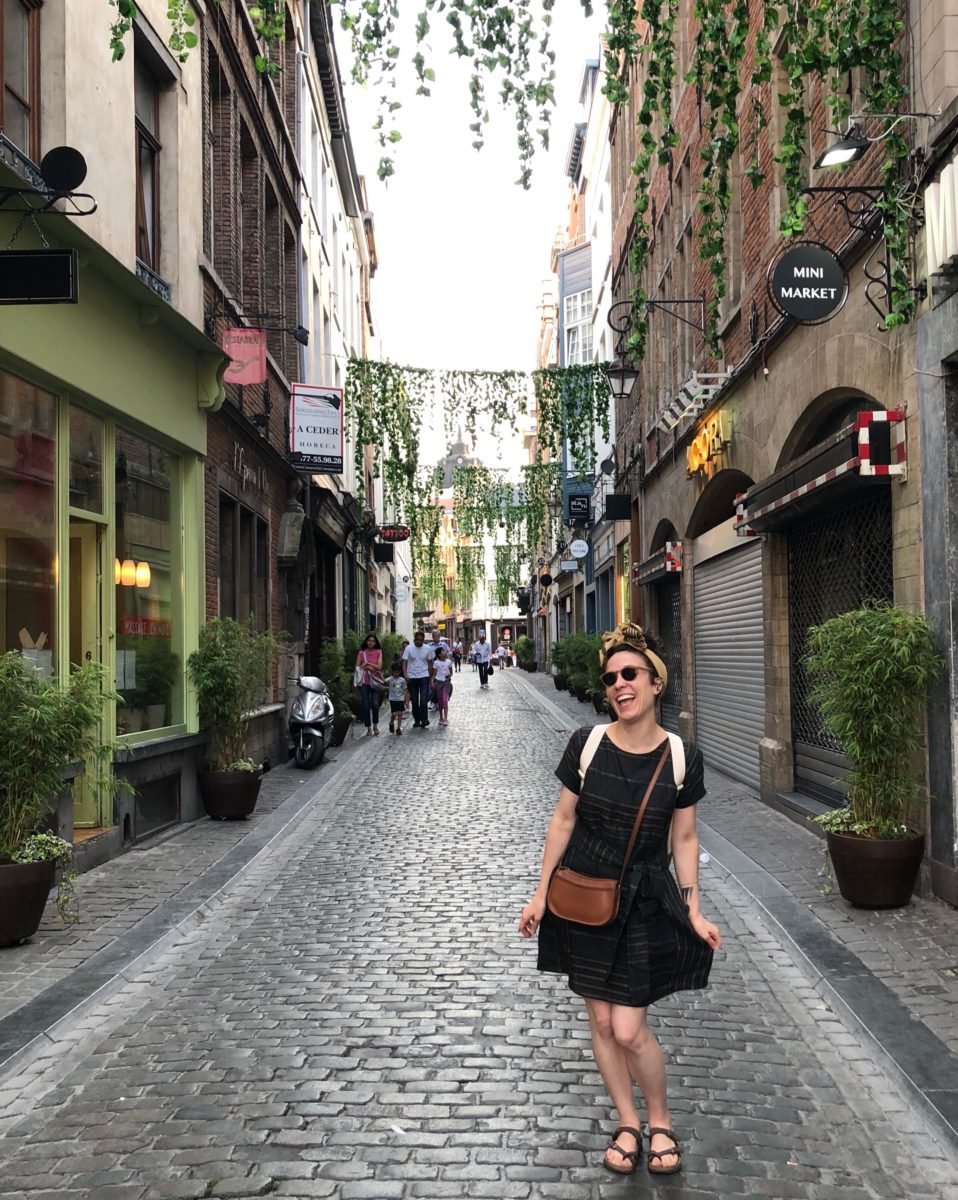
Day 6 | Wednesday | Paris
Maya Top with cuffs over Willow Tank hack dress.

Day 7 | Thursday | Paris
Morning: Cropped Willow Tank, Peppermint Magazine Drawstring Shorts, and Making Backpack.
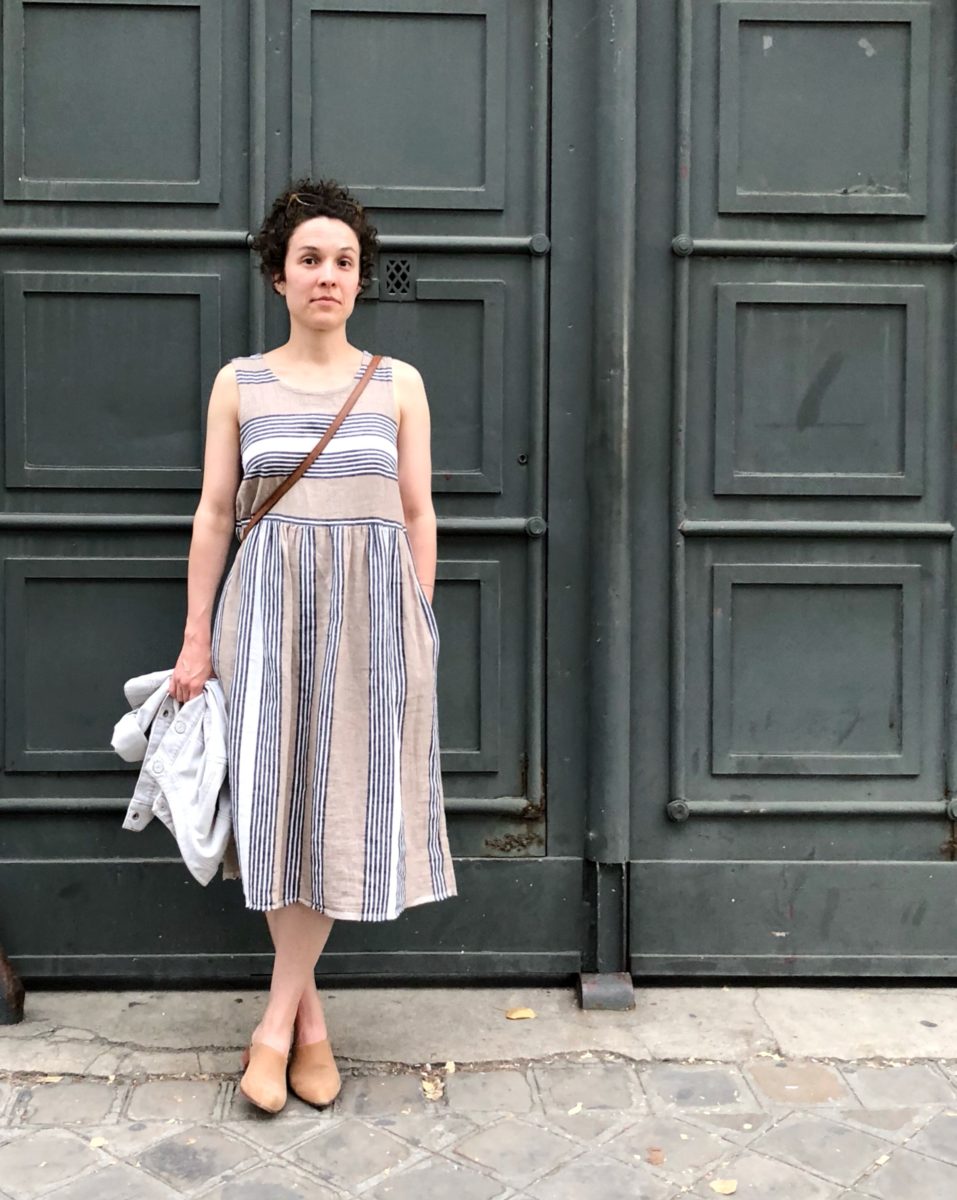
Day 7 | Thursday | Paris
Evening: Willow Hack Dress.
Day 8 | Friday | Paris to SFO
Modified Shirt No. 1 dress and Making Backpack.
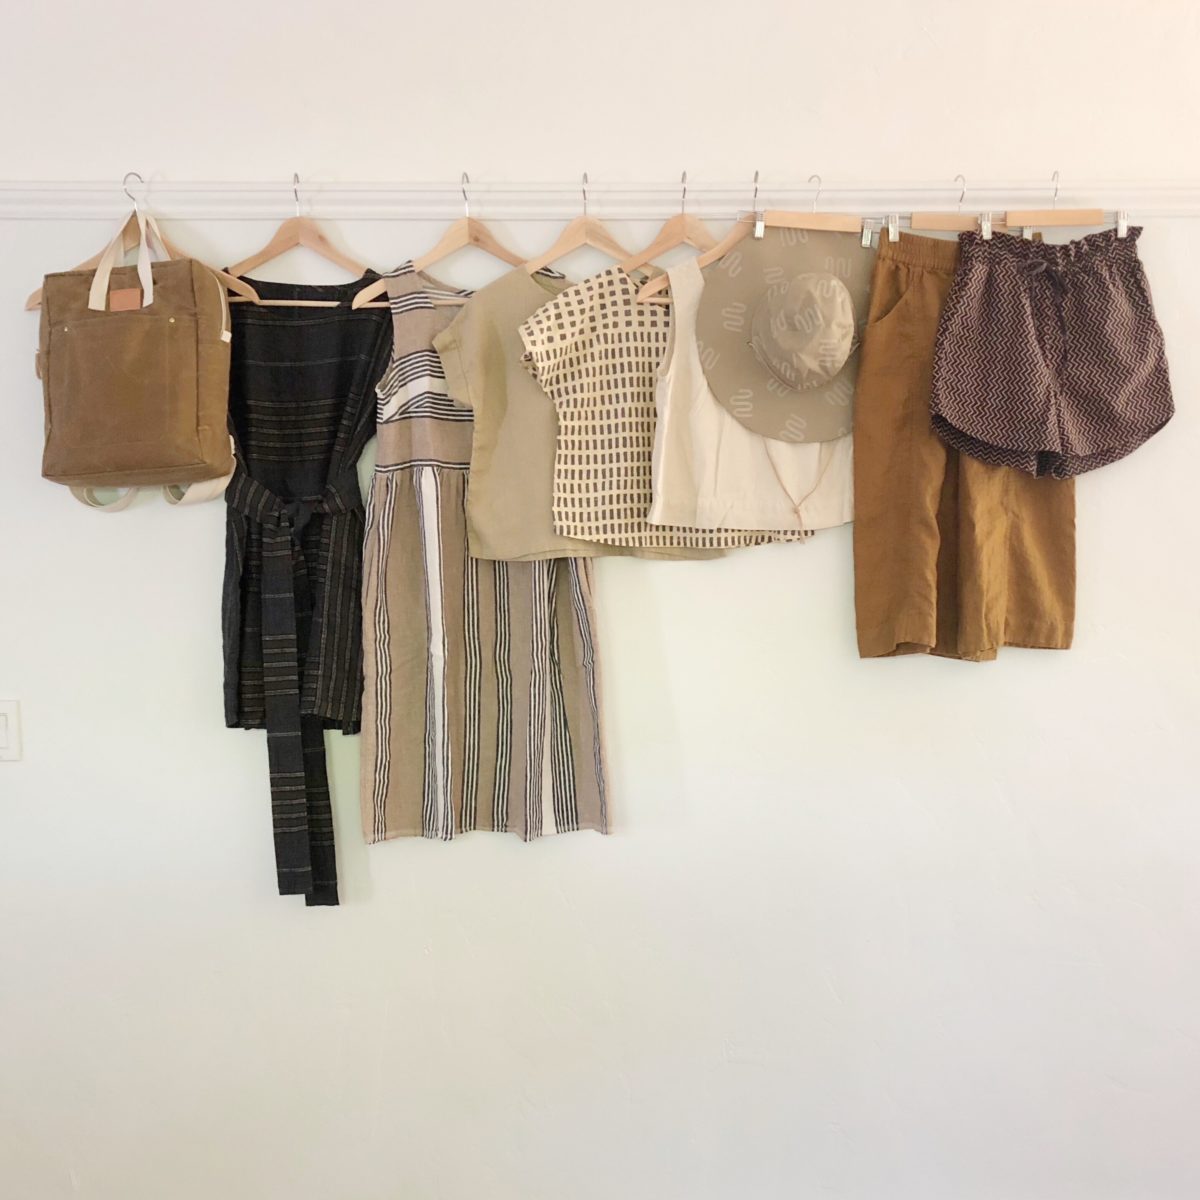
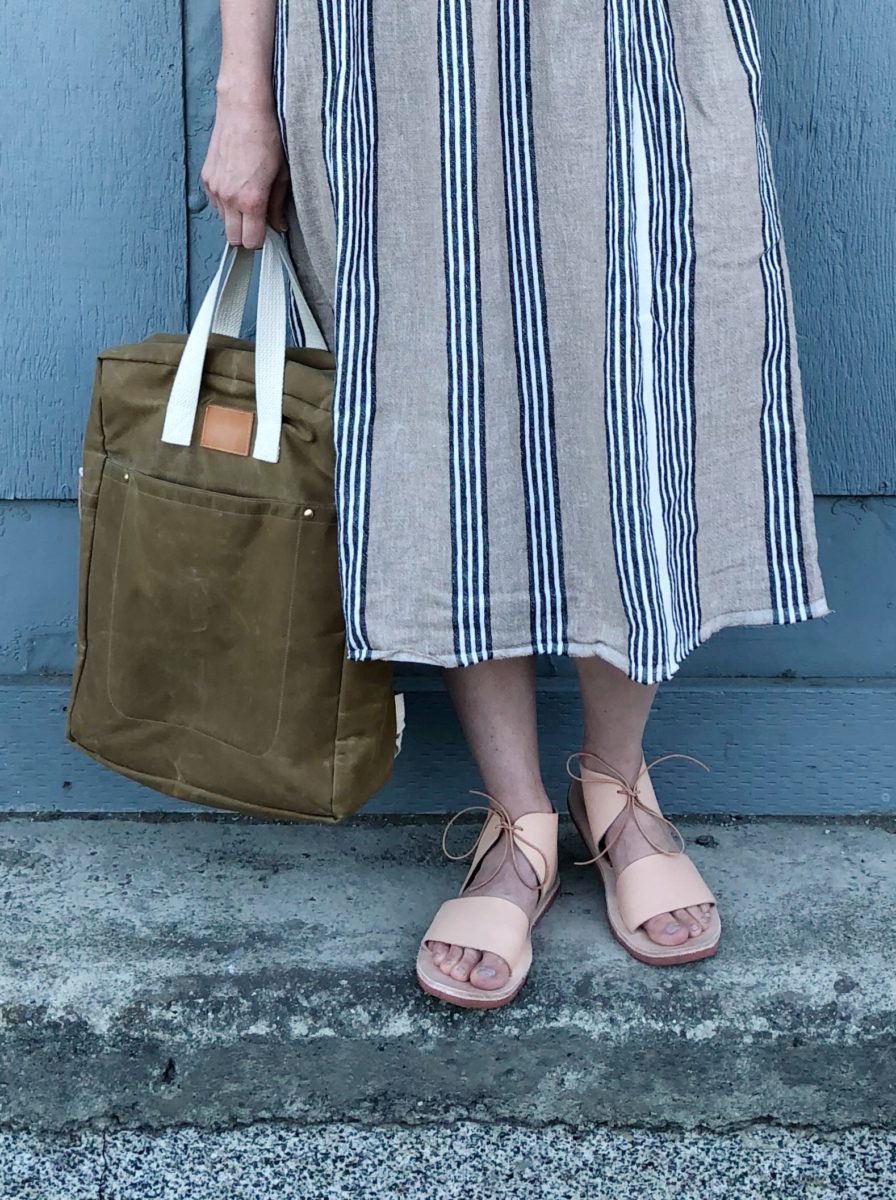
The neutral color palette allowed for a decent amount of mixing and matching. Four tops, two dresses, culottes, shorts, two scarves, one sun hat, and three pairs of footwear worked out perfectly for eight days. I also brought a RTW jean jacket for cool mornings and evenings.
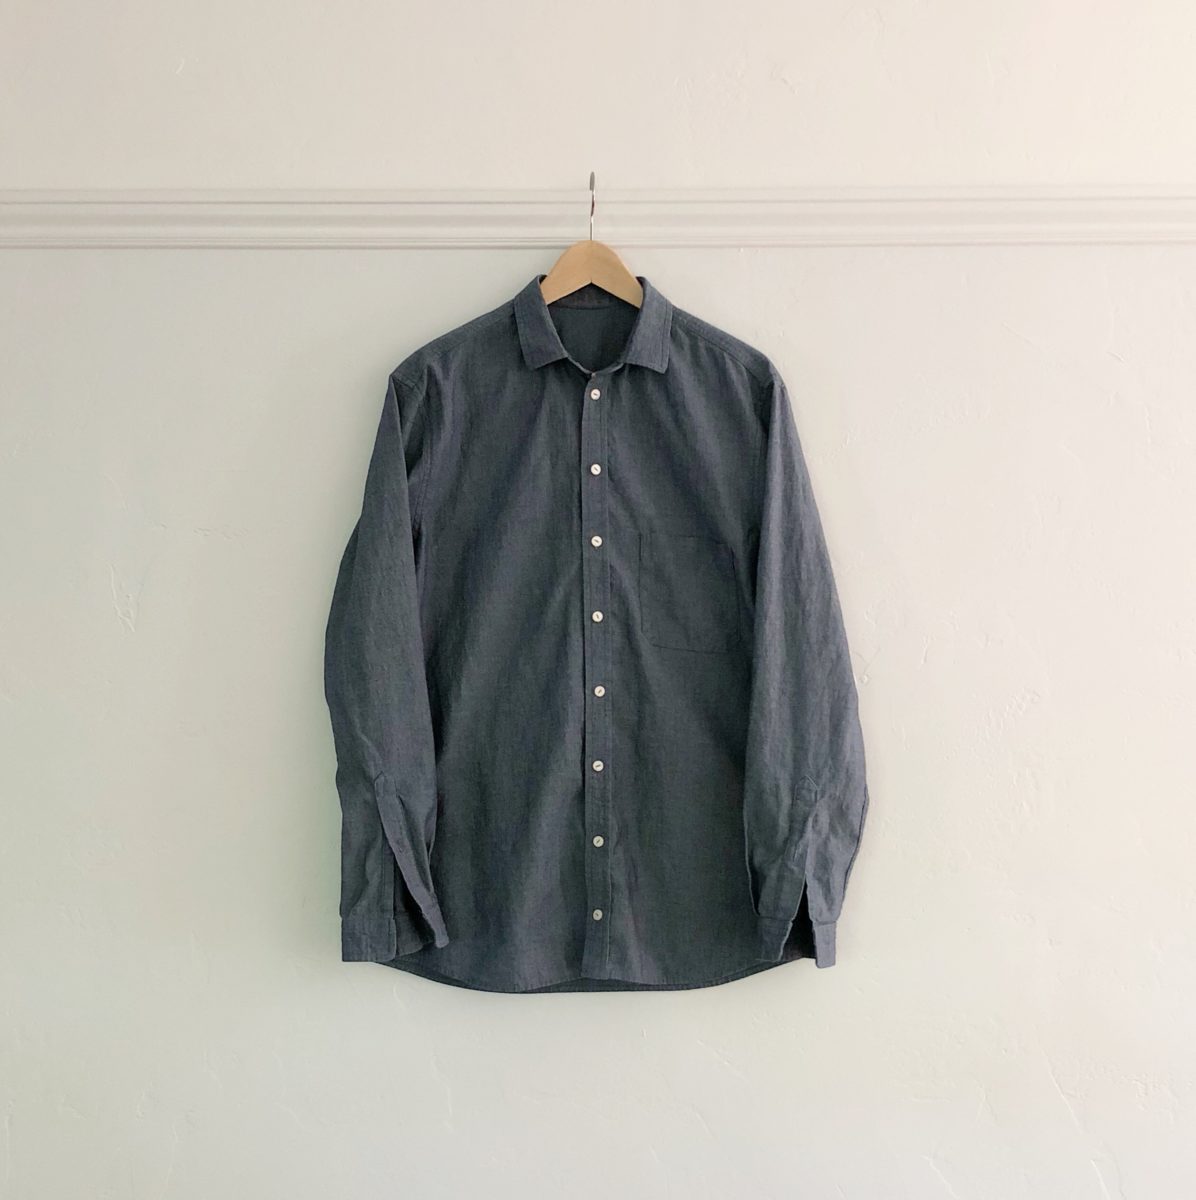
I even made my husband a Fairfield Button-up for the trip! We had two fancier events (dinner on the Seine and Vivaldi’s Four Seasons at Sainte Chapelle) which required more put-together looks. Otherwise I wouldn’t have needed the third pair of shoes. His shirt still needs buttonholes/buttons on the cuffs, but he wears the sleeves rolled up most of the time so it wasn’t a huge deal I couldn’t get them in before the trip.
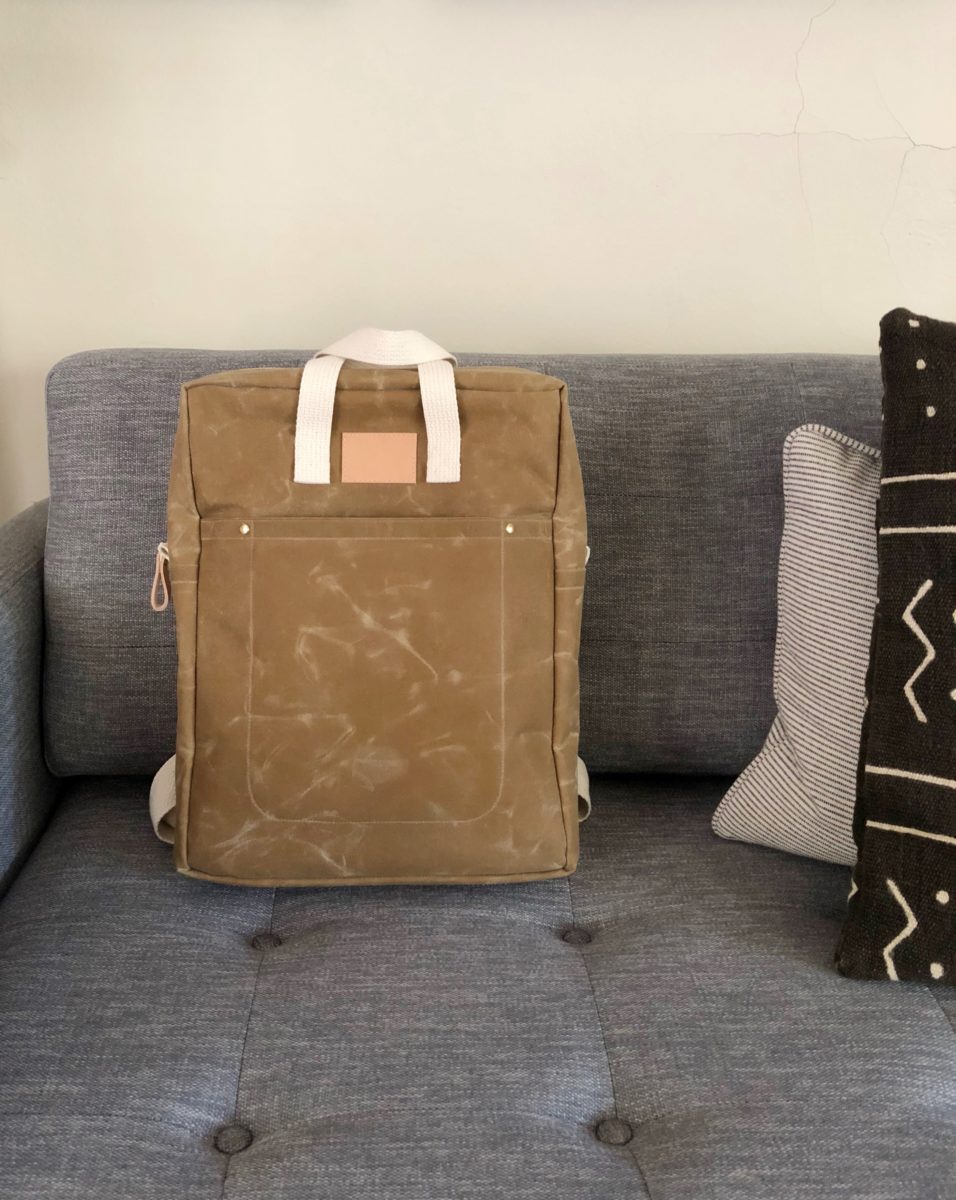
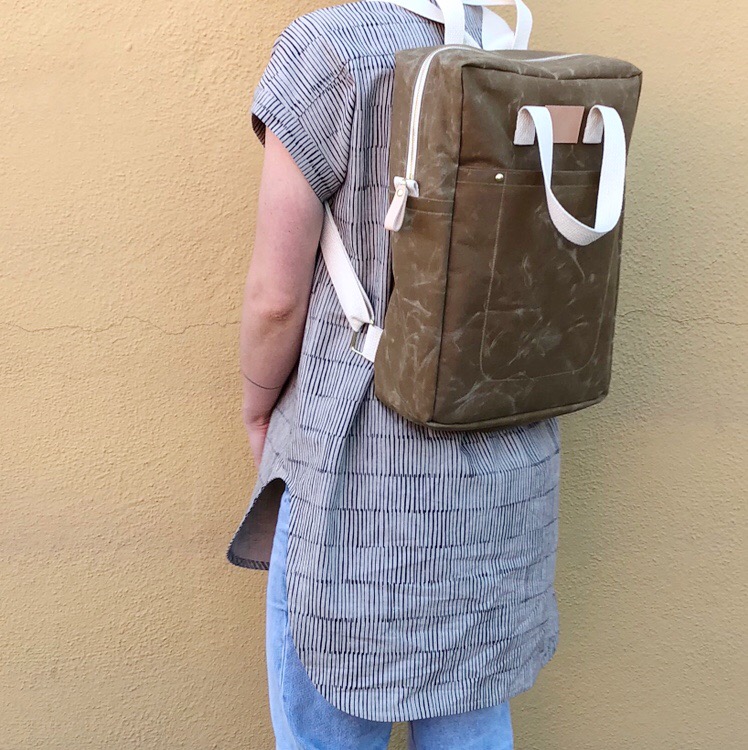
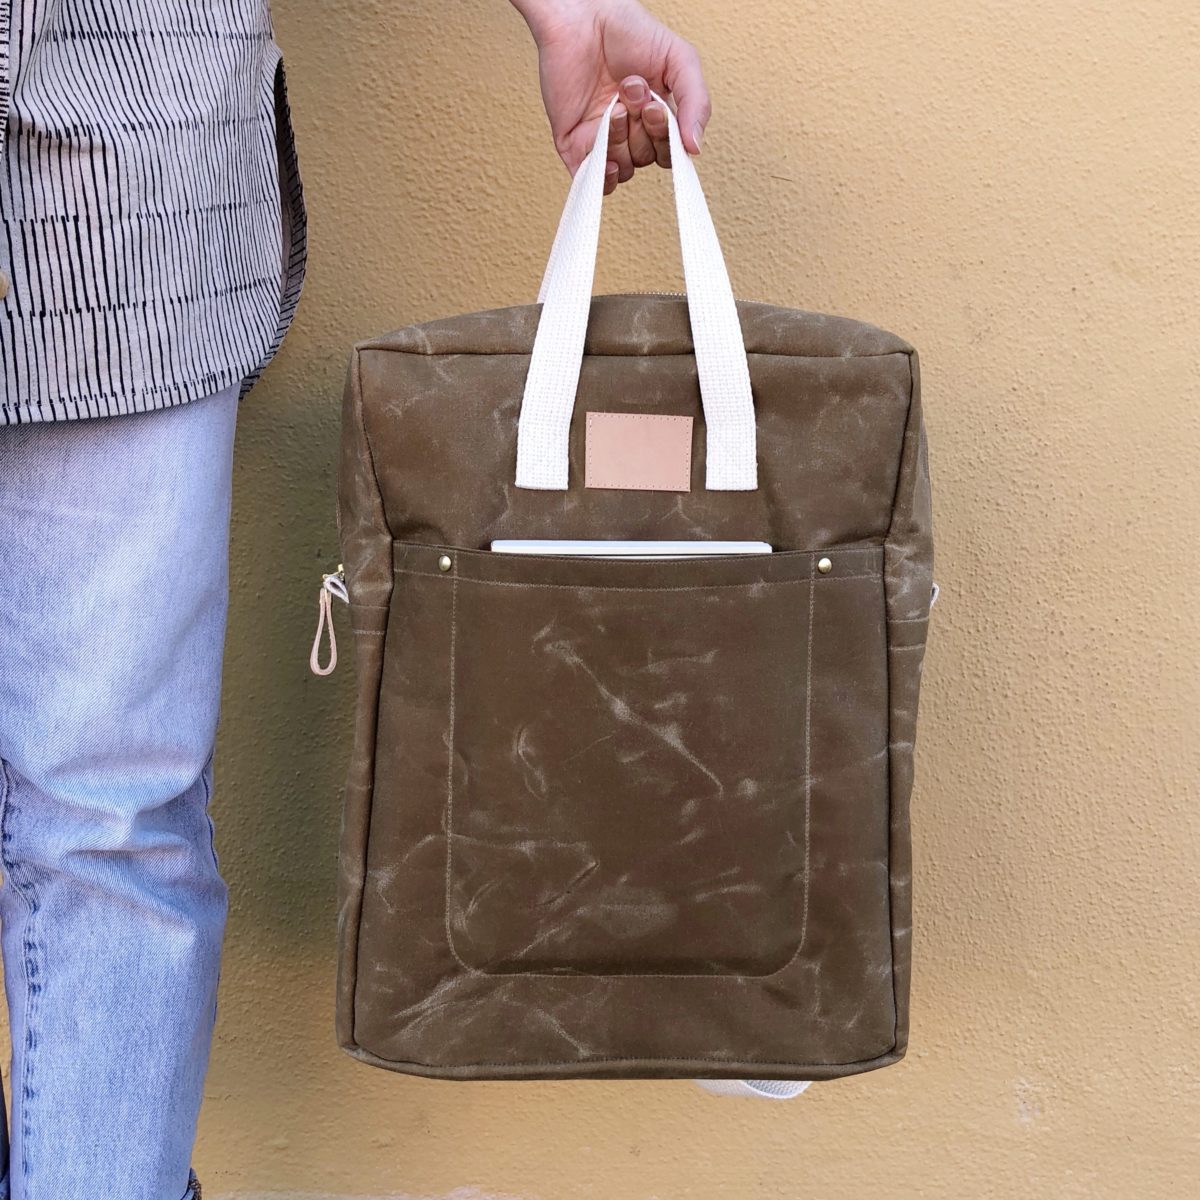
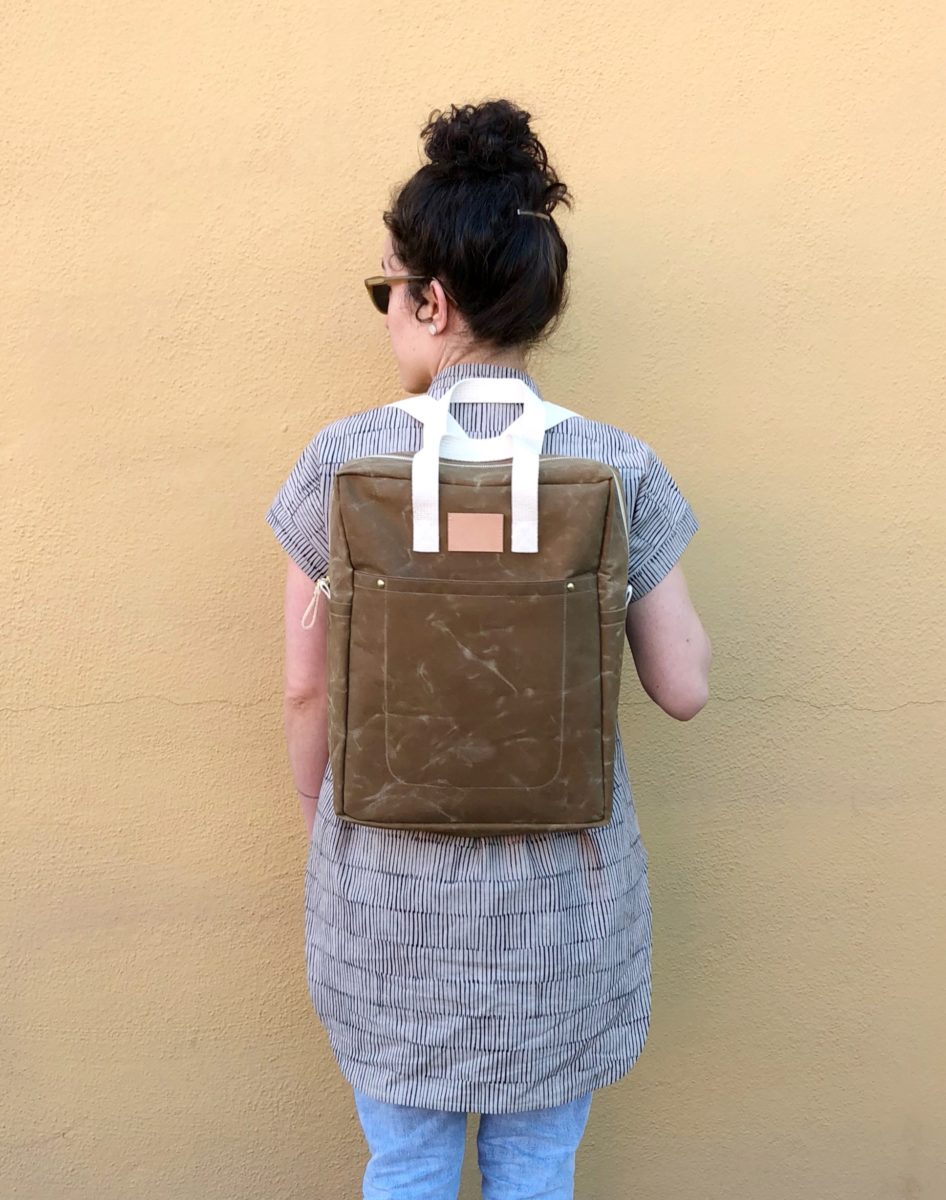
The minute I laid eyes on the Making Backpack way back in March, I was sold. I promptly ordered a subscription to Making and started sketching plans.
I went through a lot of different plans before choosing an overall neutral look of waxed canvas, natural cotton, leather, and brass (sources linked below).
Anna’s excellent instructions and clear illustrations make you feel like a seasoned bag maker. If I didn’t need to wait for brass rivets (a totally optional feature), this could have easily come together in a day.
Although it’s a small backpack, it can hold my 13″ laptop in its Quilted Computer Sleeve. I just love how waxed canvas wrinkles.
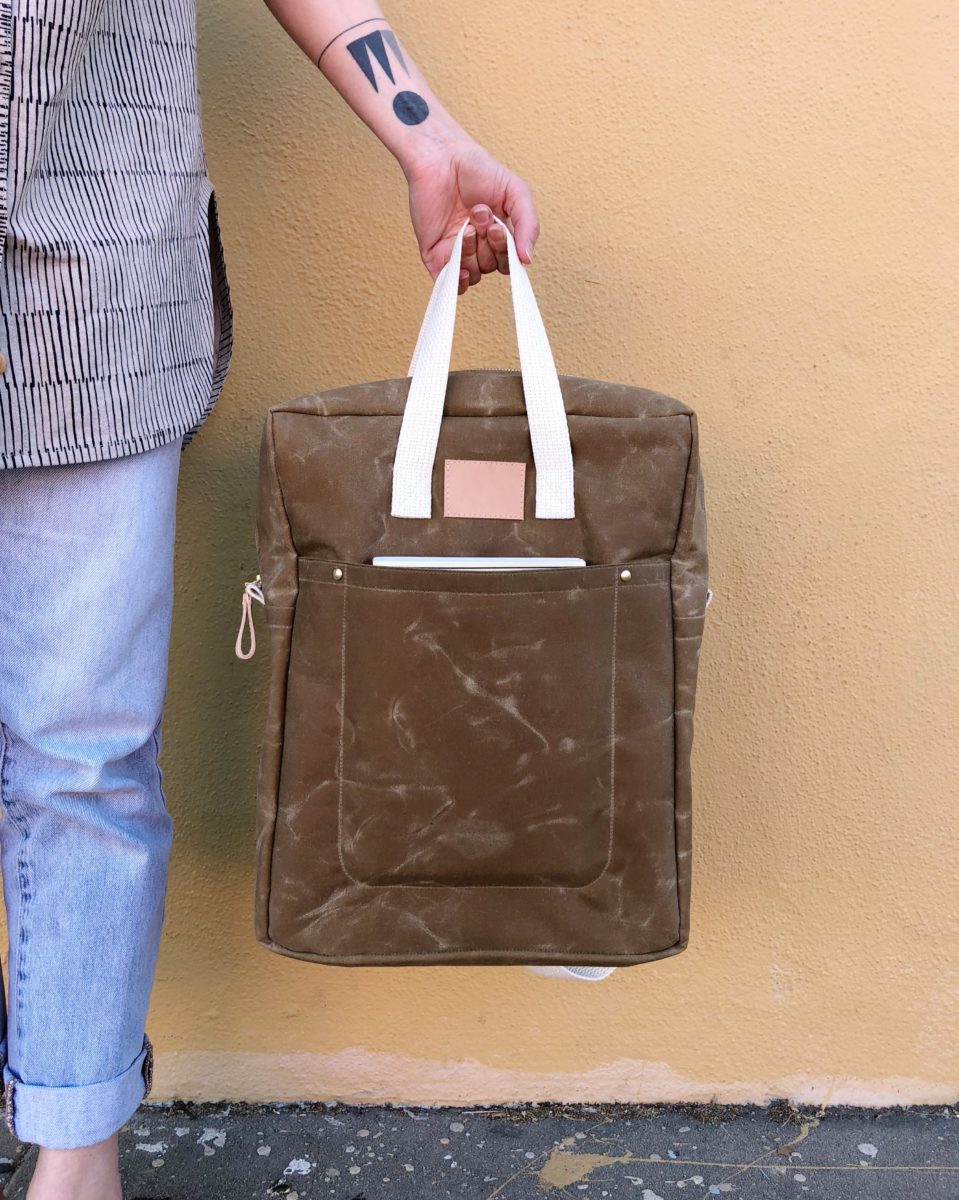
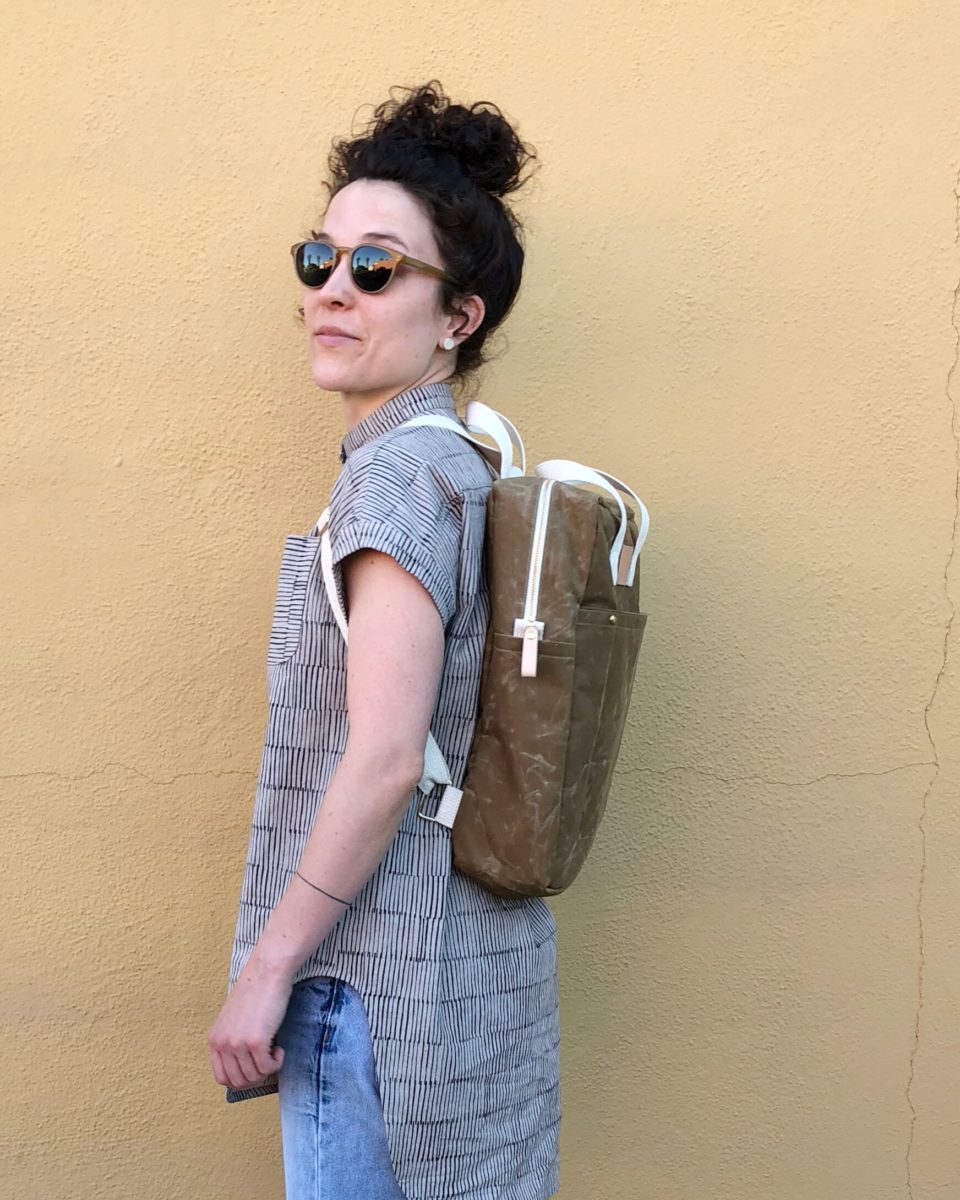
The front pocket is perfect for a paperback book, or small sketchbook.
I’m excited about the double handles because museums always pitch a fit about my tiny backpacks. Now I’ll have another carrying option besides wearing it in the front like a nerd.
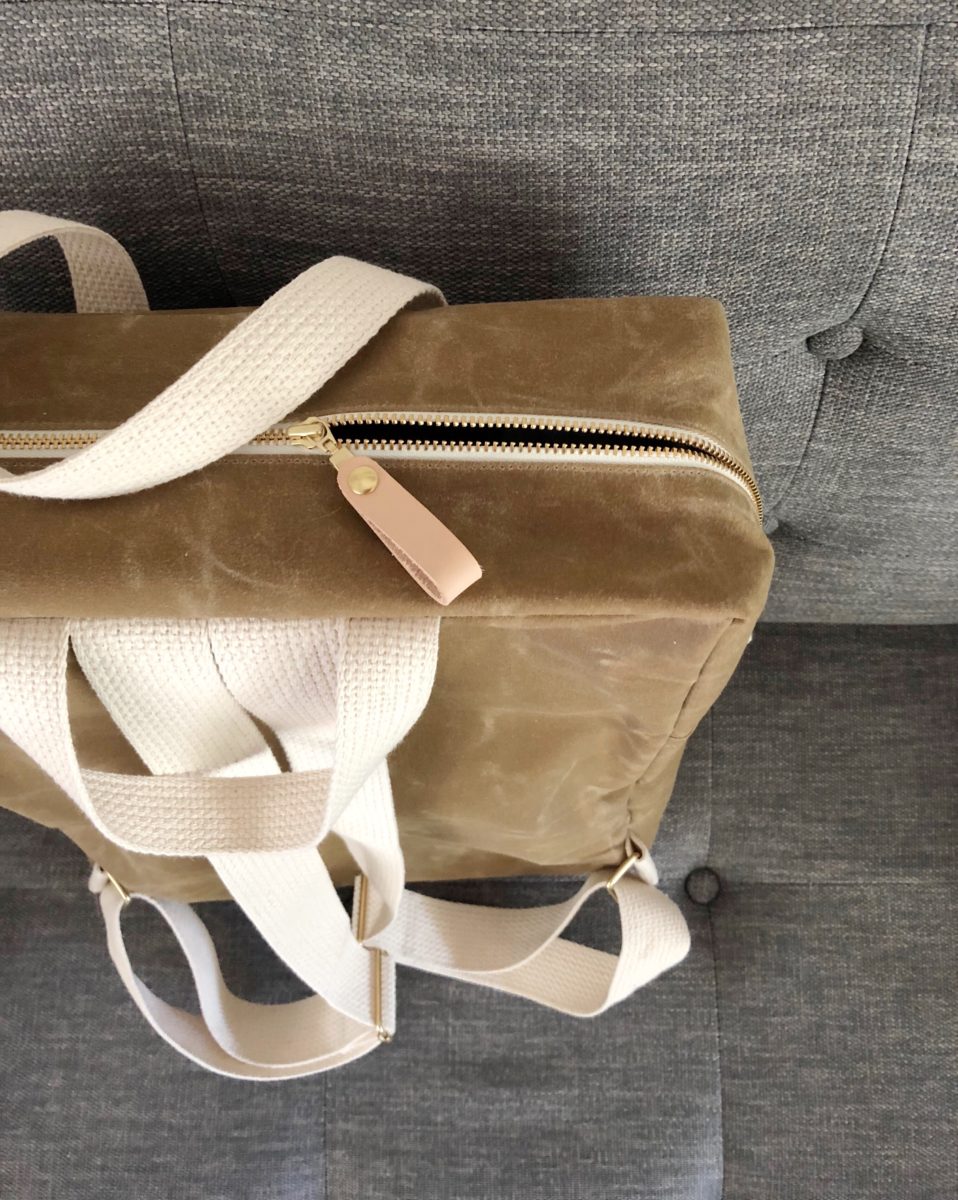
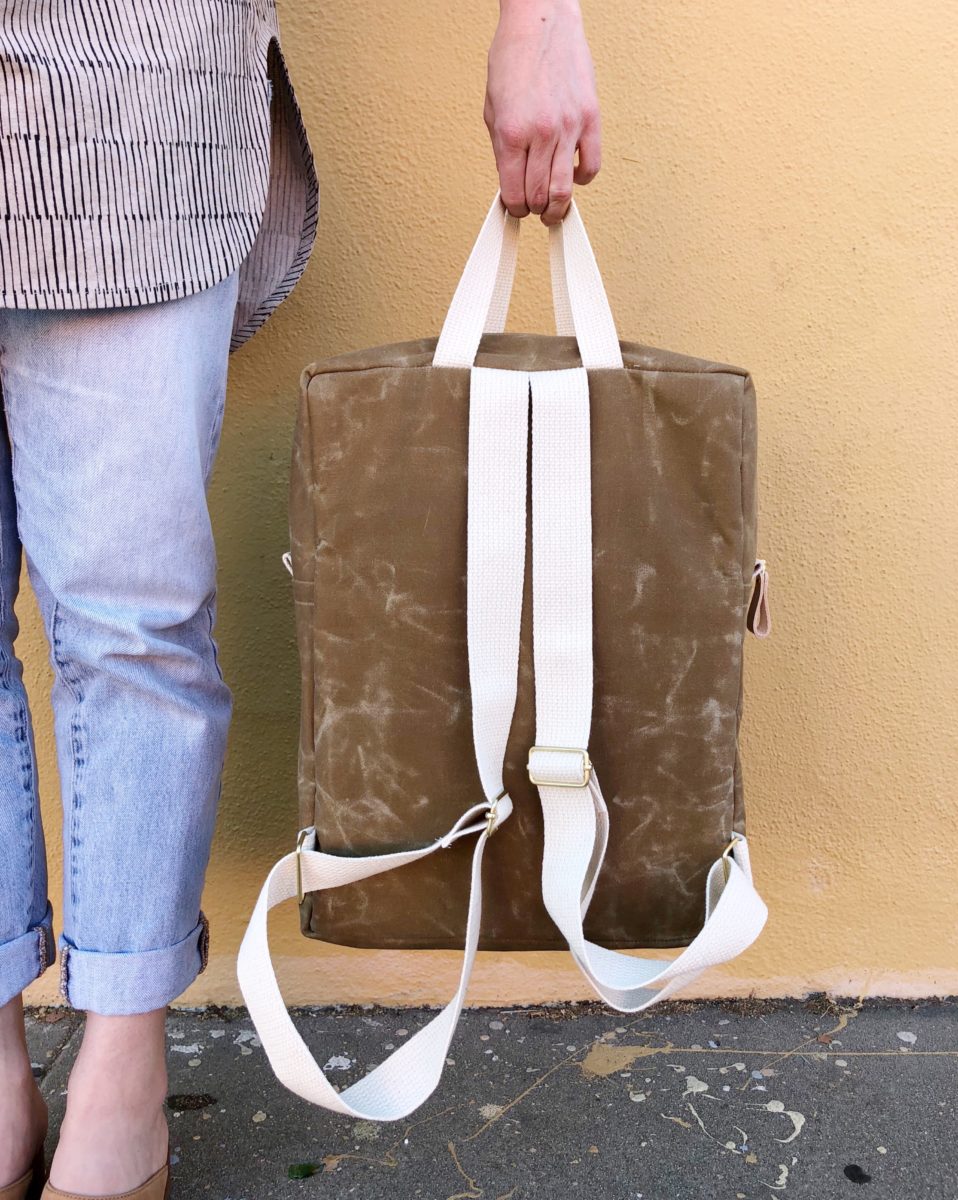
I attempted to come up with a leather/snap feature that would hold the front handle and back hang loop together. I couldn’t figure out anything that was slim enough and would slide out of the way, so I gave up. I wanted to to finish it!
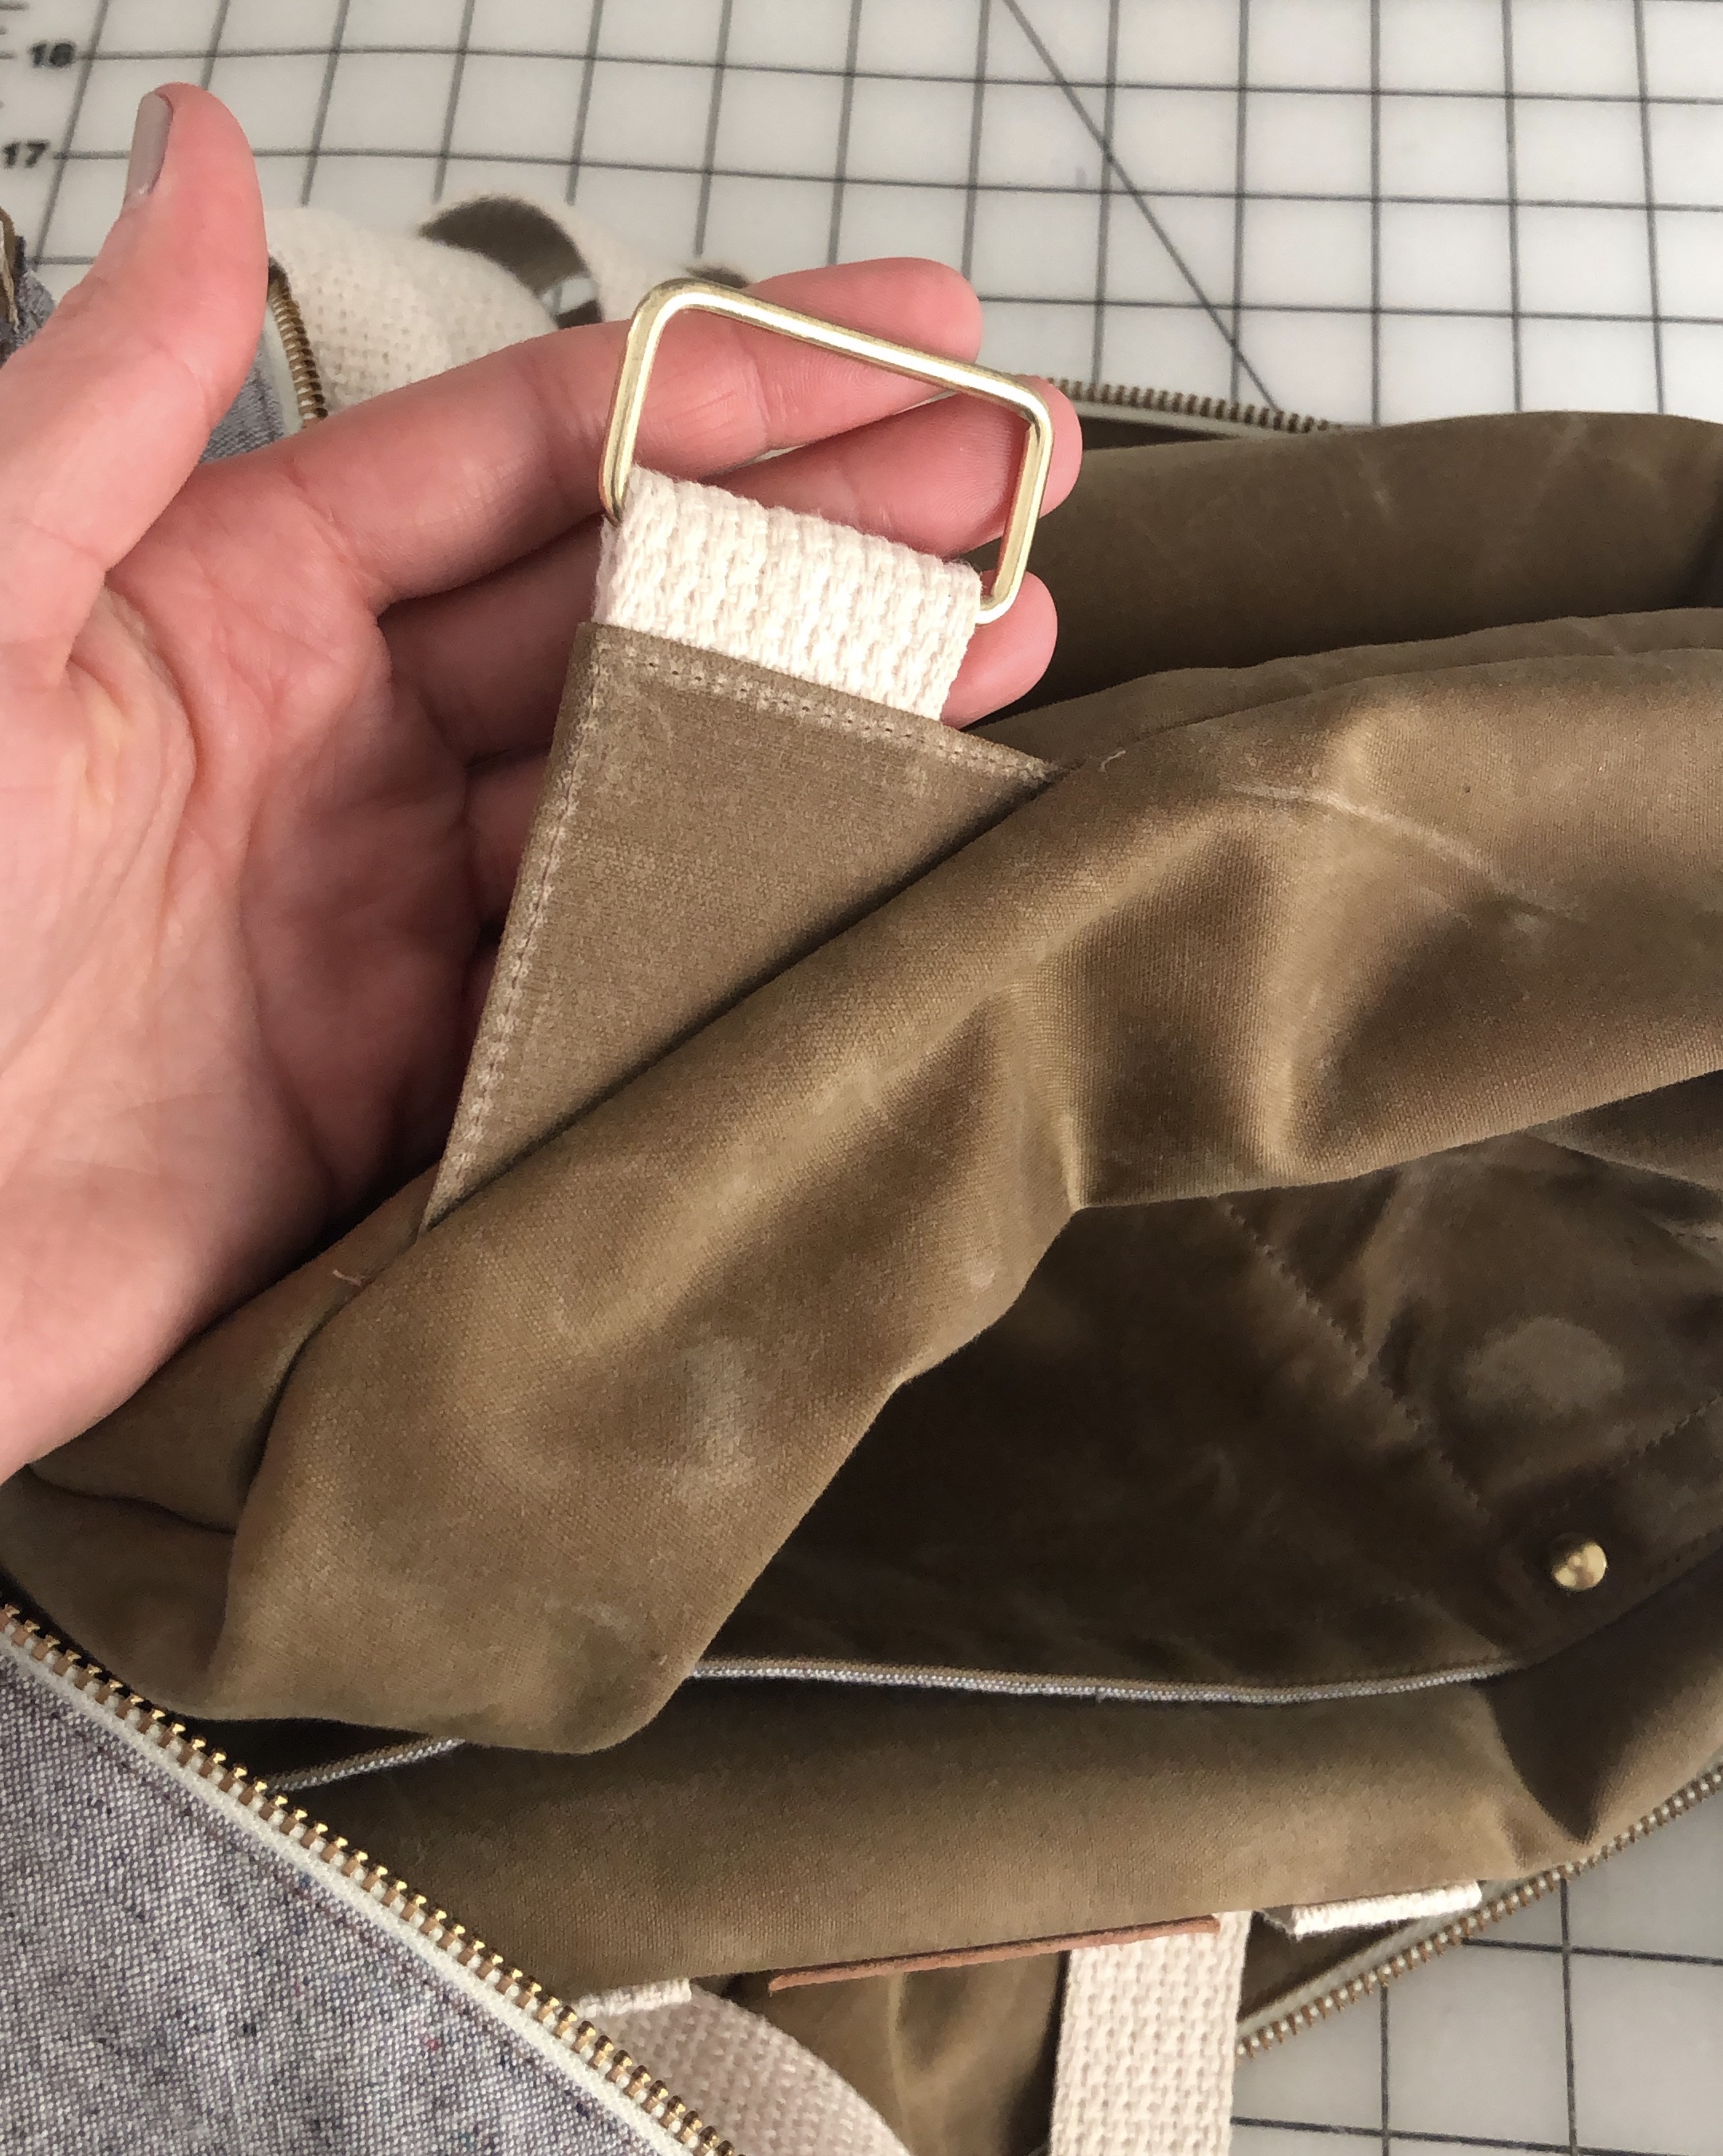
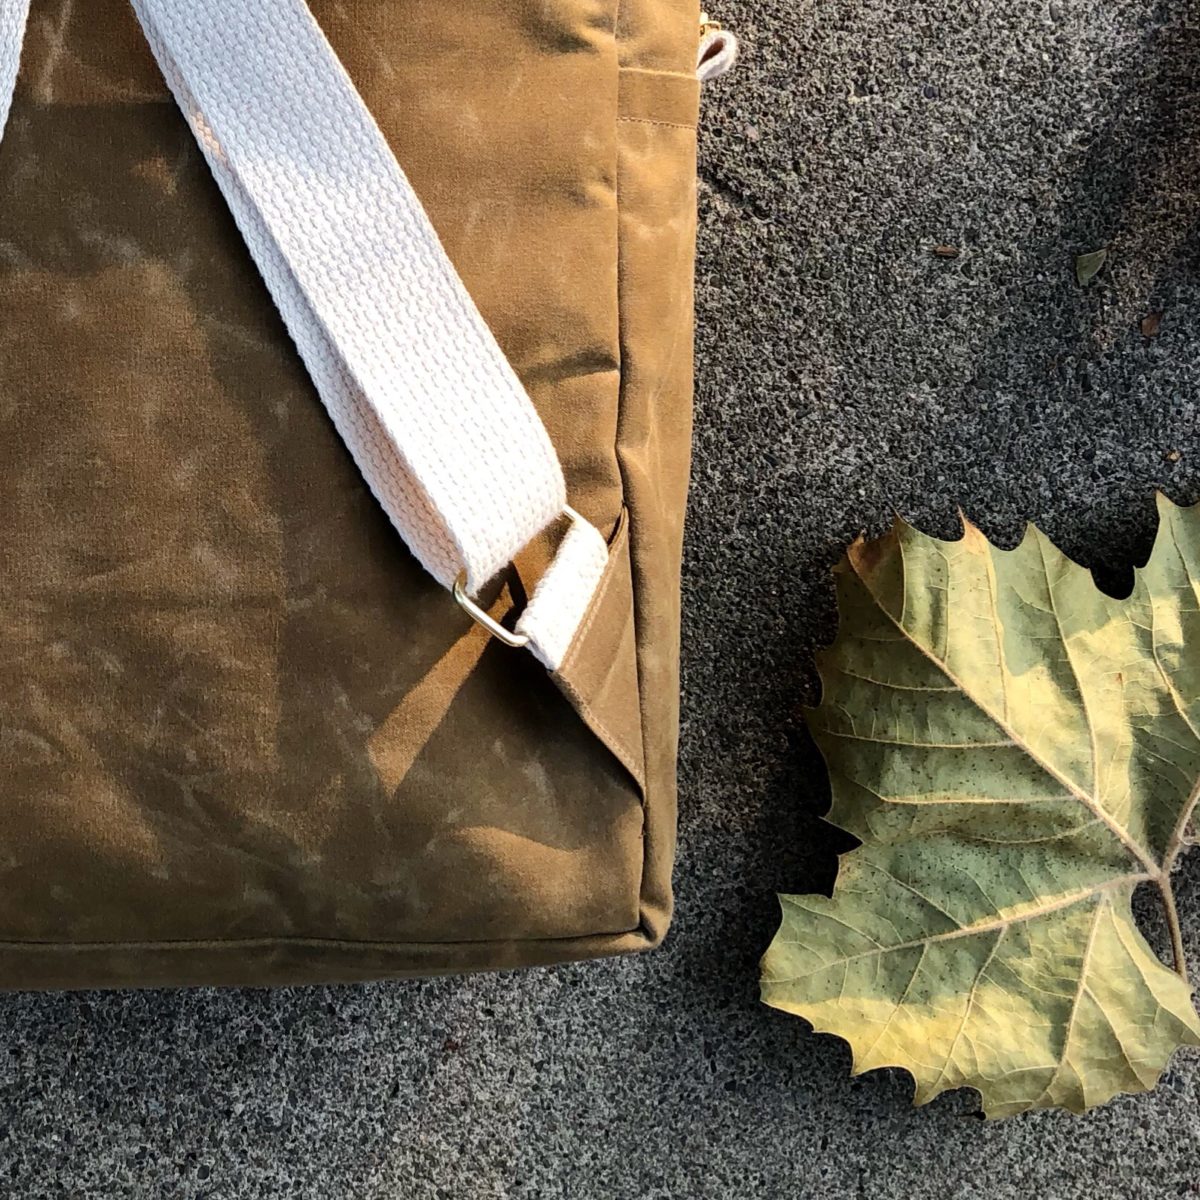
This ended up being 3/8″ slimmer than the pattern. Either my sewing was off, or the zipper tape was a little narrow. I do like how closely it hugs my back. The only thing I’d change is adding a triangle to the bottom part of the straps so that the webbing doesn’t bunch up on the rectangle rings.
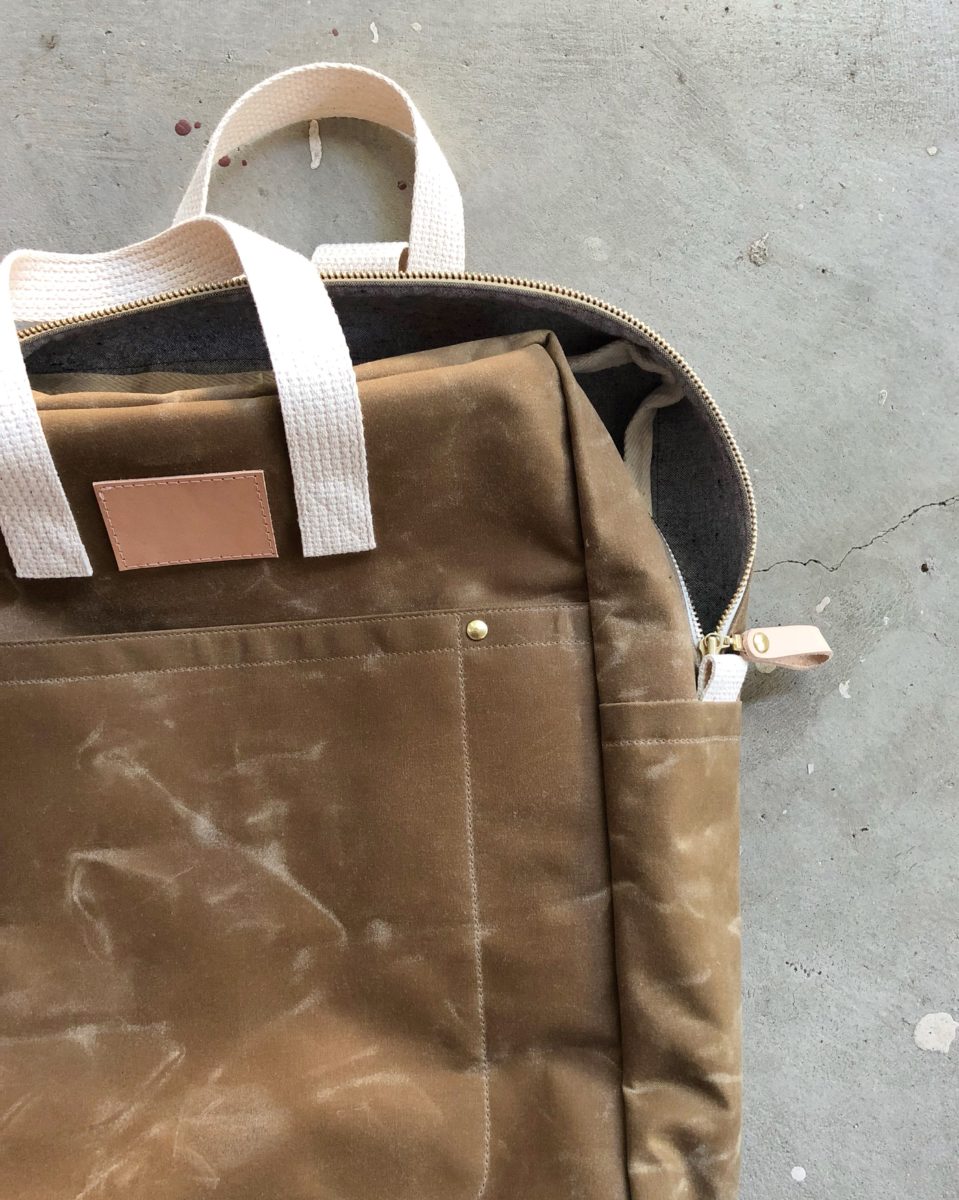
I’m oddly proud of that little leather zipper loop I added. My Bernina 530 handled the project like a champ and I’m trying not to think about all that wax residue…
Sources:
Olive Waxed Cotton Canvas: Stonemountain & Daughter
Speckled Linen Lining Fabric: purchased from Fancy Tiger Crafts in early 2017, can’t find on website.
Hardware & Webbing Kit: Noodlehead Shop, rivets and zipper leather loop not included.
WOOT! I made TWO garments in one day! Definitely a new personal record for me. Ah, I do love time off.
We leave for our honeymoon/anniversary in less than a week so naturally I think I can sew up an entire travel capsule. It’s going to be warm in Paris and Brussels requiring nothing but relaxed silhouettes in linen and silk. Everything also needs to mix and match.
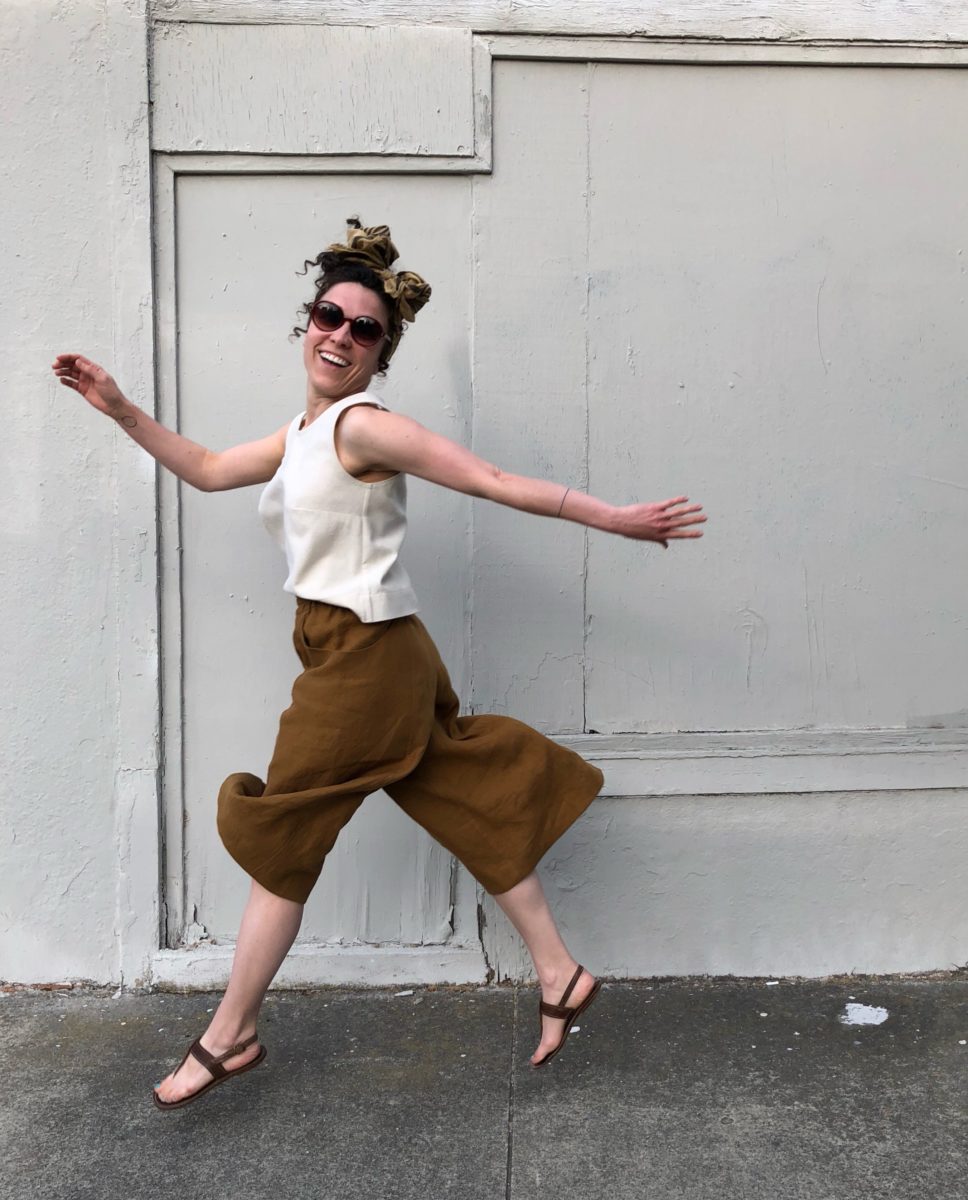
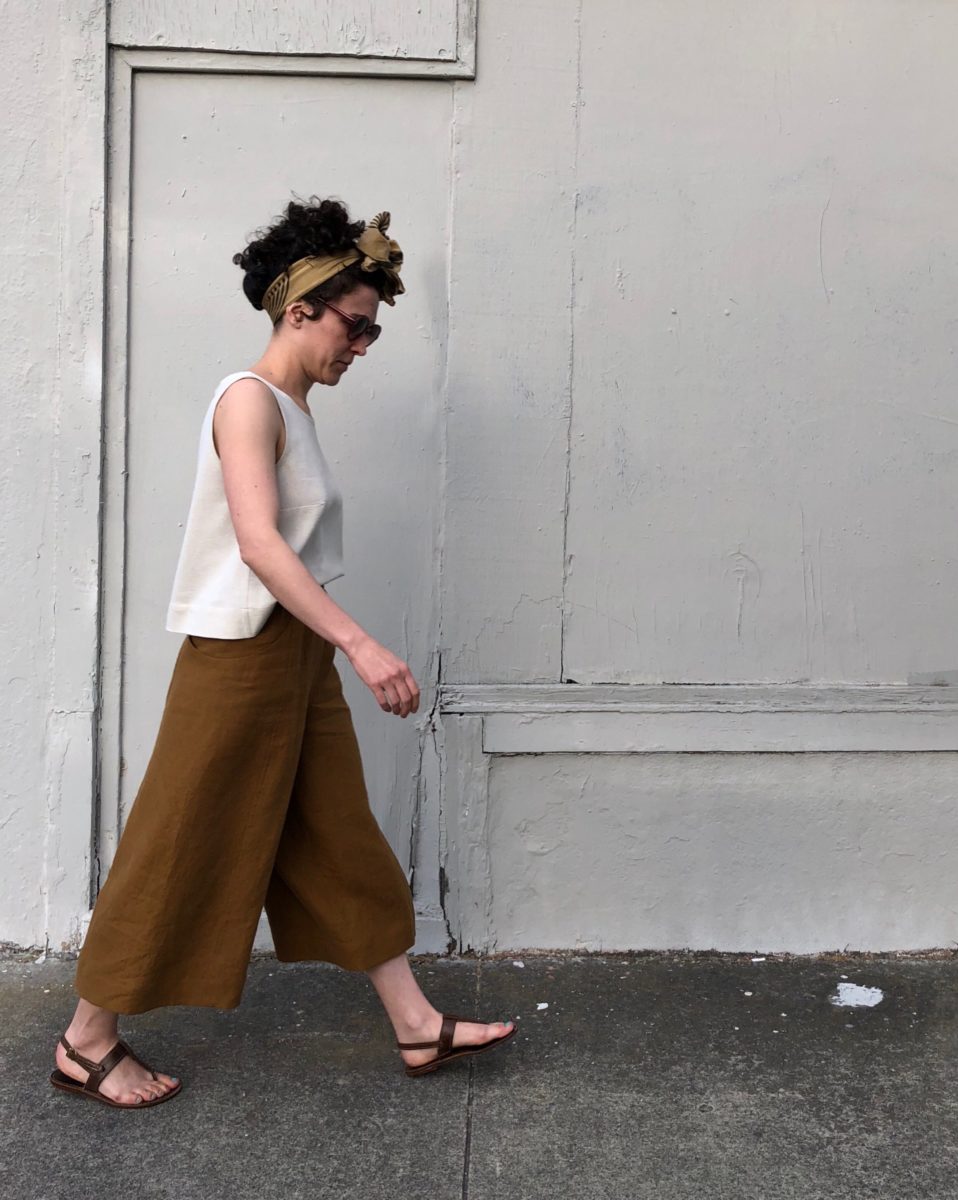
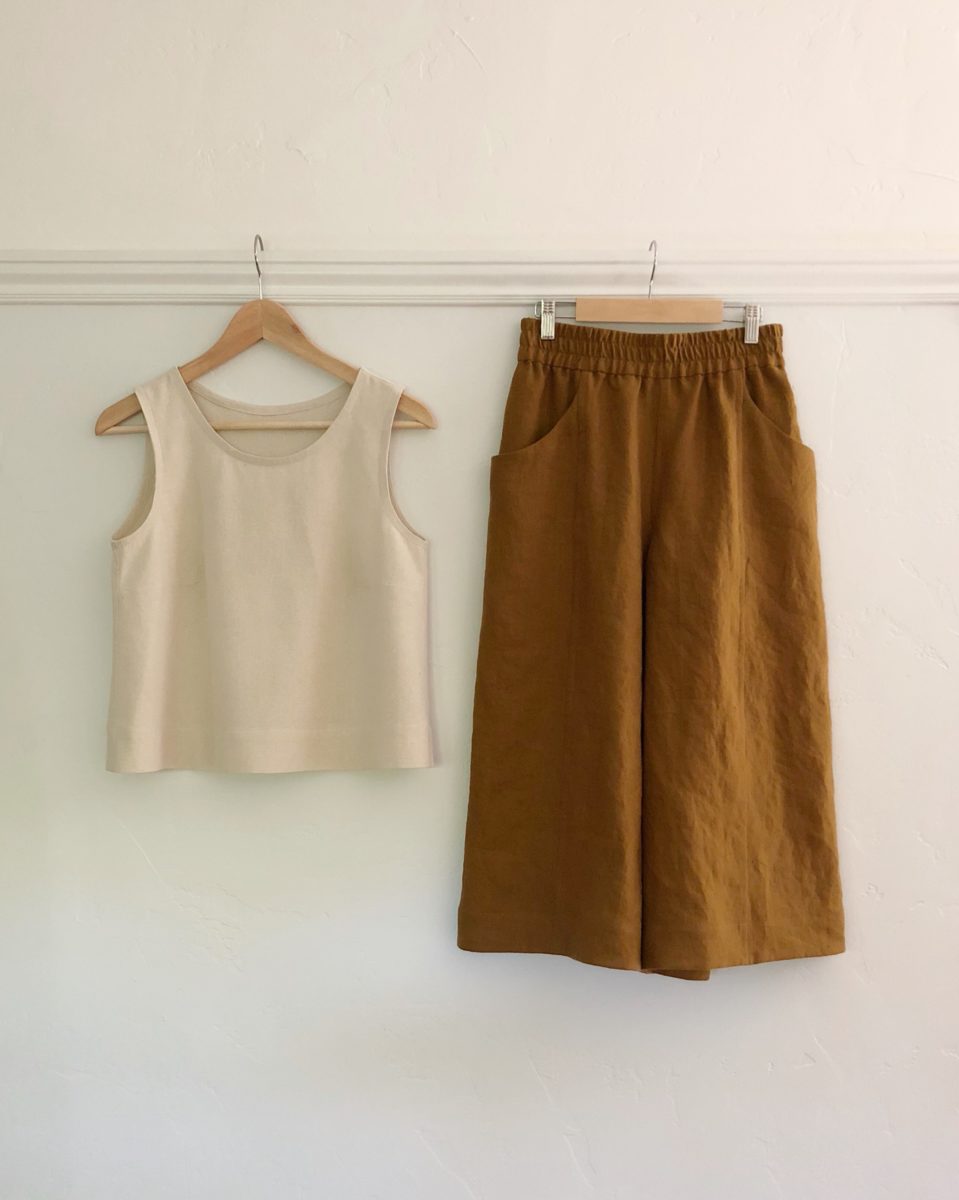
I batch cut out four projects the other night and this cropped Willow Tank and self-drafted culottes were in the stack. As I was cutting them out I thought there was no chance I could finish them in time, BUT I DID. With ample time to spare! The other two projects are a button up shirt for my husband and a Maya top.
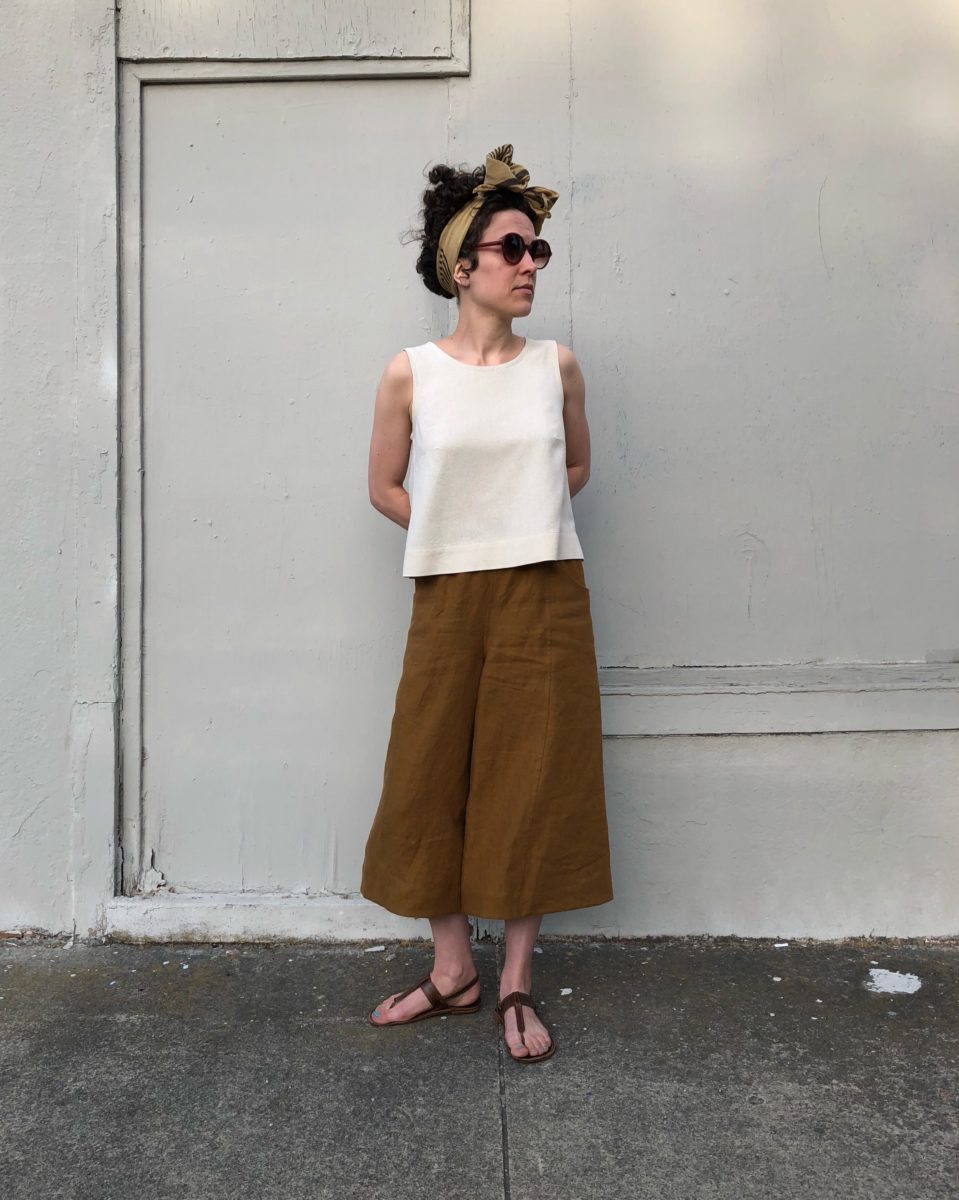
I followed Grainline’s tutorial to crop the tank and used leftover silk noil from my wedding separates. I thought it appropriate to wear a little bit from our wedding while on our honeymoon.
The culottes are from my first final skirt project in my pattern drafting class. The pockets are a little too snug over the hips but I’m impatient and didn’t feel like making that adjustment.
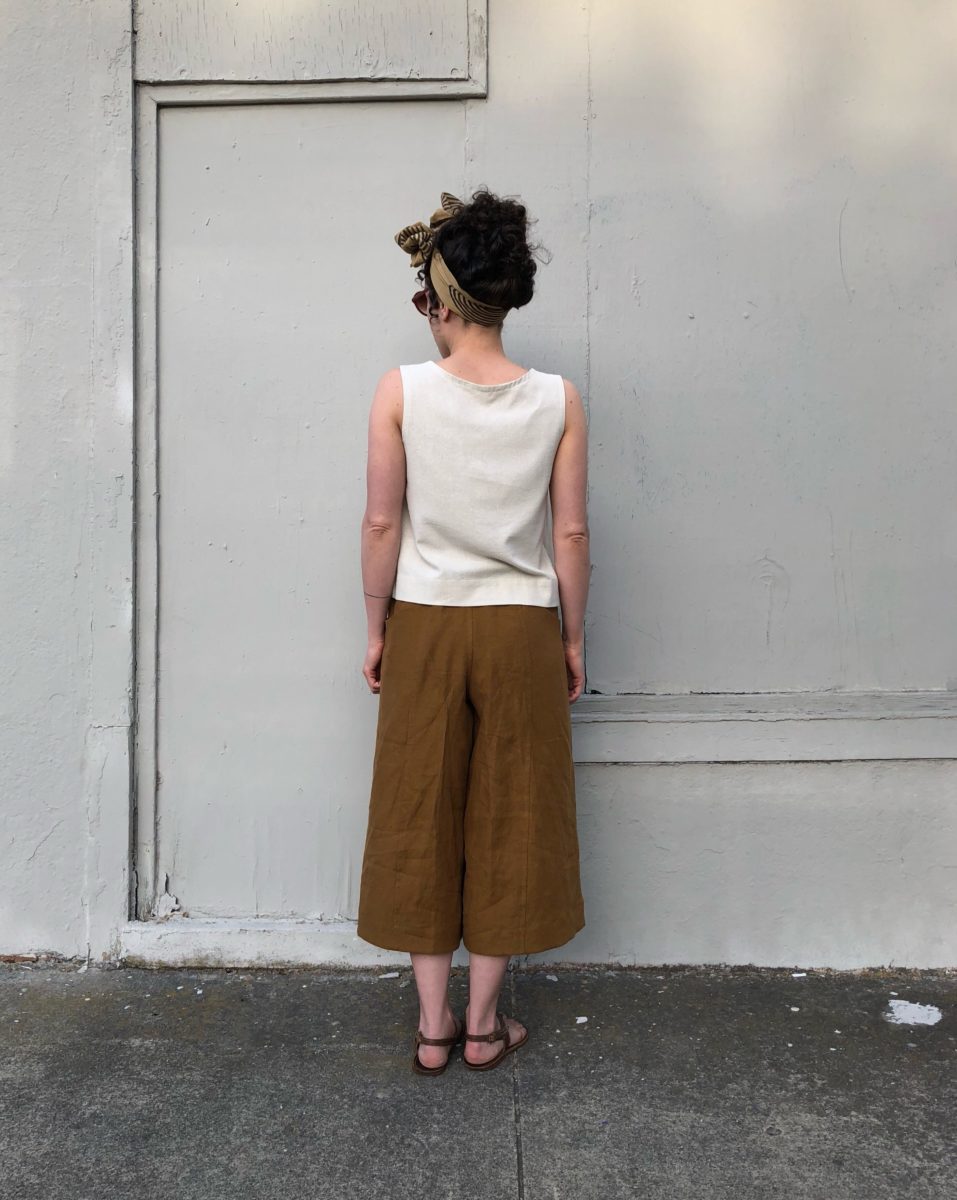
Both fabrics are from Stonemountain & Daughter in Berkeley, CA. They don’t currently have this linen in stock but I have it on good authority that they’re looking into it. Isn’t it just the yummiest color?!
Hoping to finish the Maya top, Fairfield Button Up, and Making Backpack before the trip!