Digital Organization

Leave a comment

I’m a pretty organized person. When it comes to physical things like my home and classroom, have I got systems. But when it comes to digital stuff, I’m just okay. I know which PDF sewing patterns I own and when I’m inspired to sew a pattern, I use my sketchbook to plan most of it out. But I was lacking in a system for collecting inspiration.

Instagram lets you save posts and organize them with collections, but you can only access those through the app. I’ve had a Pinterest account since it first came out, but it felt a little limited in what it could do (and the ads are annoying). Then a couple of days ago I realized Pinterest added a “Sections” feature to its boards and I ended up spending my Friday night re-organizing my whole account.

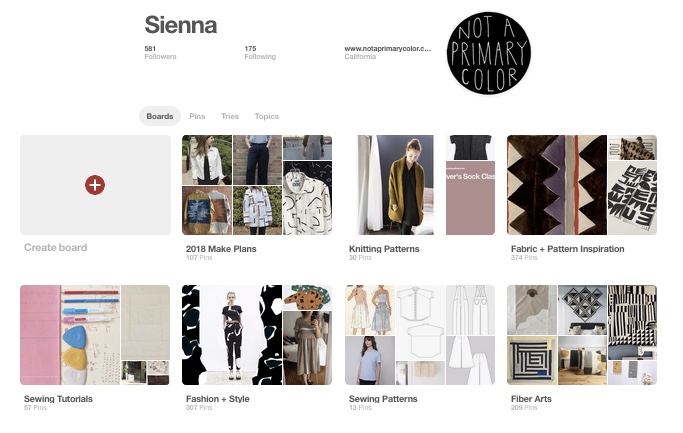
Since I’d had this account for years, it had quite a few pins that were no longer my style and entire boards that just didn’t make sense for how I wanted to use it now. As far as my making-related boards go, I pared things down to the following categories:

2018 Make Plans – I’m going to make a board for each year of the patterns I want to make (sewing and knitting). It’s divided into sections by pattern and will include RTW inspiration as well as others’ makes.

Fabric + Fabric Inspiration – This board has links to fabric I’d like to purchase (or just look at because they’re pretty) and a section of surface design inspiration for future blocking printing projects. Or if I ever figure out Adobe Creative Suite, my own fabric designs.

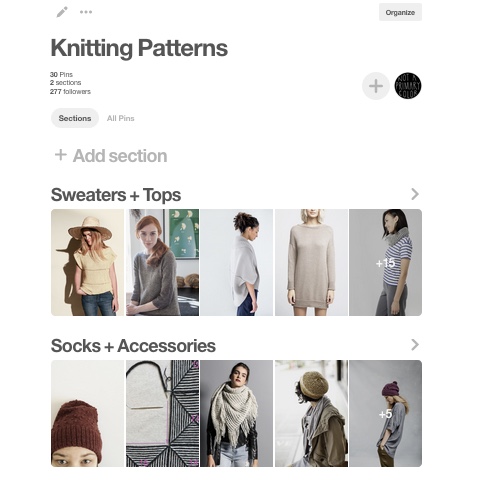
Knitting Patterns – This board consists of knitting patterns I don’t currently own, but might want to purchase in the future.

Sewing Patterns – This board also consists of patterns I don’t currently own, but might want to purchase in the future.

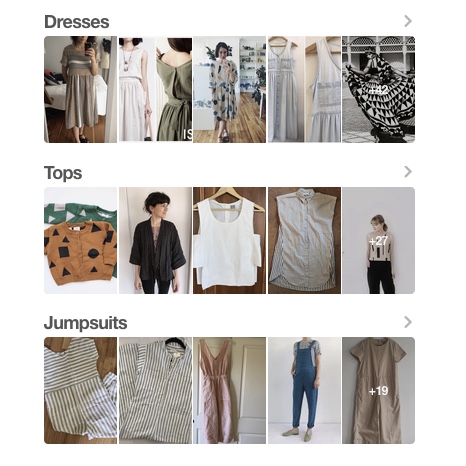
Fashion + Style – I’m quite excited about this board. I made sections for each type of garment. I’m planning to use this board to help my design process for my patternmaking class and for future making plans.

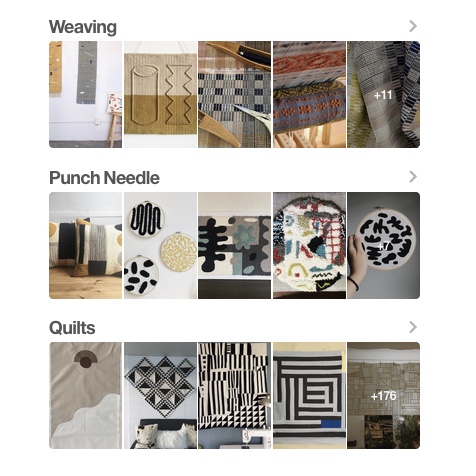
Fiber Arts – I also have an Art + Design board with media-based sections, but decided to make a separate Fiber Arts board. It includes weaving, punch needle/rug hooking, and quilt inspiration.

Sewing Tutorials – This board is a collection of links that help me sew french inseam pockets, bind a quilt, thread my serger, and etc.

All of my boards are linked if you’re inclined to check them out. How do you organize your inspiration and plan projects?

Pottery + Ceramics as Therapy

Leave a comment

Over the past few weeks, I’ve been doing a lot of purging of stuff. Maybe it’s the new year, maybe it’s my making practice, maybe it’s my partner (aside from his books and instruments, he lives a pretty minimal lifestyle). It’s definitely a combination of factors, but the making practice I’ve cultivated since teaching myself to sew in late 2014 has really influenced how I feel about stuff.

Making things with your hands feels so good. And wearing and using things you’ve made feels awesome. Empowering. Dope.

So I got rid of a lot of stuff. A lot. Like a car-full. The haul consisted mostly of things I hadn’t made but did include a few early makes that just weren’t my jam anymore. I thought about selling the good stuff, but the time commitment involved in that made me feel like everything would just end up back in my closet. So out it (almost) all went. The local thrift store got a whole lot of Anthropologie sweaters circa 2011-13.

First mug I made that didn’t weight a thousand pounds.

My closet now consists of handmade garments, ethically sourced and saved up for pieces, and secondhand. I think I’ll talk more about that in another post.

The purging and organization bonanza later made its way into my making space, which led me to realize I needed a way to view some of my favorite me-made ceramics. They had been previously hidden (yet still functional) in an IKEA RASKOG utility cart next to my sewing table.

They all hold making tools that I want quick access to, but I wanted them to also be showcased. So I bought a little plank of wood, spray paint and some pegboard accessories and VOILA. Now they’re in my face when I’m sitting at the sewing machine. I also made the hanging planter on the top left of the first picture. Good feels.

During purge-fest 2018, I listened to the Love To Sew podcast and learned about the Sewing Makes You Love Yourself challenge. Its goal is to highlight how sewing can make you love your own body and how therapeutic and healing the practice can be. And it’s true for me – sewing helped me get through the absolute dumpster fire year that was 2016, but so did drawing and pottery. So I’m changing things up a bit and declaring that making things with your hands makes you happy/love yourself. Not quite as catchy…

Pottery was my therapy during loss. I took an introductory 6-week wheel throwing class in February of 2016. I signed up because our 4 year old dog became mysteriously sick and we had to put him down mid-January. It was awful. And an empty couch on Saturday mornings was unbearable.

I picked pottery because I’d driven past the studio many times, it was something I enjoyed doing as a child/teen, and it seemed just the right amount of challenging to distract me from my sadness.

It worked. 6 weeks turned into over a year of weekly hours spent at the studio. Yes, I still cried a whole lot, but the public crying almost stopped and I didn’t hate my empty couch as much.

During that year and some change, I took the introductory class twice (I really liked my instructor and it’s HARD), a jewelry making class in which I made giant weird things my instructor wasn’t too fond of, and then did several 3 month memberships, which gave me a shelf for my stuff and unlimited access to the studio.

I also became friends with a fellow K-12 art teacher who was taking the class to inform her teaching. We don’t have the set up at my school for ceramics and I hated my job during the 2016-17 year, so the class was ALL FOR ME.

Taking any kind of a making class is such a good way to meet people if you’re new to a location, or just lonely.

Naturally sewing made its way in to my ceramics and I tried to make pattern weights. They were cool in concept and appearance, but definitely need some refinements for function. I believe these ended up in the donation pile…

All the stuff that didn’t get glazed because of my car.

I had to stop my membership after my car was totaled in early 2017. I had every intention of starting back up once school let out for the summer and I had recovered some of my savings that was obliterated by a surprise necessary car purchase. It didn’t happen, BUT this summer I WILL pick it back up. Therapy is expensive, but I’m worth it.

Wedding “Dress” Separates

3 Comments

In July of 2017 I got married. It was the most un-fussy wedding; we only invited our immediate families, had the ceremony at city hall, and then hung out at the beach all weekend. I highly recommend this route if the idea of planning a wedding makes you panic, like it did me. Also, holy crap do traditional weddings cost a lot.

But let’s get down to the essence of this post: what I wore. Initially, I planned to wear a vintage dress and shoes I thrifted in Tulsa, OK. After declaring this was the outfit, I began to rethink things in momentary bride-like fashion. Vintage didn’t feel like the current me and I had no desire to make a traditional dress I’d wear for less than a day. Making a traditional dress felt wasteful in both time and materials, but the making part felt true to me.

Enter wedding “dress” separates. I had recently made an Named dress and decided the cropped tee would pair nicely with a gathered skirt. This clean silhouette would allow me to wear a sweet statement necklace AND, most importantly both pieces could integrate into my everyday wardrobe. It also gave me an excuse to purchase my minimal accessories from two bad-ass women.

The much coveted Bryr clogs were acquired by pure luck. Normally, the studio has at least a 30 day waiting period, but this pair was in stock and I ran up to SF to claim them. If you’re a clog gal, this brand is worth every penny. They’re surprisingly comfortable and made in San Francisco.

I have been a long-time admirer of Fanny Penny‘s work and was also lucky enough to grab this necklace for the brief period it was in her online shop.

The top came together quickly but the skirt really tested my patience. I had my failing Brother machine serviced in the middle of making and it got dirty oil all over everything. Thankfully silk noil is pretty resilient and it came out/blended in with a wash.

The skirt shape I had in my head didn’t match any indie patterns, but it seemed simple enough to wing it. Boy, did I run in to a lot of problems. It was smooth sailing until the gathers, which took forever, then I sewed on the waistband and it was all messed up. I can’t remember the specifics due to blacking it out, but I do know I had already taken out all of the basting stitches before realizing everything needed to be redone. I think I may have even needed to recut the waistband… Anyway, it was a mess and I was running out of time and fabric. Once the waistband was finally attached, my machine couldn’t make it through the layers, so I had to abandon the pretty button plans. Then of course, after sewing on the hook and eye, I realized the inseam pockets I added to the sides weren’t evenly spaced. Oh well.

Even though the skirt proved to be challenging, I’m quite pleased I made the somewhat last-minute decision to make my “dress.” I’ve worn the top a few times, but would wear it more if I sewed the facing to the shirt or changed it to bias binding. I never grab a garment if it needs ironing and the facing ALWAYS flips up (probably because I didn’t interface it). The skirt hasn’t been worn at all since, but I’m blaming that on the weather.

Three Day Weekend

2 Comments

This weekend was a good weekend to reflect. I took some time to make some long term plans (moved this lil blog over to my swanky new domain name), did some deep cleaning and organizing (purged our closets), and started a new book: The Hate You Give. I’m still trying to read mainly women authors and this particular book feels very relevant to where we are as a country. Hoping we can drive out some of the darkness soon.

I did make what I was hoping would be a quick trip to Joann’s. It was packed and took close to an hour to get this linen and lightweight denim cut, but the coupons more than made up for it. I’m planning to use these fabrics to make the FINAL version of my culottes.

The Patternmaking & Design certificate program I’m pursuing is split into sections, the first being skirts. At the end of each section, students are required to design, draft, muslin, and sew two designs in fashion fabric.

I’m not a huge wearer of skirts so I was thrilled that my teacher allowed me to draft culottes as one of my final designs. The pockets are heavily influenced by the iconic Clyde pockets of Elizabeth Suzann. I wanted to see if I could take what I’ve learned and puzzle out their construction.

The first draft’s pockets (pictured above) were a little too droopy so I decided to hike them up in the final production pattern (I didn’t like having to bend over to reach the pocket bottom!). My goal is to finish both the production pattern AND sew them in fashion fabric this week before class next Saturday. Putting those words out in to the world to hold myself accountable!

Another thing I reflected on this weekend is how slowly I’m moving through the PM&D program. I really need to buckle down and figure out a system for completing the homework throughout the work week. I think documenting my progress and what I’m learning here will help.

First Finish of 2018

1 Comment

Pattern: Unfolding Jacket by @shopwiksten for Making Magazine vol. 4. I’ve heard that it will be released by Jenny as a stand alone pattern in late Spring. The magazine is totally worth buying though. It has SO. MANY. GREAT. PROJECTS.

Fabric: Main & Lining is a thrifted loose weave fabric. Unsure of the content, but guessing it’s a linen/cotton blend. I’ve had it for years and I’m glad I finally found the perfect pattern to pair it with.

Size: XS

Mods: None, other than forgetting to interface the collar, which I don’t recommend.

IMG_1278

I started my second Unfolding Jacket in late December right after returning from an unsuccessful trip to the airport. Many delays and future missed connections meant surprise extra sewing time. I was able to finish everything but the collar before leaving.

As mentioned in the last post, I left the black and cream cotton ikat version of this jacket with my mom making me VERY motivated to finish this one when we returned home.

Normally, I have better habits and interface all necessary pieces before moving on to sewing. My extreme excitement to finish and the time away from it caused me to forget this step. I think it’s not as disastrous as I initially thought, but you can see that the collar doesn’t quite have enough structure to fully roll in the picture above.

After making the first version with the modified pockets (set into side and collar seams), I intended to make the same changes on this one. However, the pieces were already cut out (I’m trying to batch cut things on weekends) and since the lining is from the same fabric there just wasn’t enough to re-cut all 4 pocket pieces.

Even with my new Bernina my topstitching skills are a little wonky (hoping to buy a new foot for this soon), so I was a little worried about needing to do the patch pockets. No pockets was not an option so I pushed forward, learned how to do bartacks, and think they look great!

I’m really enamored with this color combination. I paired the jacket with a pair of Emerson Crop Pants (pattern by True Bias) and a knit Lou Box Top (pattern by Sew DIY). The earrings are my new favorite pair by Baleen which I picked up at Dear Golden while in Ann Arbor.

IMG_1325