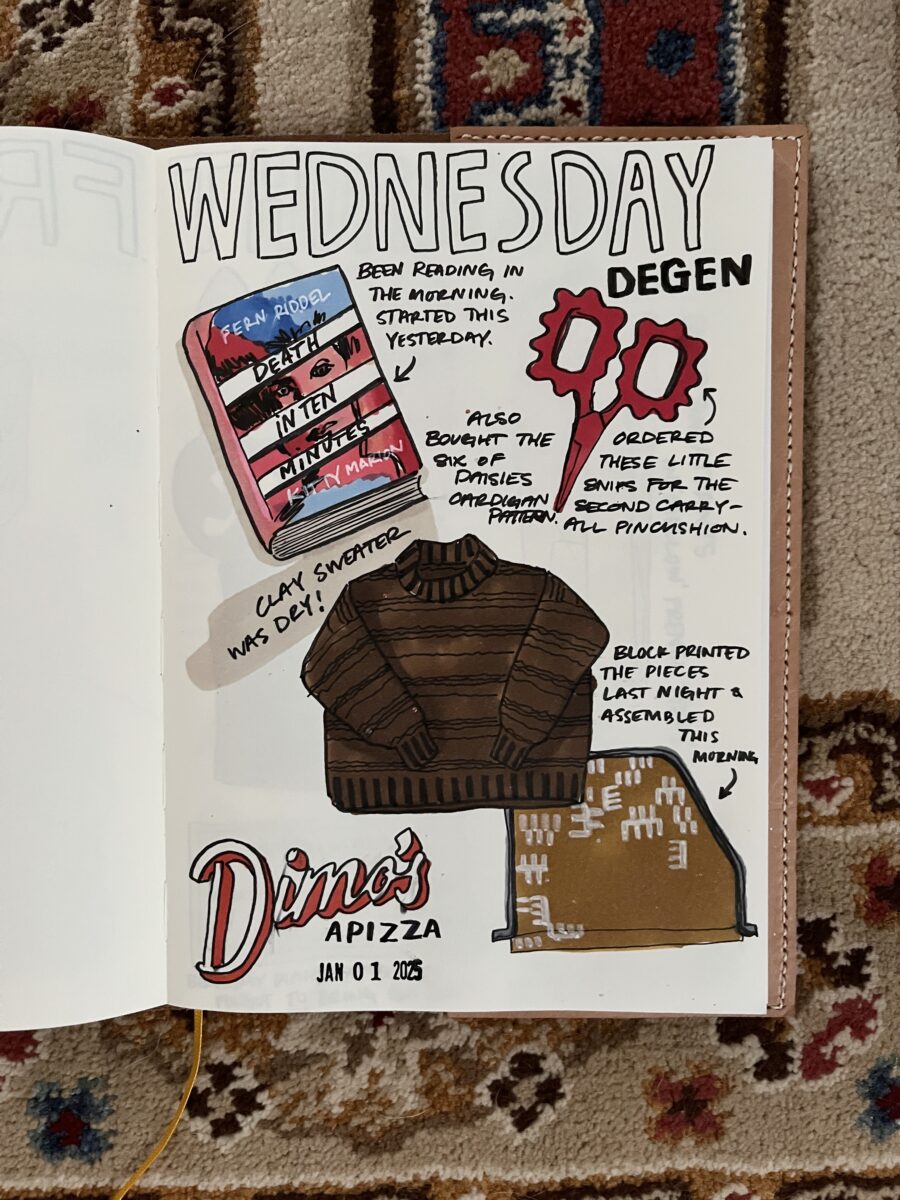
Things feel dark as fuck, but I’m still making shit. I hope you are too.
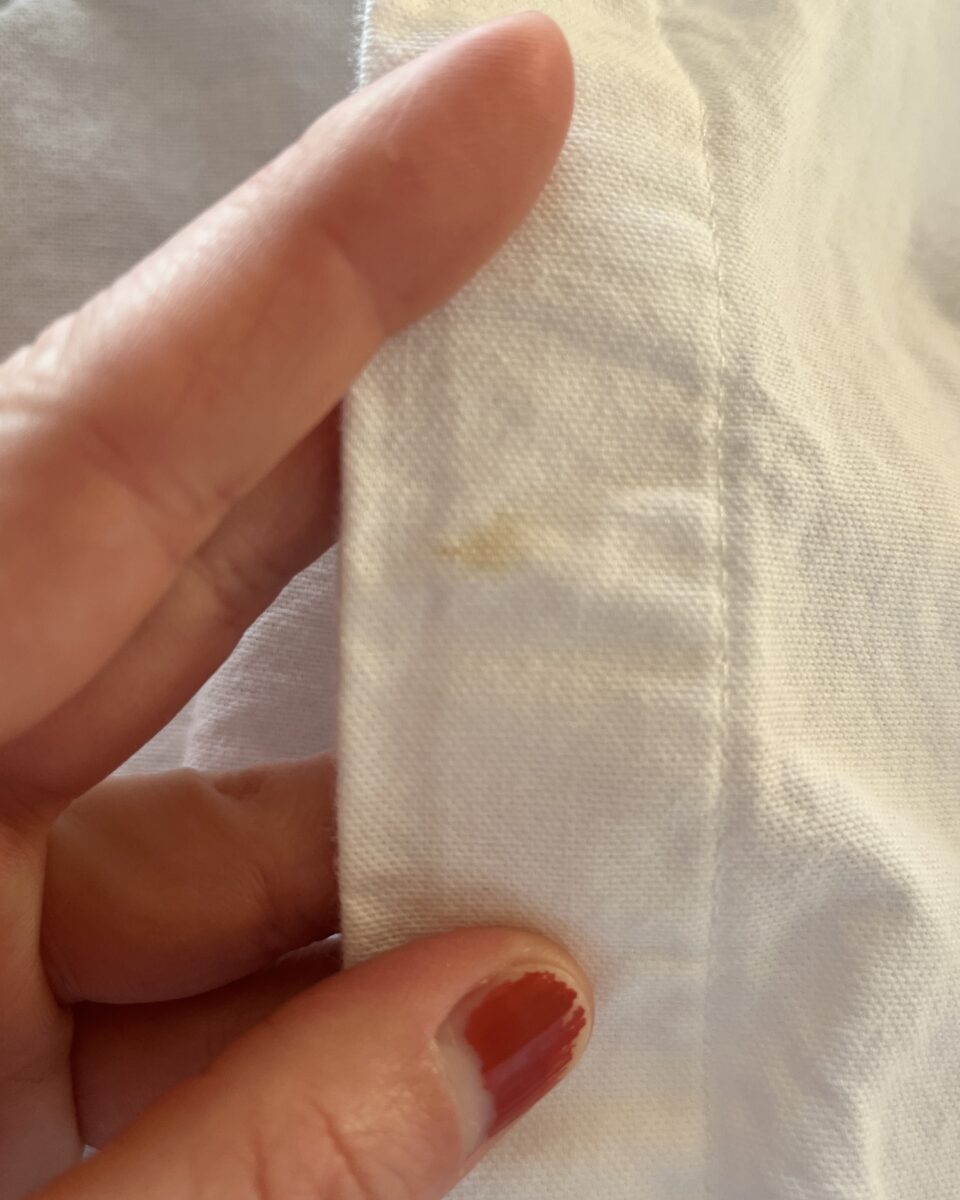
A very stained shirt.
After years of flawless use, my go-to washable marker let me down. On a white shirt, no less. I also used the shittiest interfacing I have in my stash and it has not held up to the numerous stain remover and bleach baths this shirt has been subjected to.
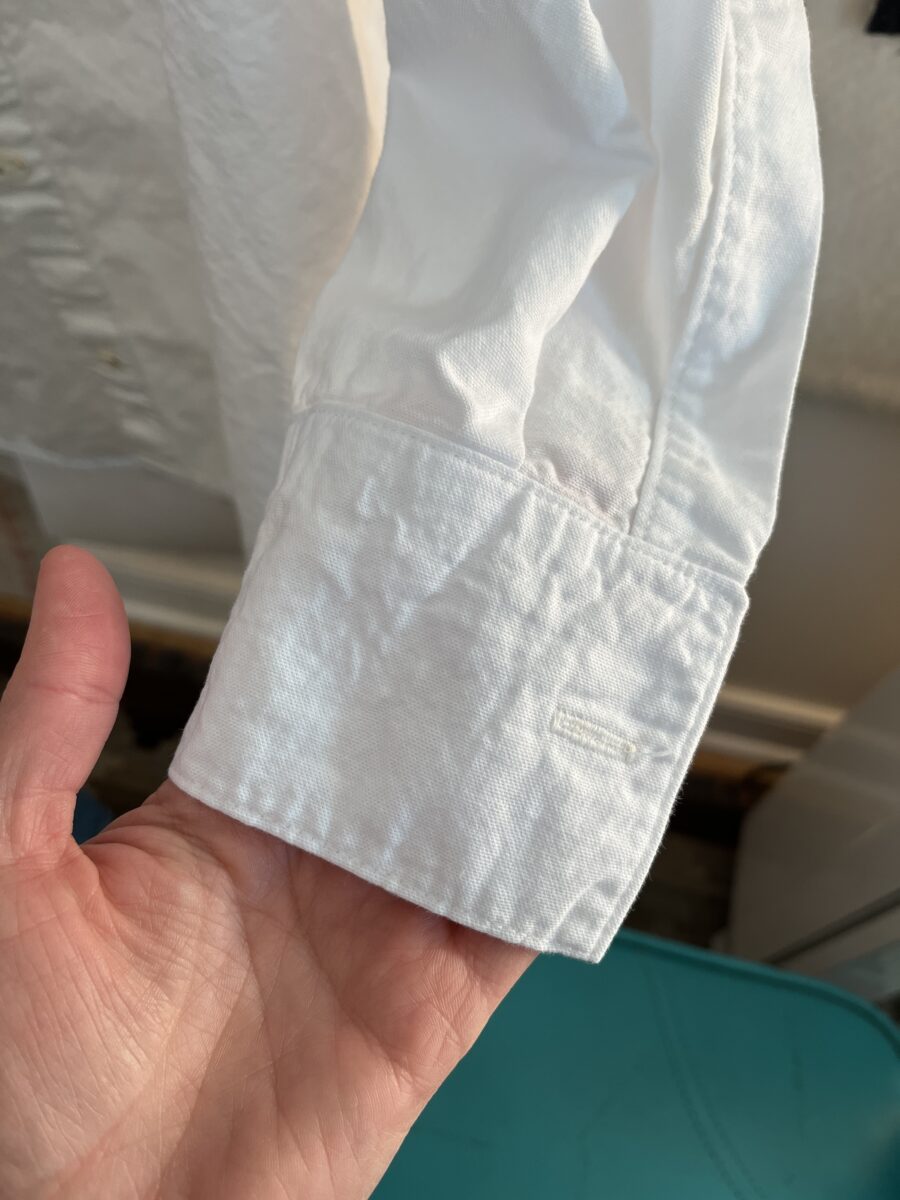
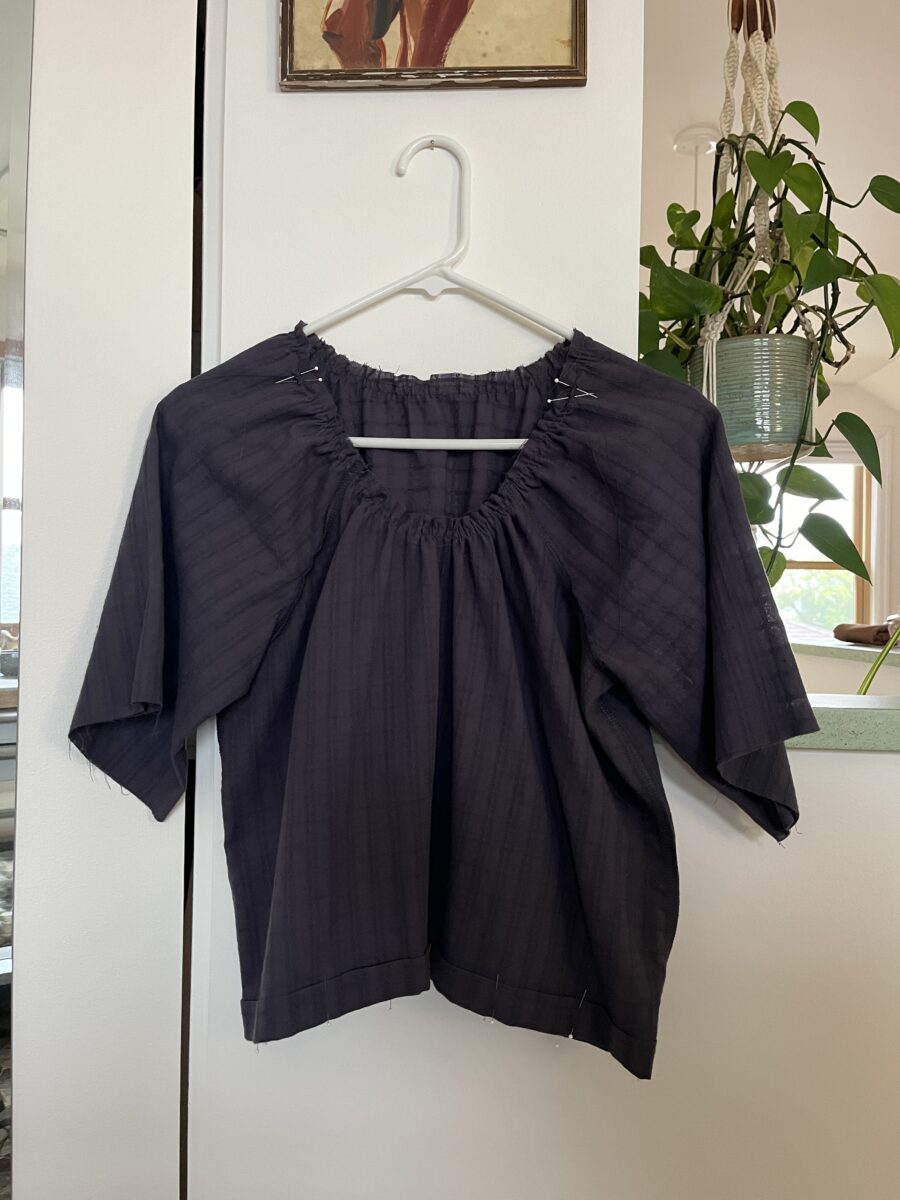
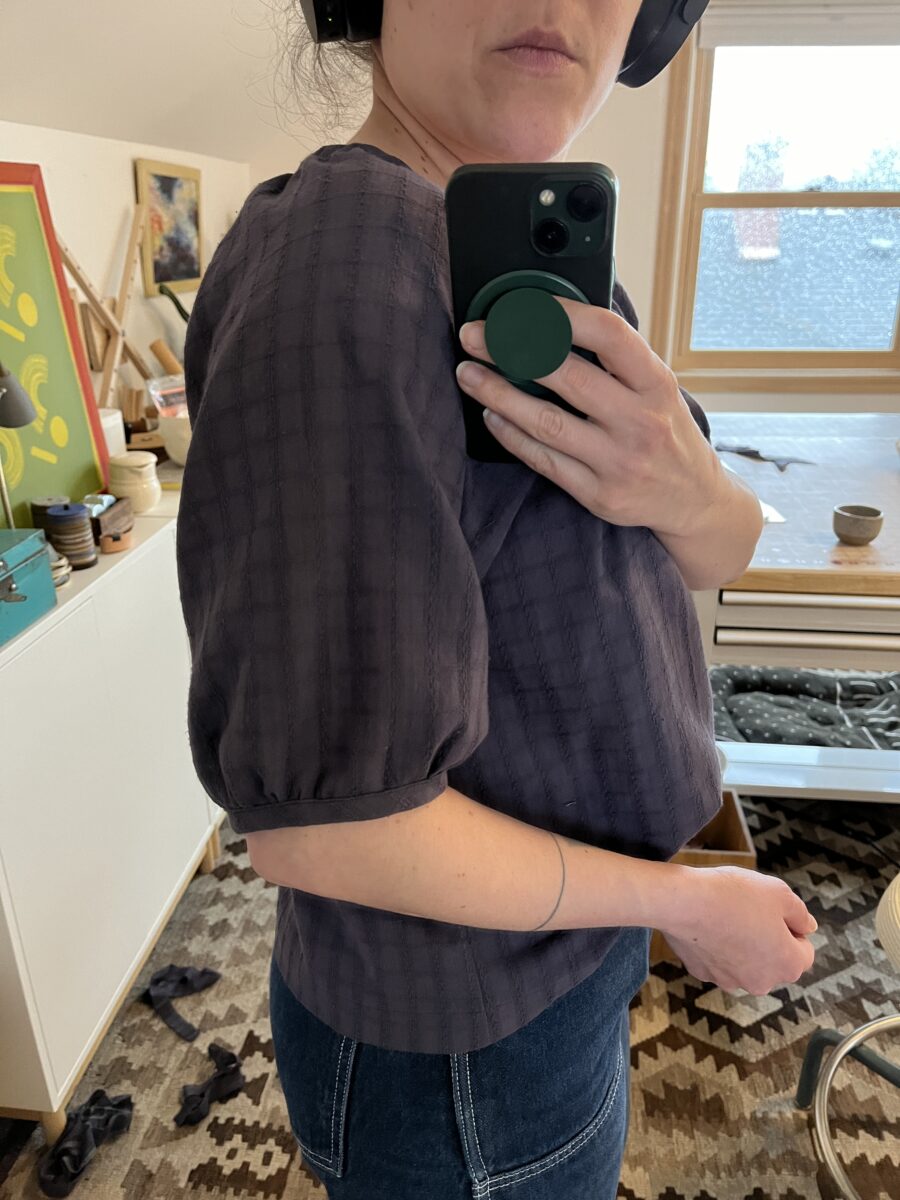
It’s the Closet Core Jenna. It was worked on over a few months and I plan to make a light-ish weight denim version soon. I learned how to do the burrito method on cuffs and waistbands when I was taking patternmaking classes in Oakland, CA but had never tried it on a collar before. IT WORKS SO WELL!
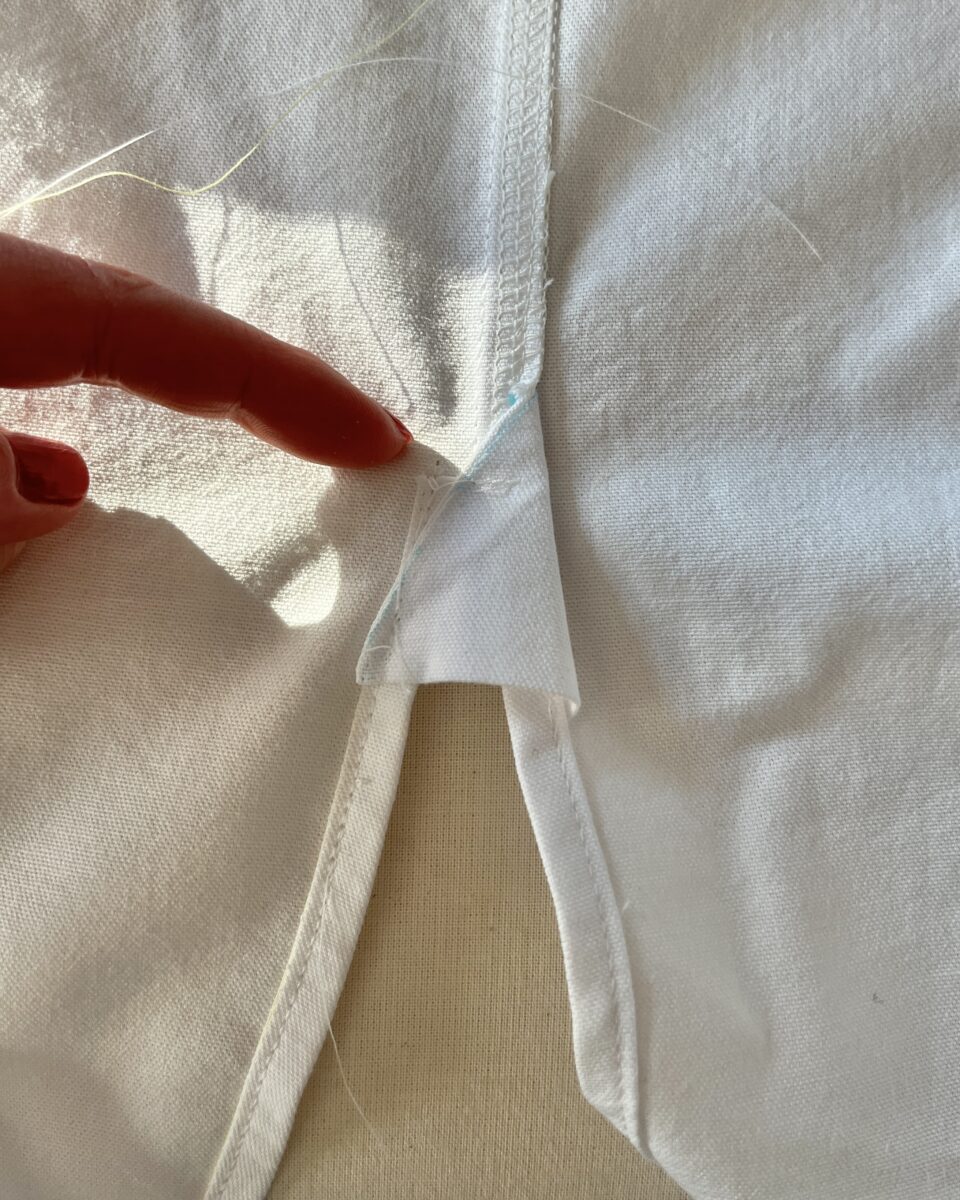
My one pain point in the construction was hem gusset. There’s no way to stitch it down neatly. The white fabric is a little sheer, so there was no hiding that it doesn’t quite line up with the shirt hem. I took them off and I’m kinda mad about it.
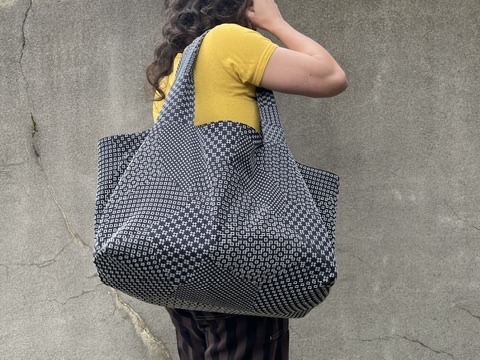
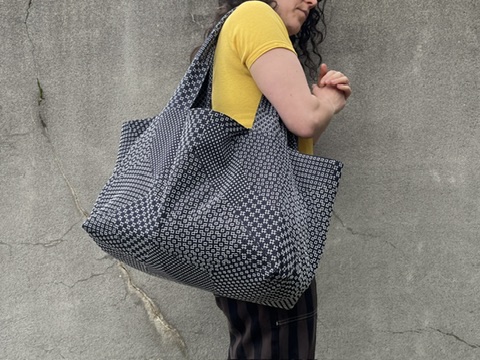
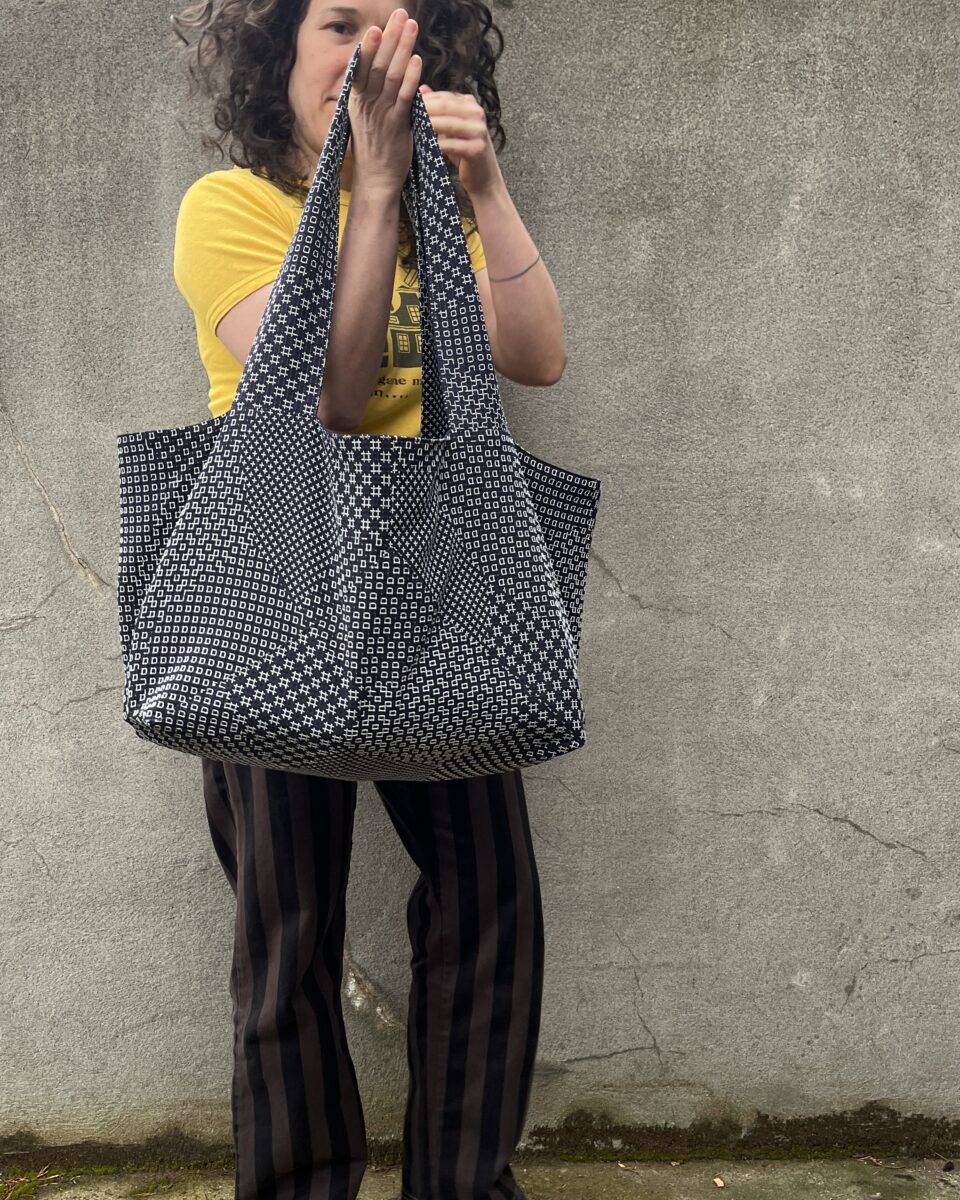
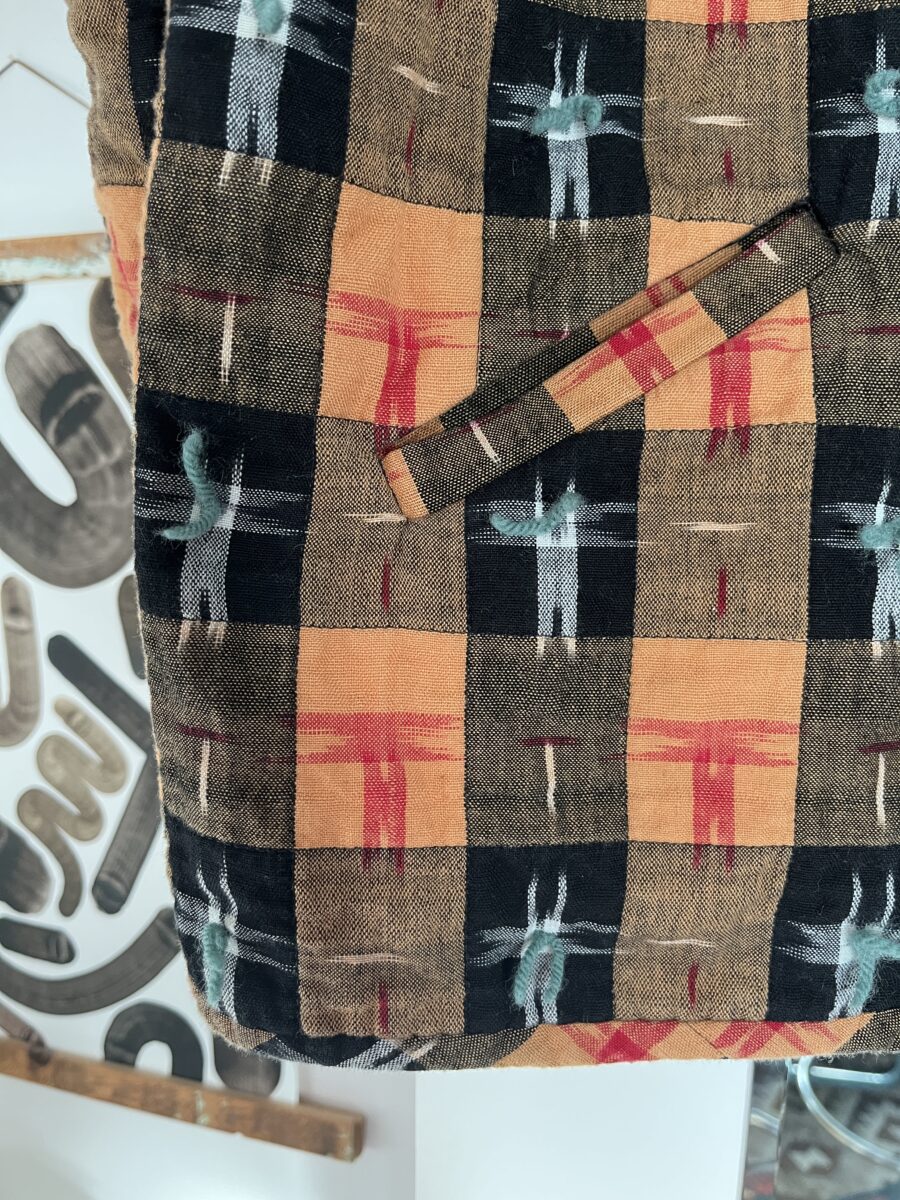
A very big bag.
I’ve been toting a lot of things back and forth from the office. Several paper bags have ripped on me, so I made this huge tote out of this really fun Japanese fabric my husband bought me a few years ago. I added a lining too.
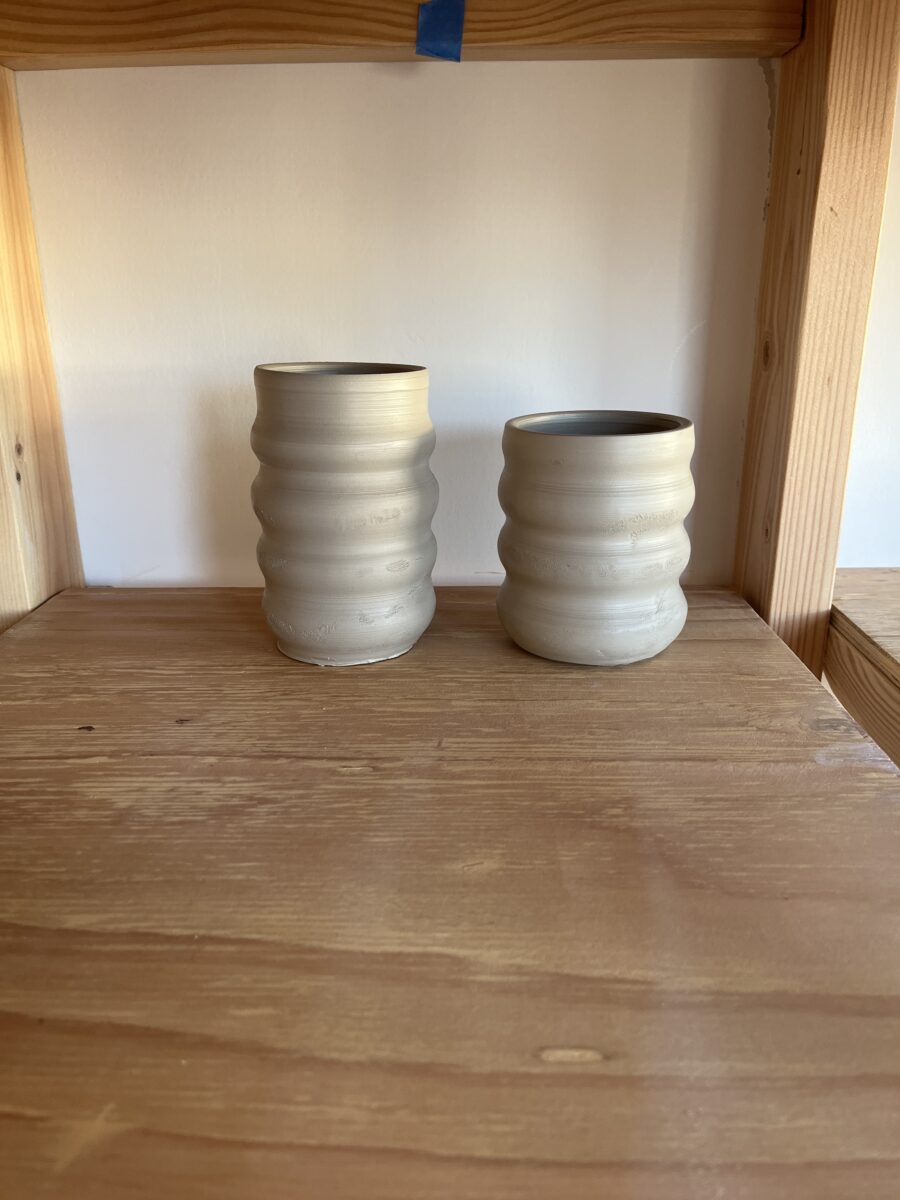
A very lumpy mug.
Who doesn’t want to press their lips against ceramic lumps? I’m not sure why I went with this texture, but I did. It kinda reminds me of a corn cob.
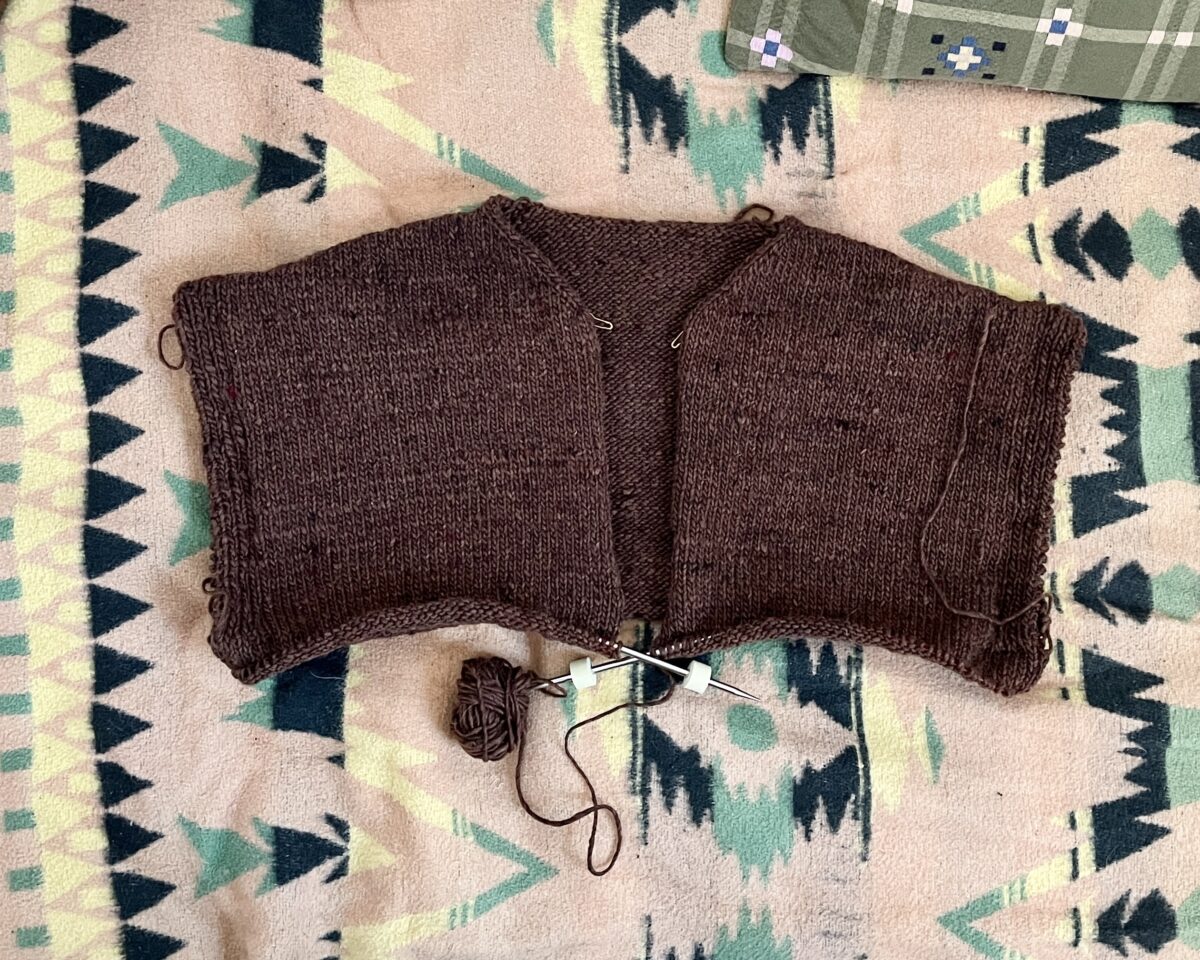
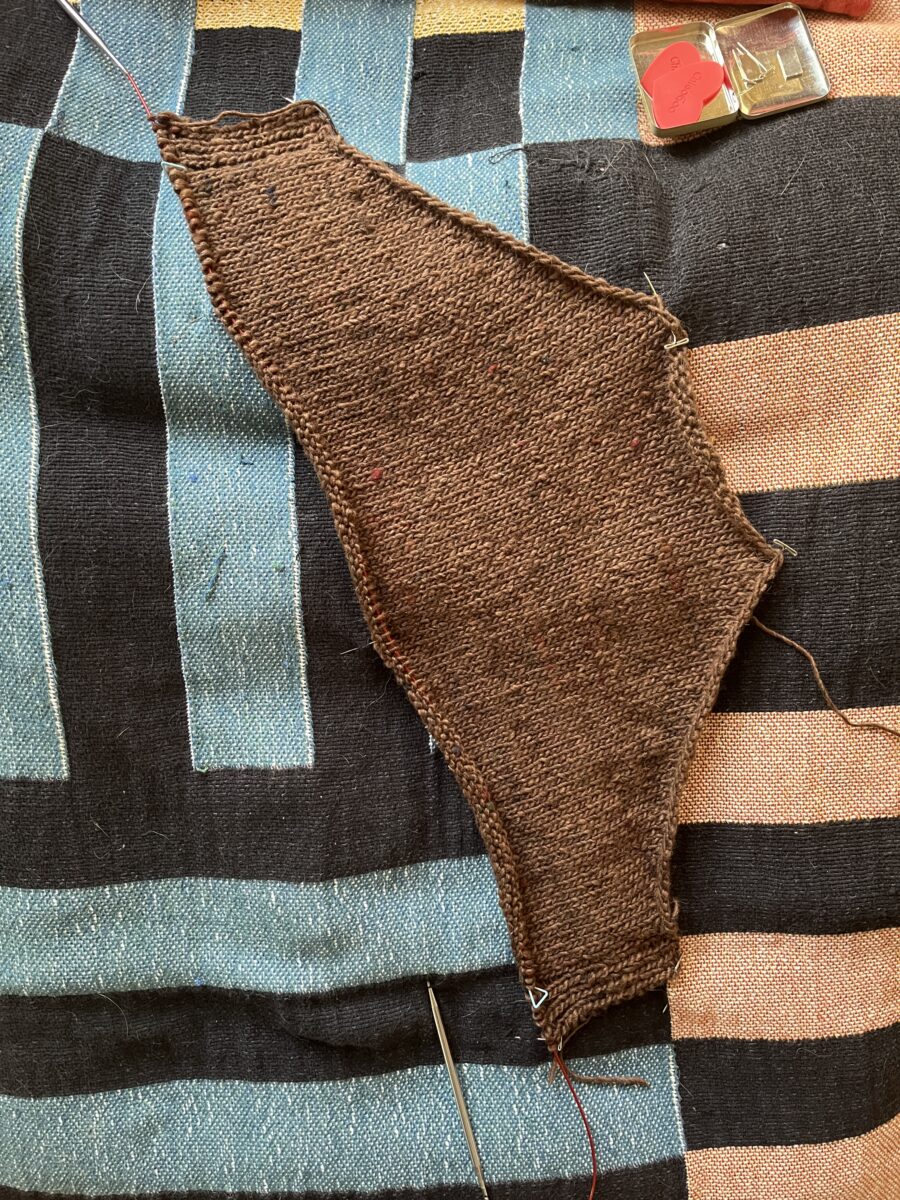
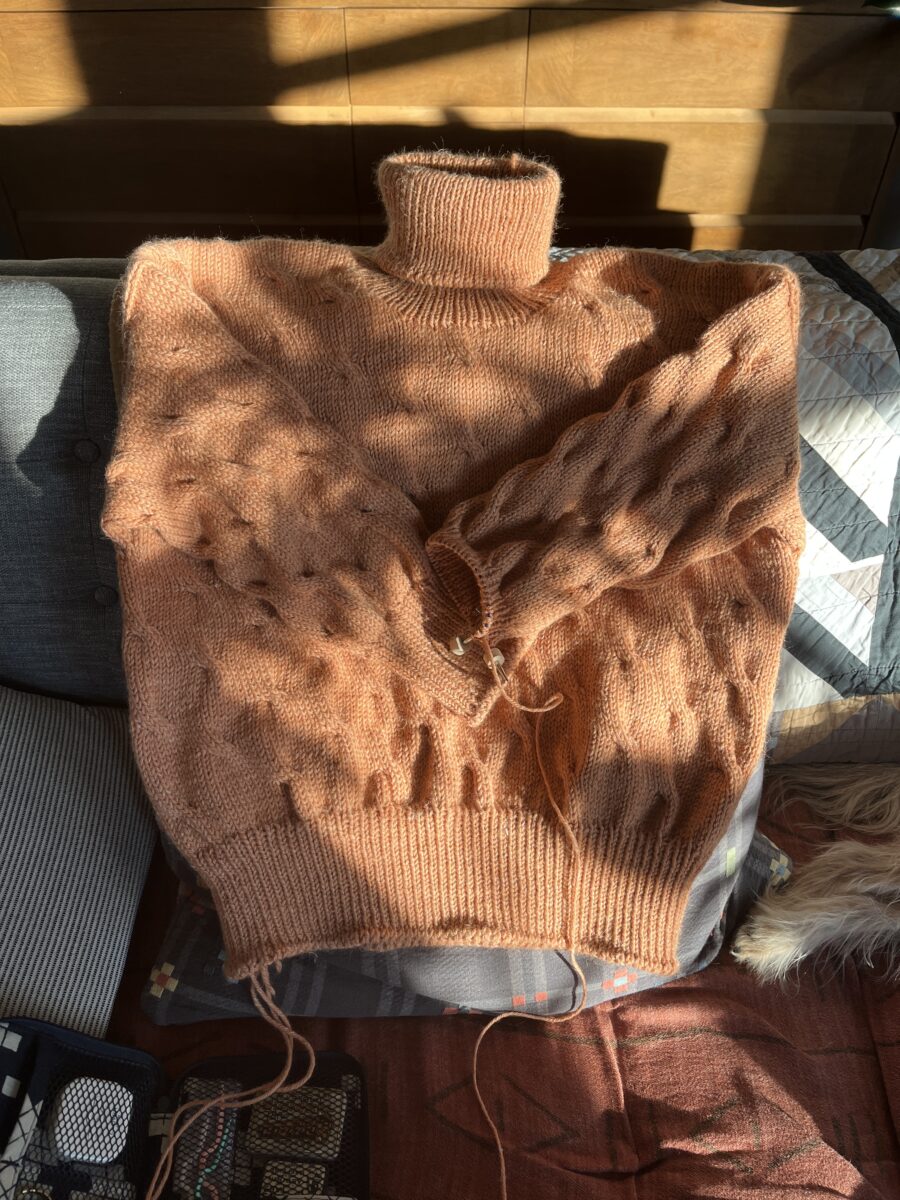
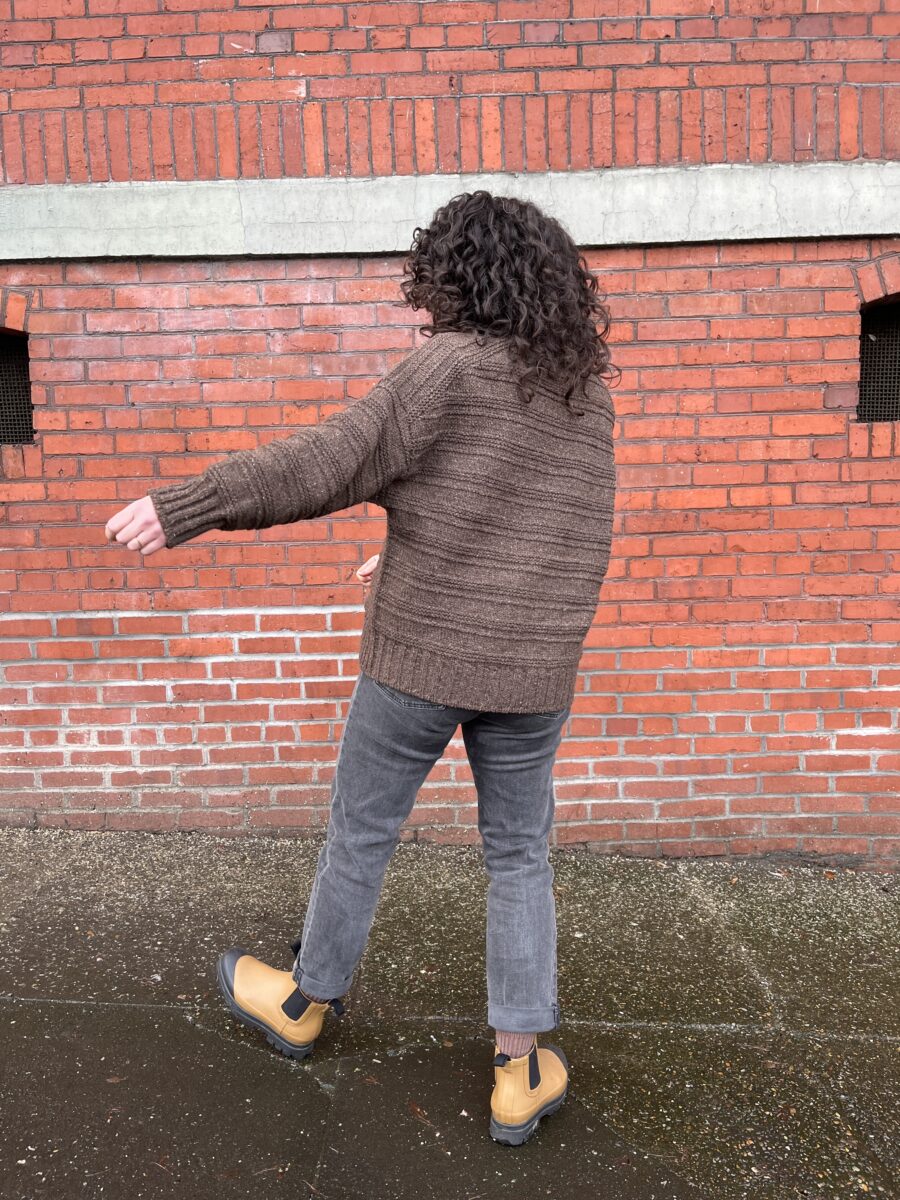
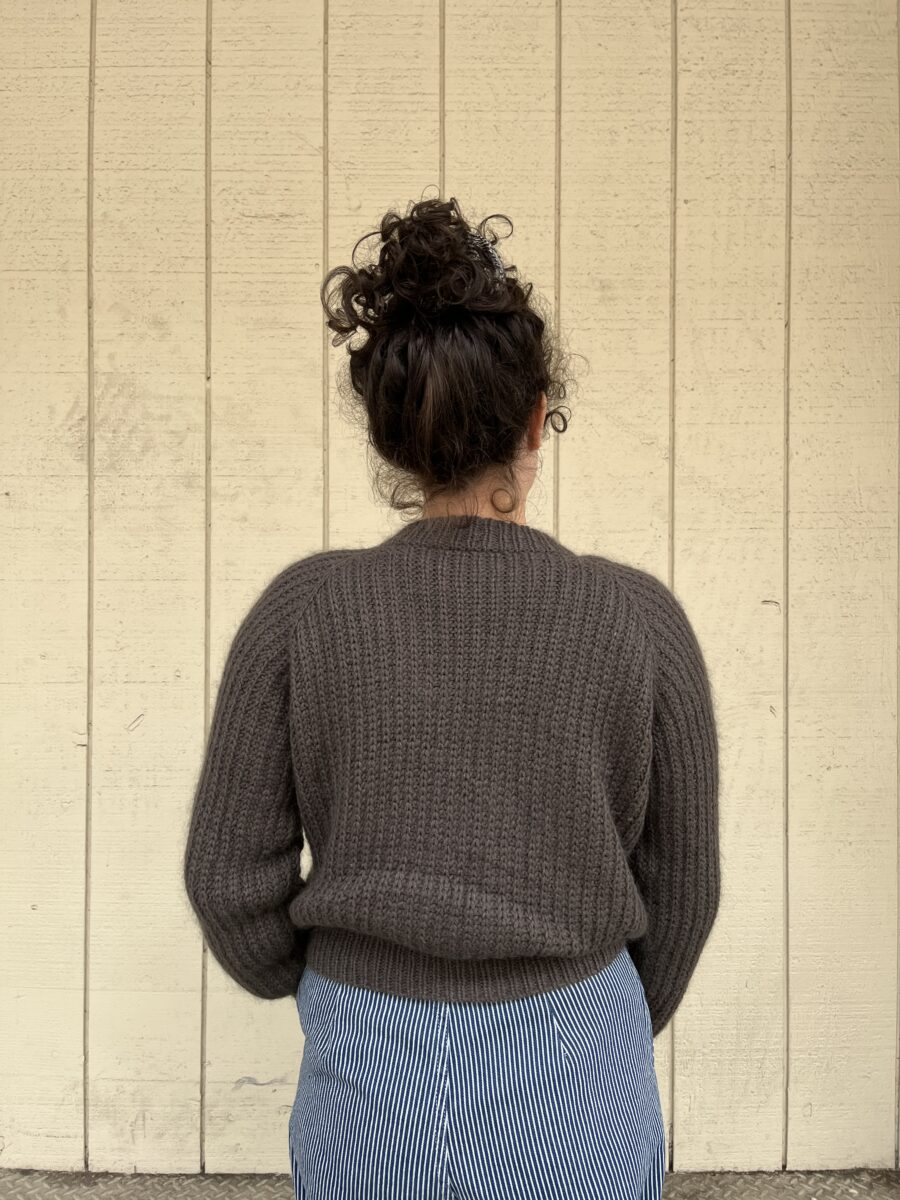
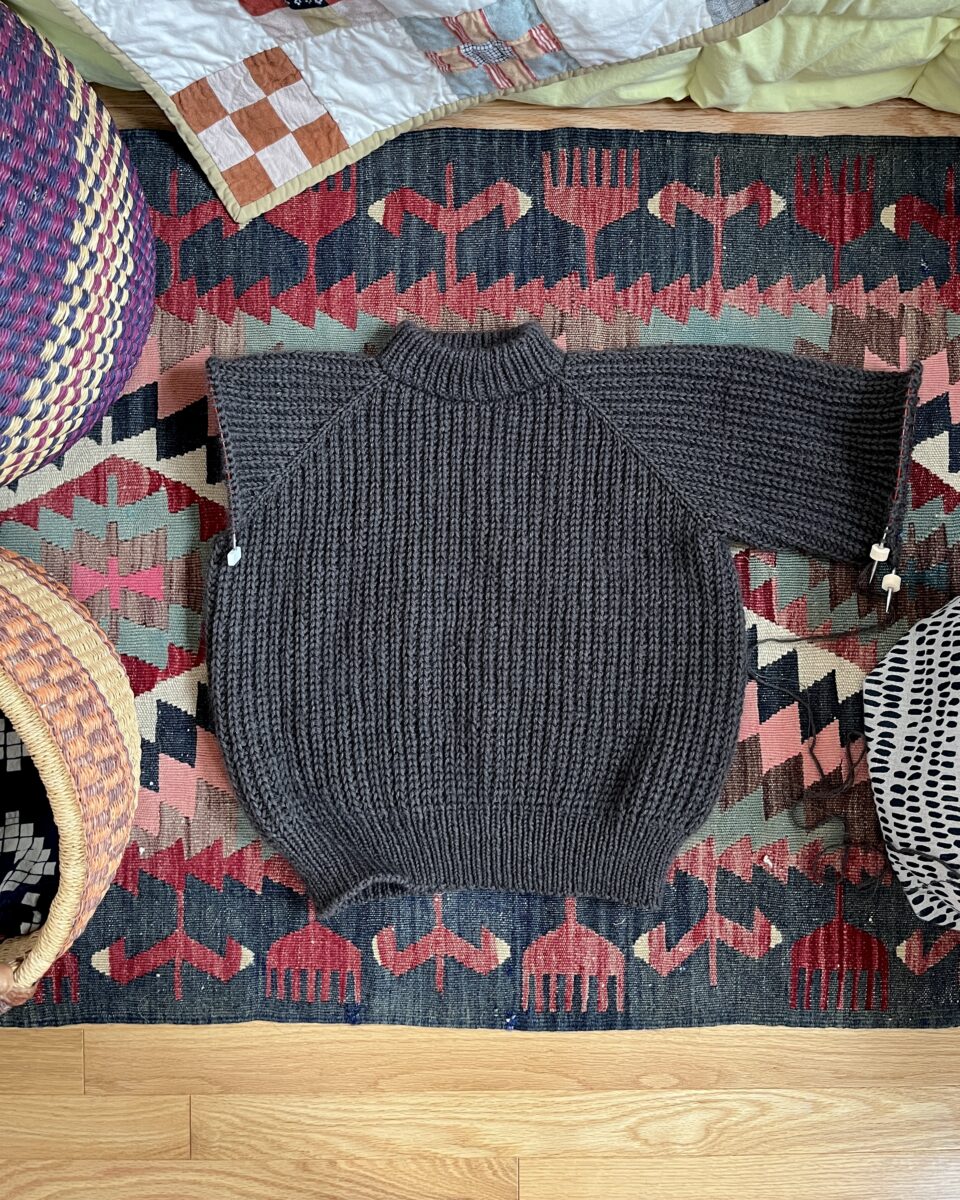
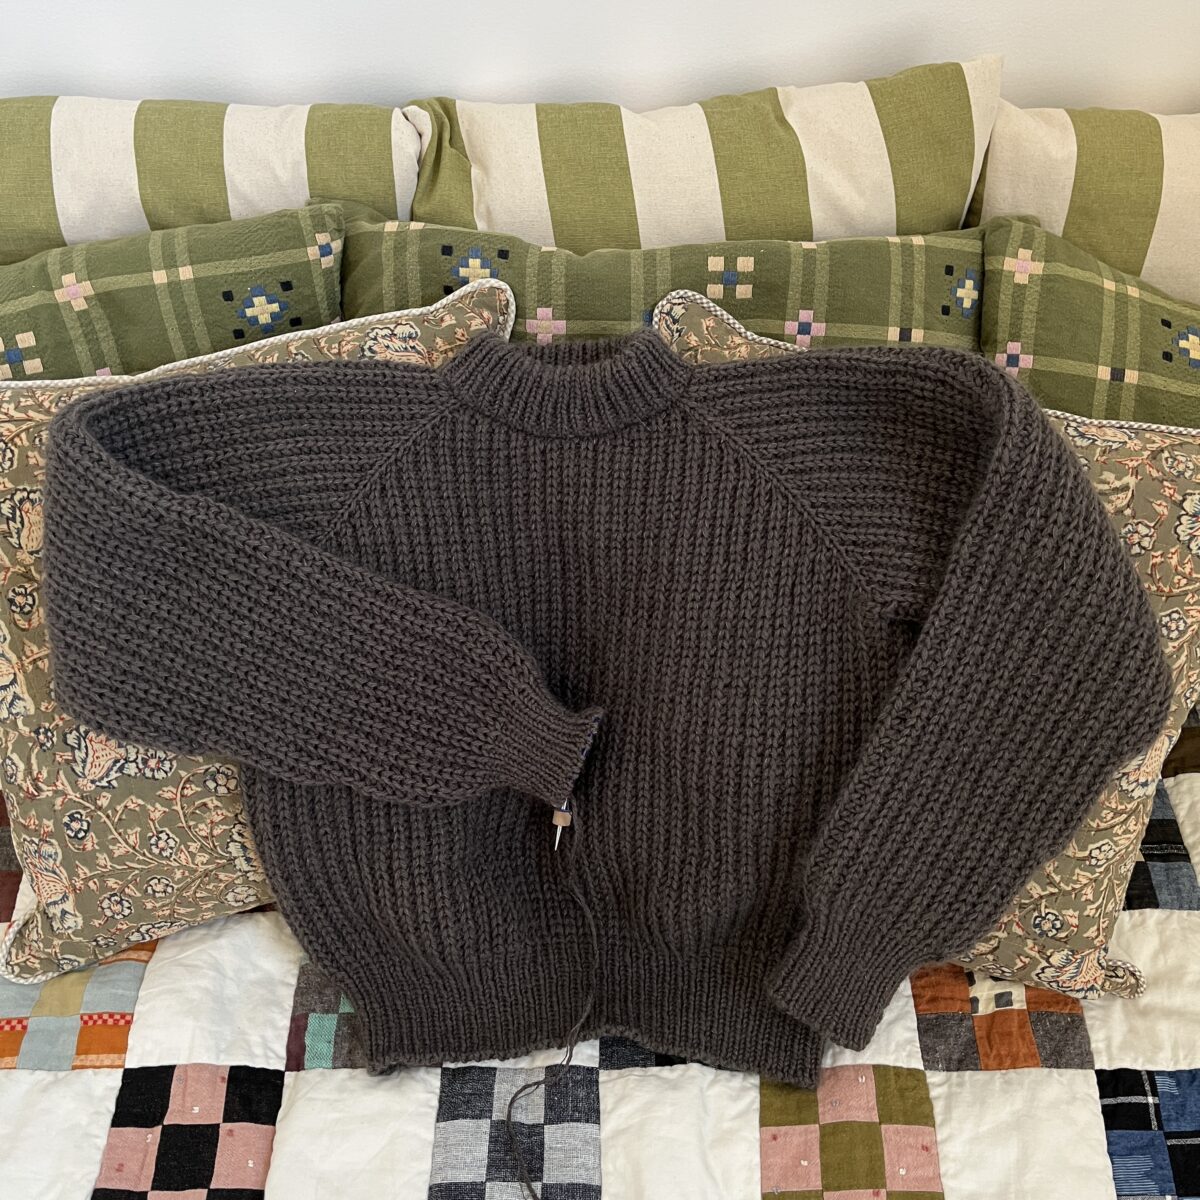
And another brown sweater.
I like what I like. Finally joined the fronts and back together – there’s only 7″ inches before I can start the ribbing.
In an attempt to be productive while dissociating, I am prioritizing daily creative acts. And I’m going to try to document some of it too. Last week felt especially creative, so here’s what I did.
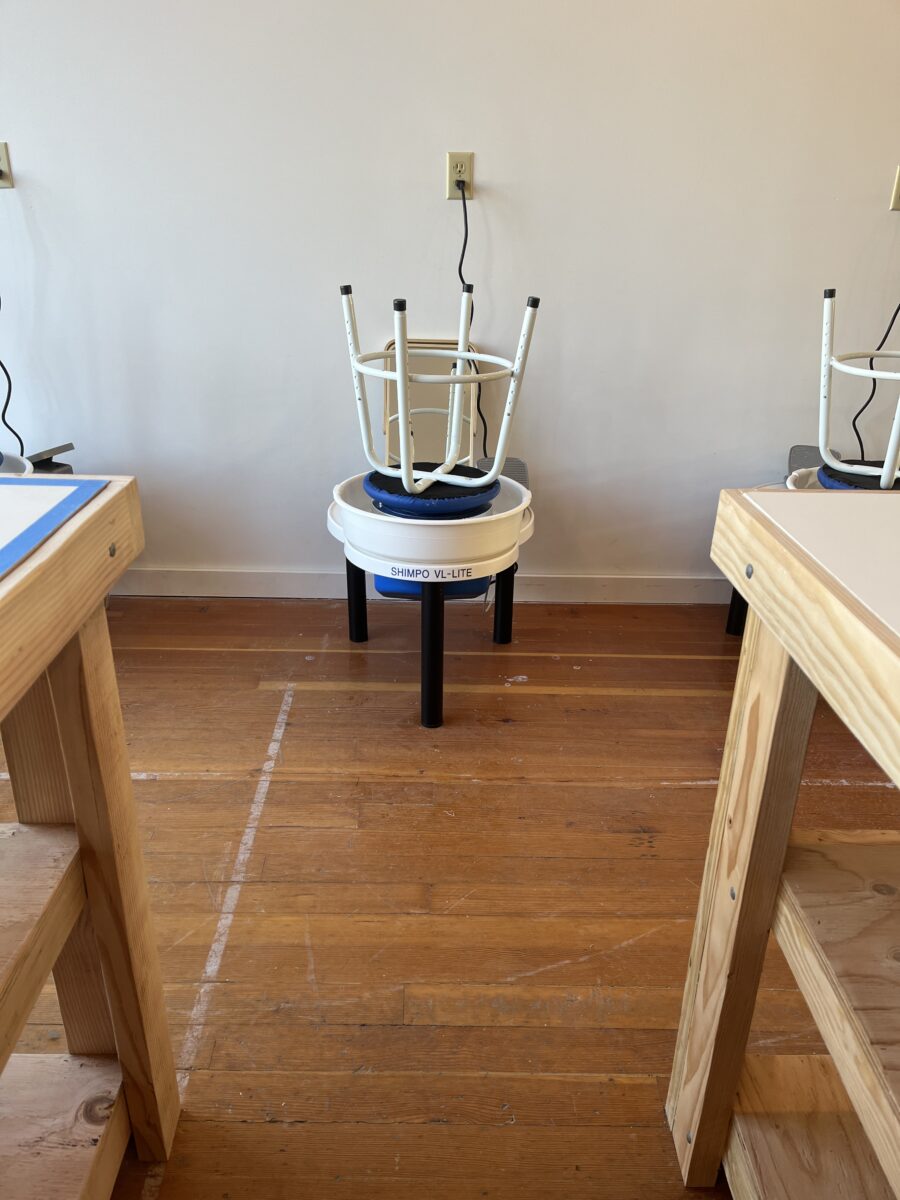
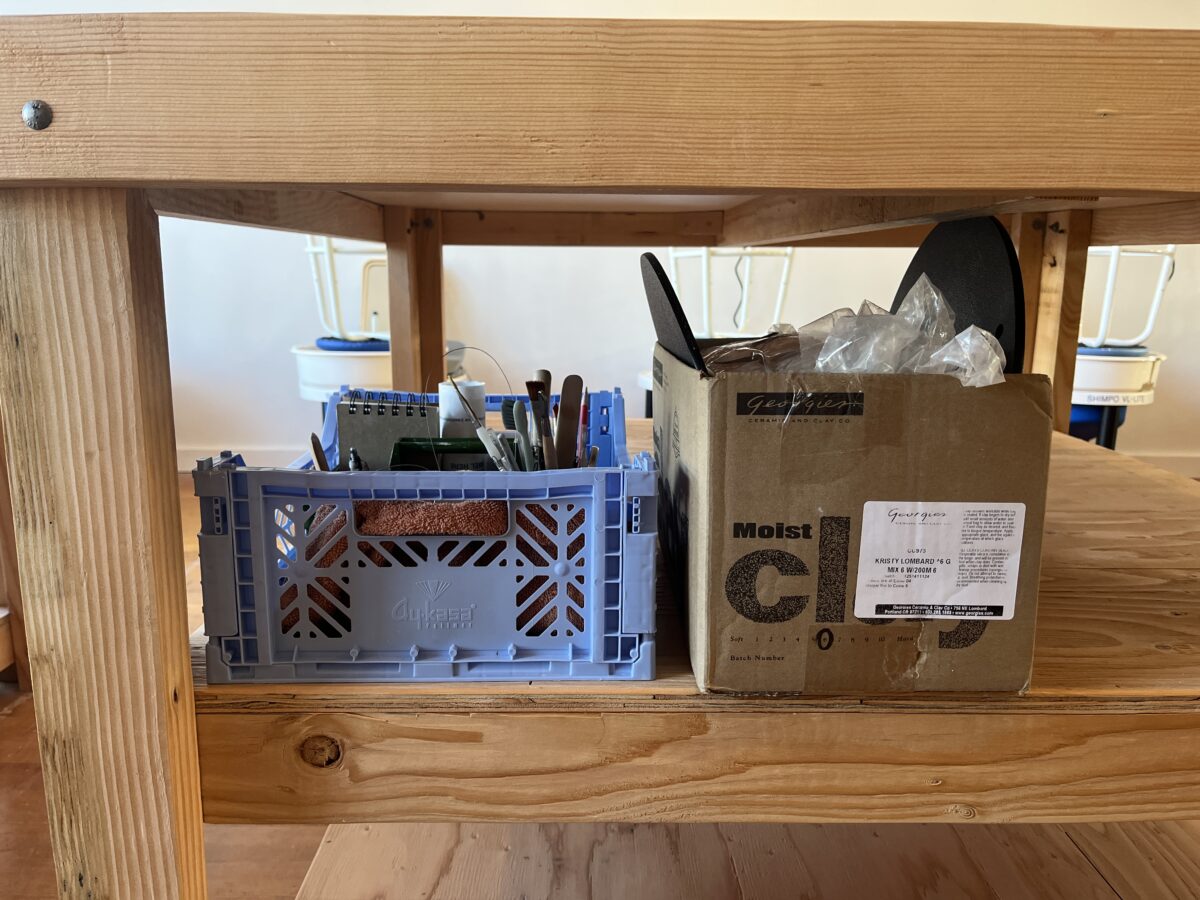
Fine Things Community Pottery Studio
I joined a brand new studio and successfully threw two pots! I feel really nervous not having the traditional support of a class, but I’m excited to explore some ideas outside of the scope of local classes. Here are the things I’m planning to work on:
Nerikomi patterned pieces (this technique excites me so much)
Tiles for my fireplace renovation
Chess set for my husband
Hand-built plates using MDF forms I eventually make
A tabletop lamp?
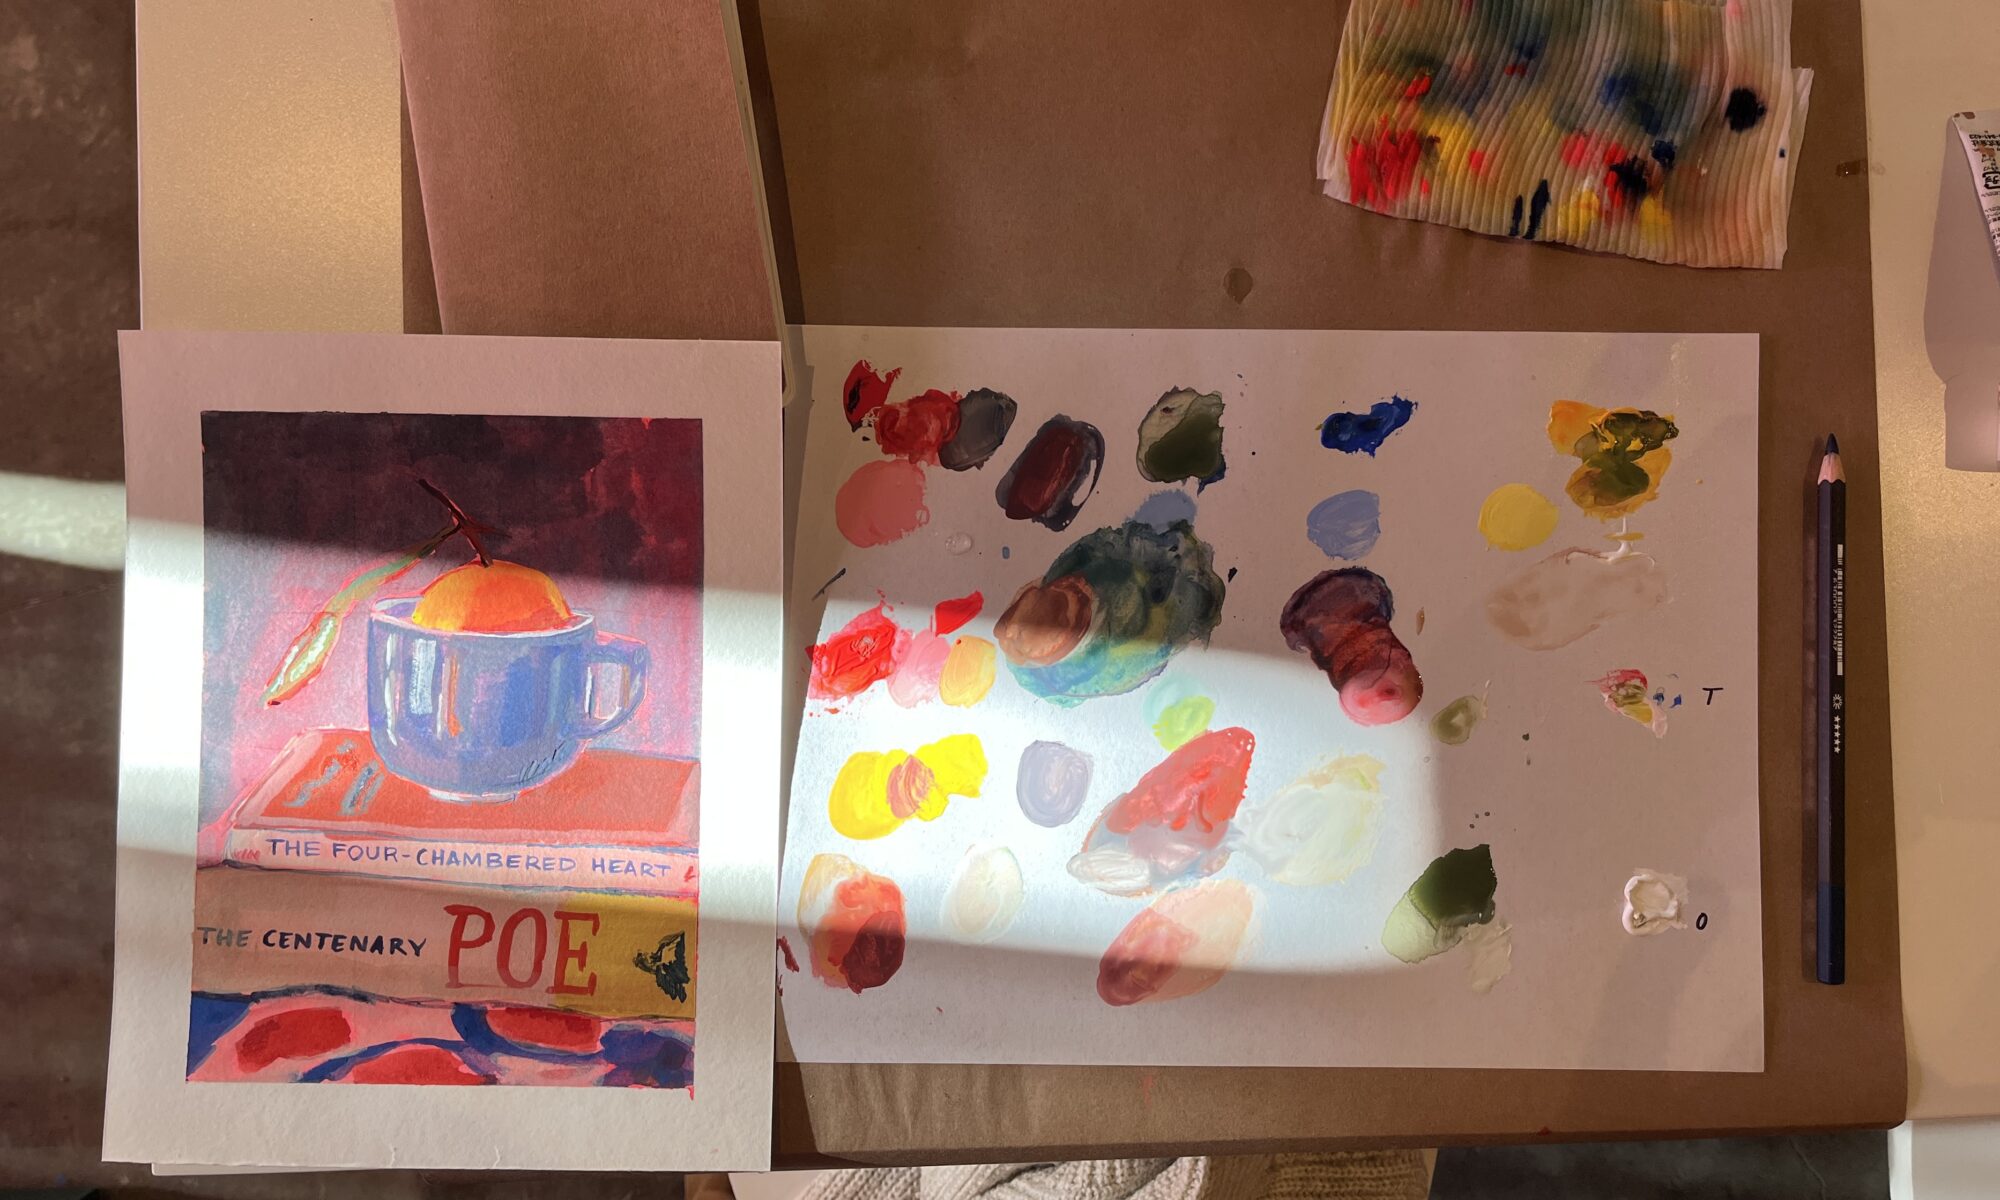
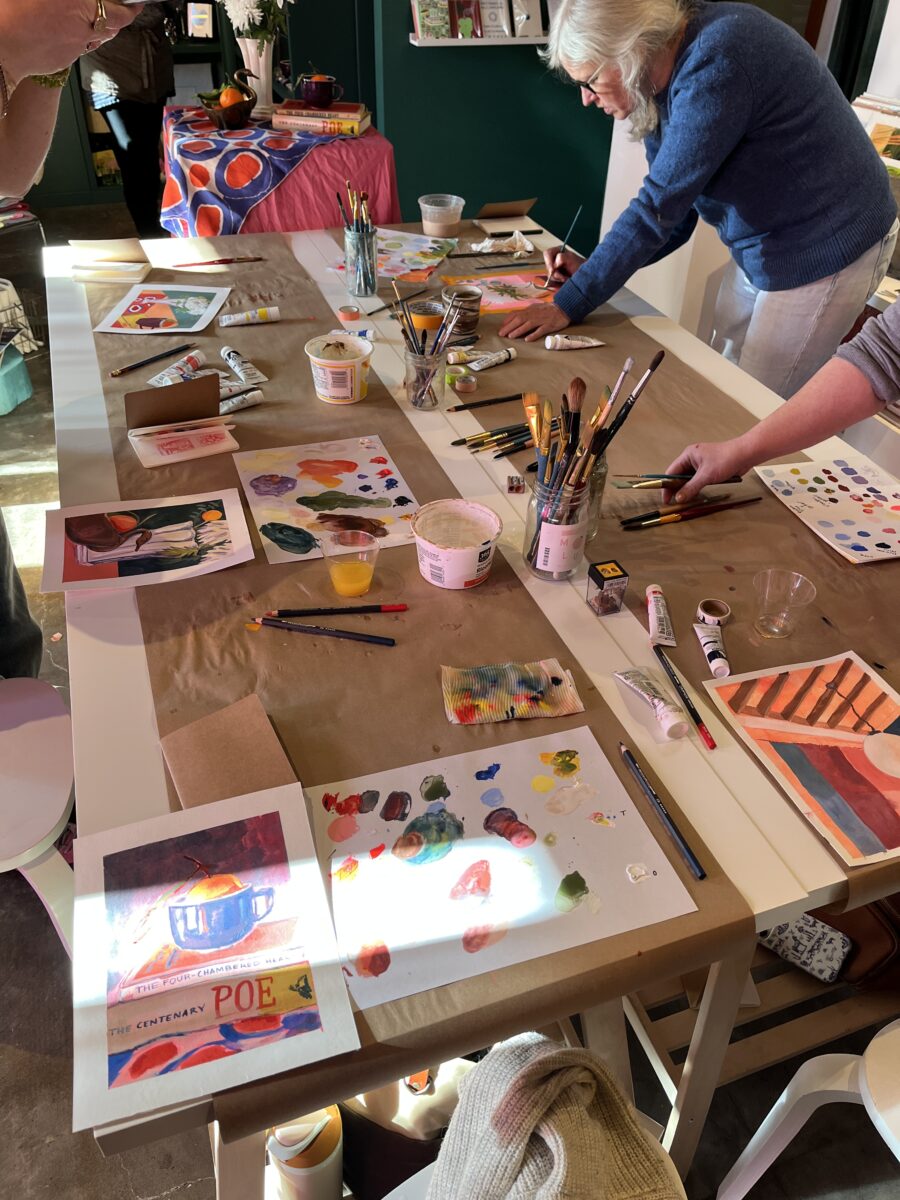
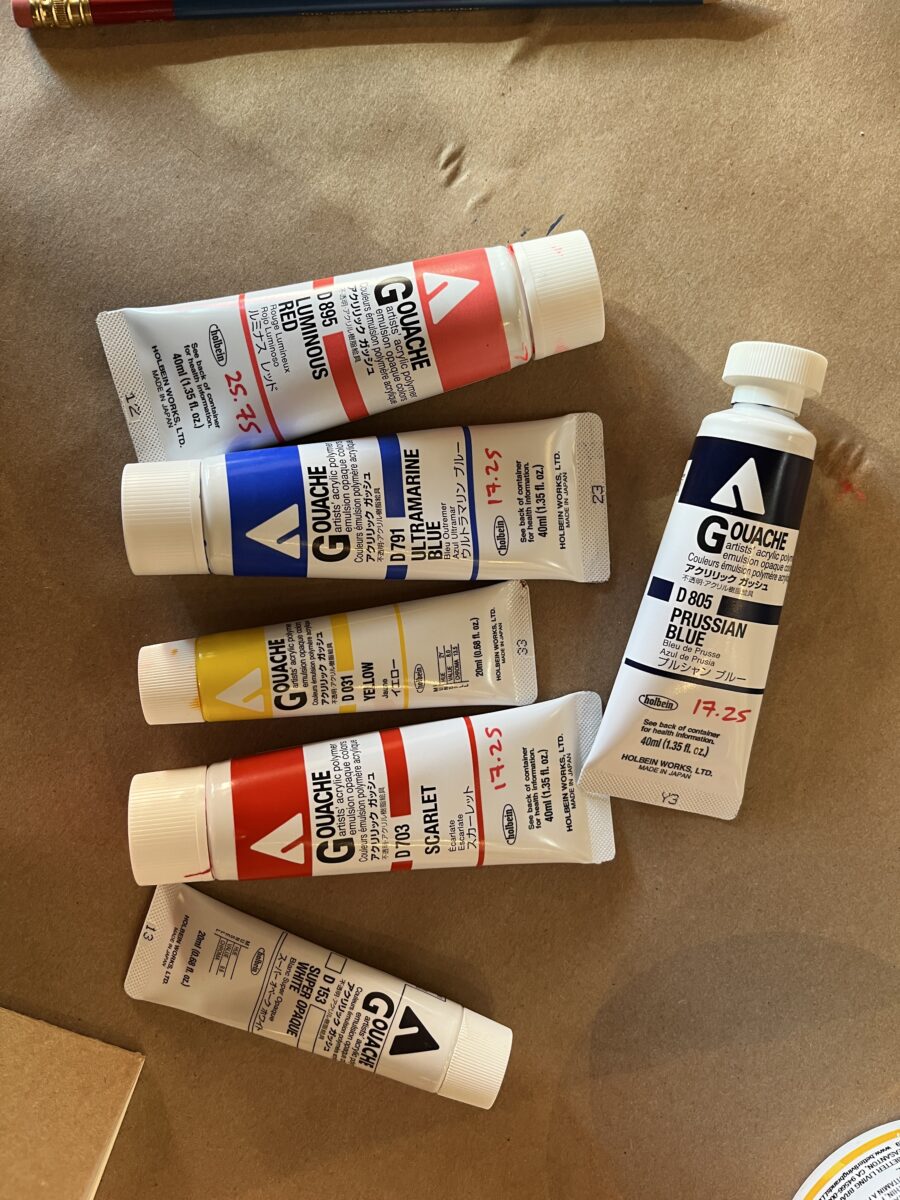
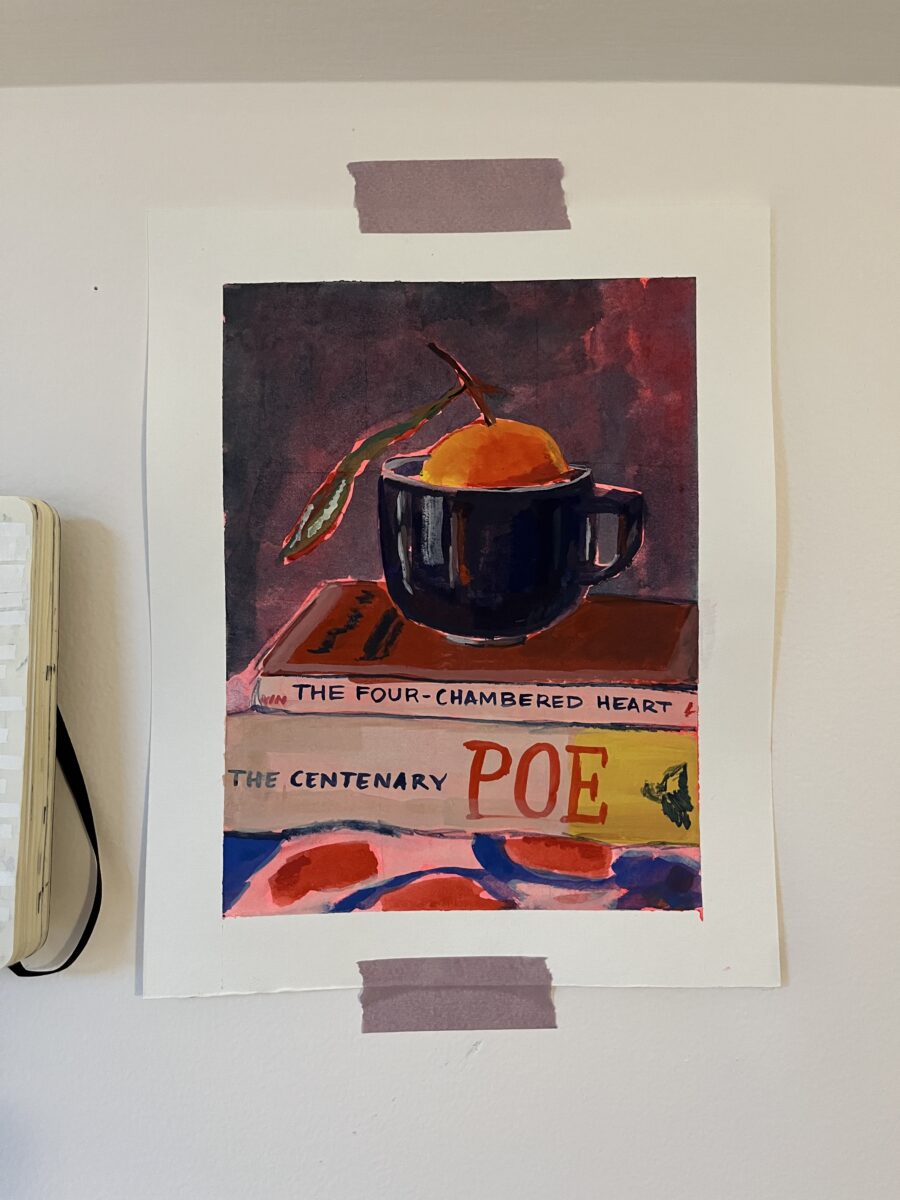
Painting Workshop
I attended a really lovely painting workshop taught by Allie Yacina at Happy Anyway. I am obsessed with sketchbook artwork and Allie has an incredible practice, some of which is currently on display at the shop. The morning consisted of creating color swatches using a primary palette, thumbnail sketches of a still life, and then a final painting. I left so inspired, I spent way too much money at the art store. Acrylic gouache is a fun medium and I learned just how creamy Caran d’Ache pencils are.
Cast on a New Sweater
Portuguese practice.
In additional to just starting the Port Jacket, I learned the Portuguese knitting style. I wanted to try this method out because I read it can reduce hand pain and give you better purling tension. I’m not getting amazing results doing German short rows with this knitting style, but I’m hopeful it’ll get better with practice.
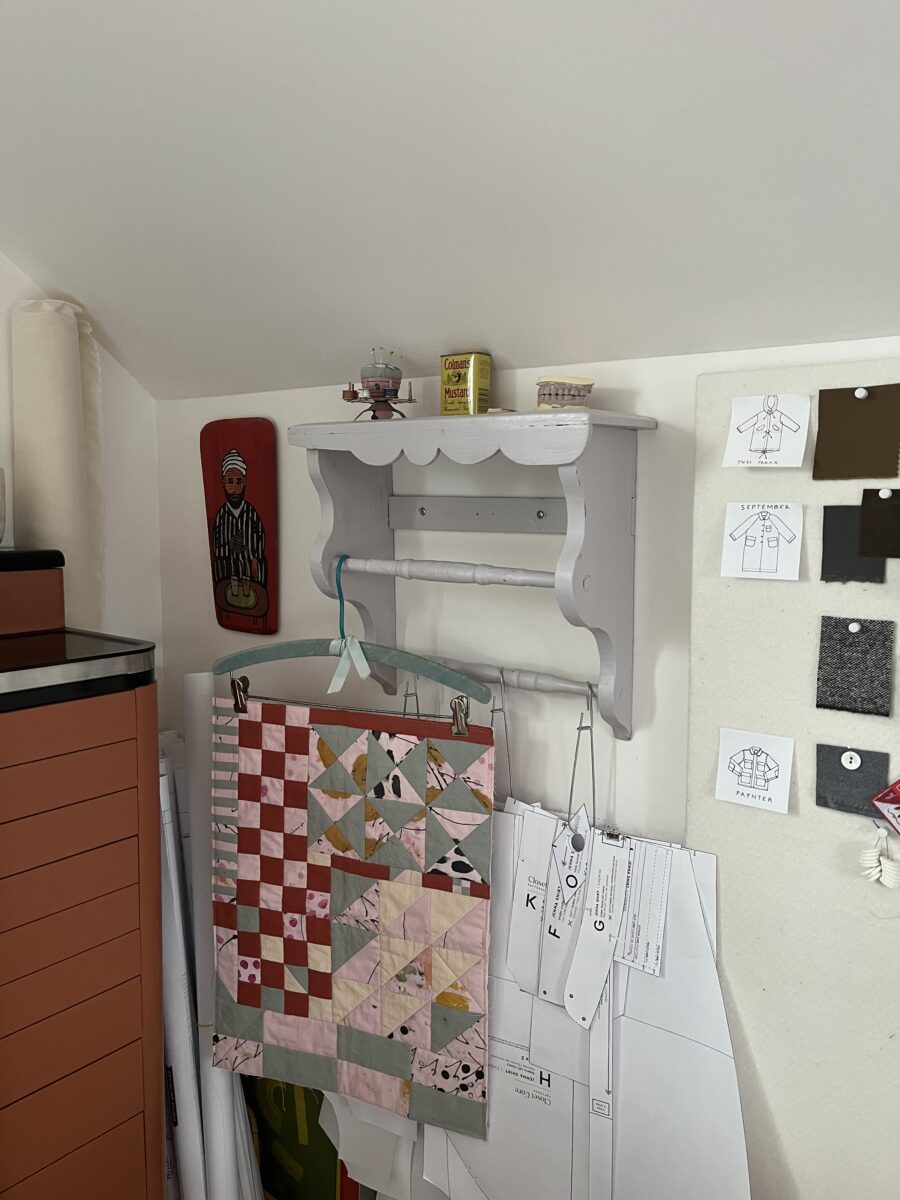
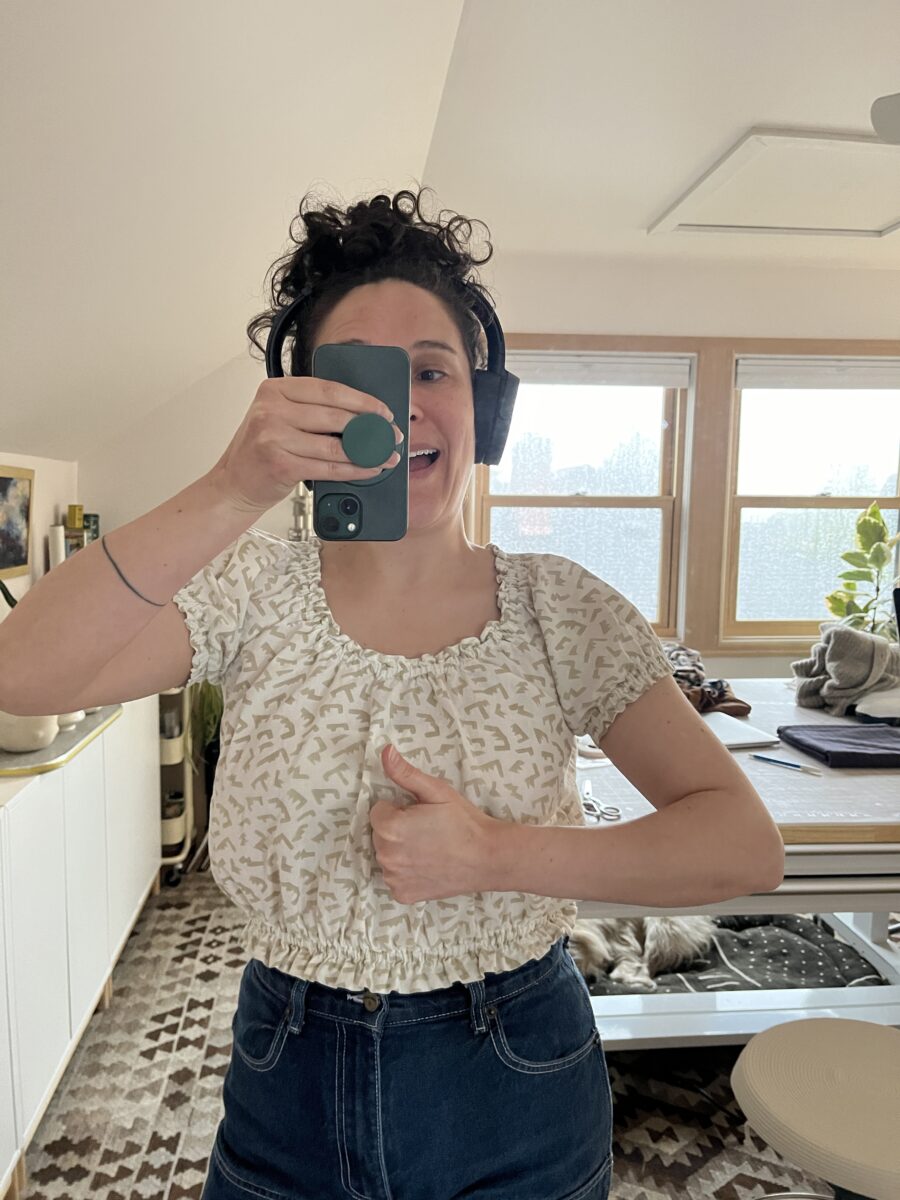
Shirt Sewing + A Weird New Shelf
And lastly, I made a lot of progress on this button up. All that’s left are the cuffs and buttonholes. I also bought and installed this so-hideous-it’s-kinda-cute towel rack that I’ve had my eyes on for months. I wanted something on the wall here where I could hang works in progress and in-use patterns. I also moved my small “design board” over to this wall too. It’s way easier to access now that it’s not behind a table. You can see I have quite a few outerwear projects planned!
I had no idea how much health issues had slowed down my desire to play around with materials and make stuff. But now that my thyroid medication seems to be at the right dose and I no longer have a uterus (thanks to fibroids), I’m BACK BABY.
It’s really exciting to feel like I’m actually awake during the day now. And I want to celebrate my newfound productivity by cataloging my recent makes. First up, I just added the binding to this wall hanging I made years ago.
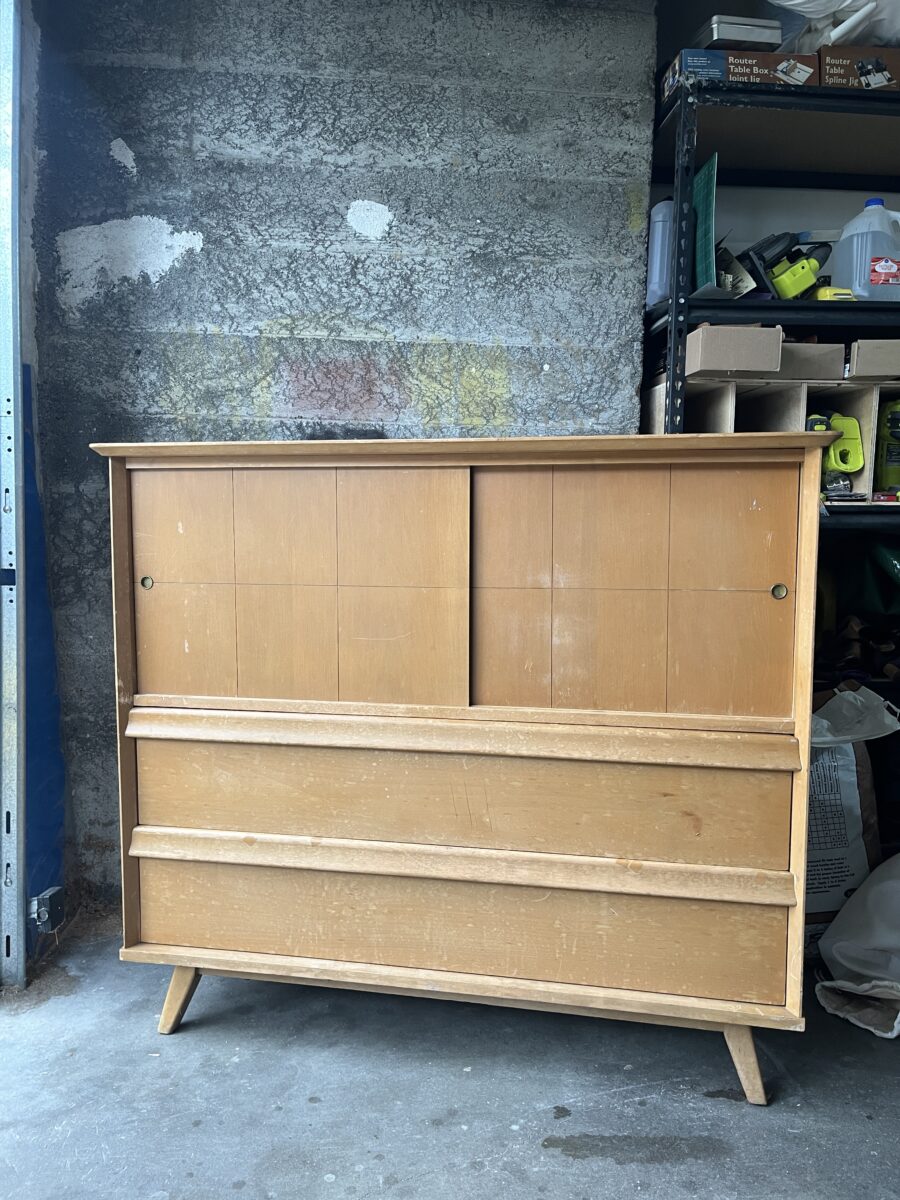
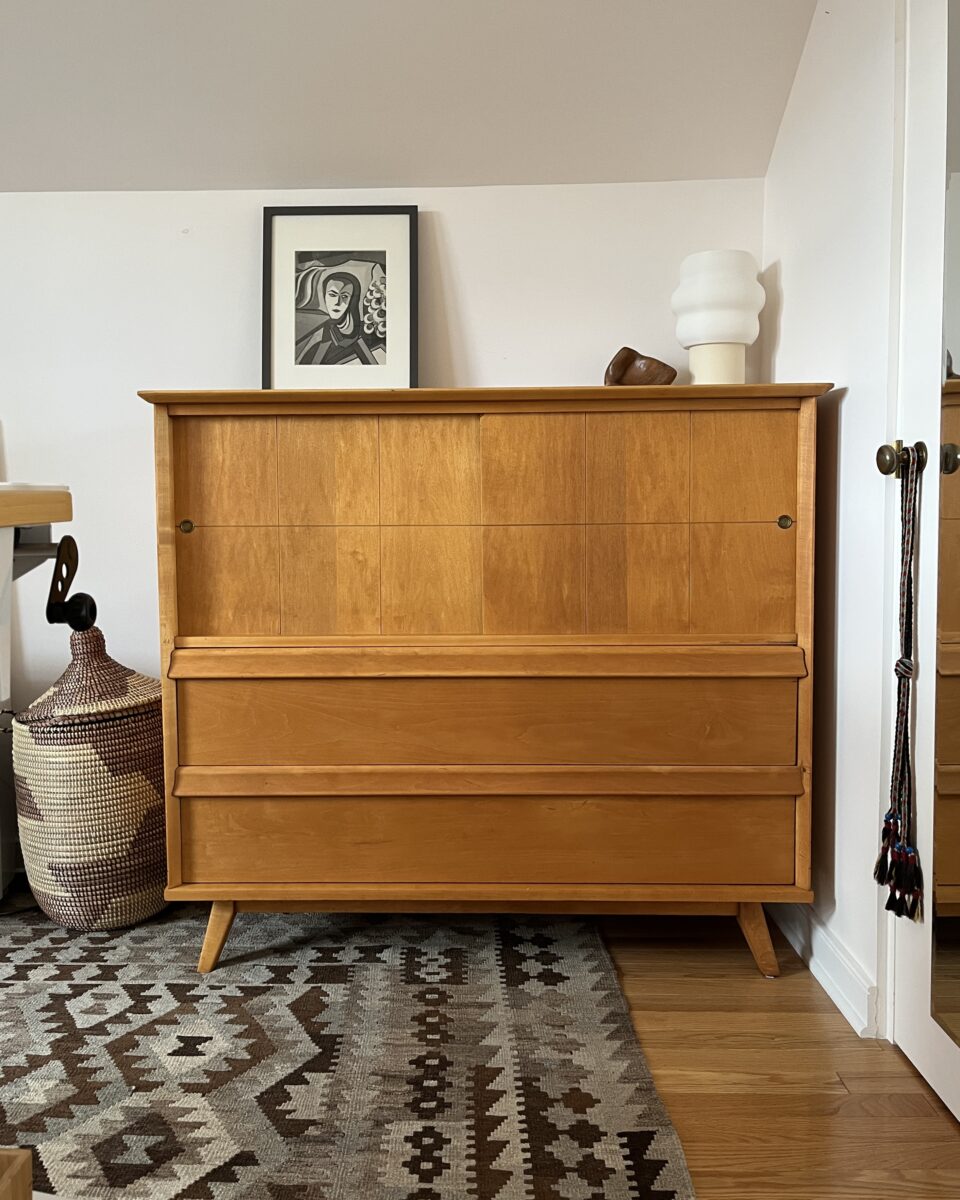
I refinished this “gentleman’s cabinet” which you can read more about here and here.
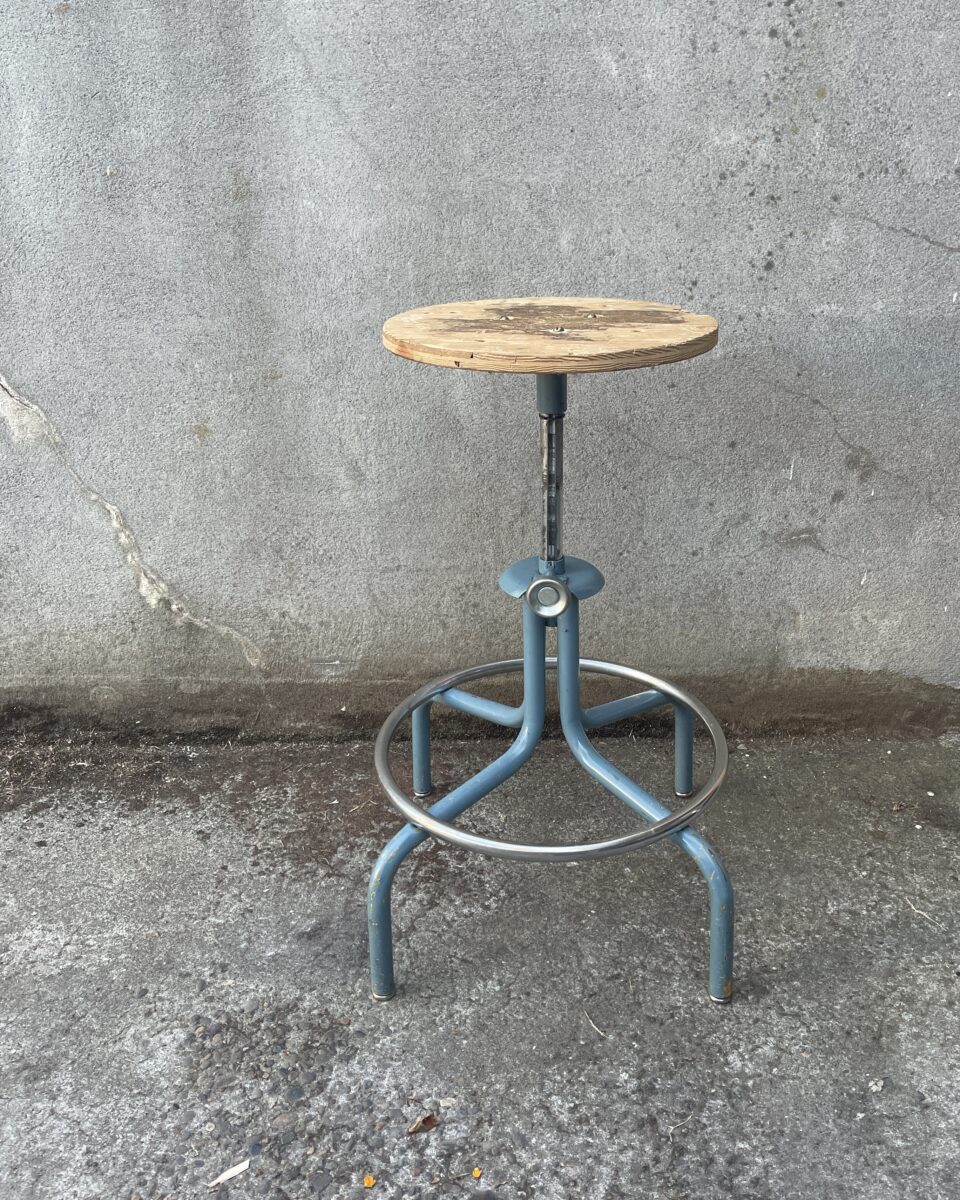
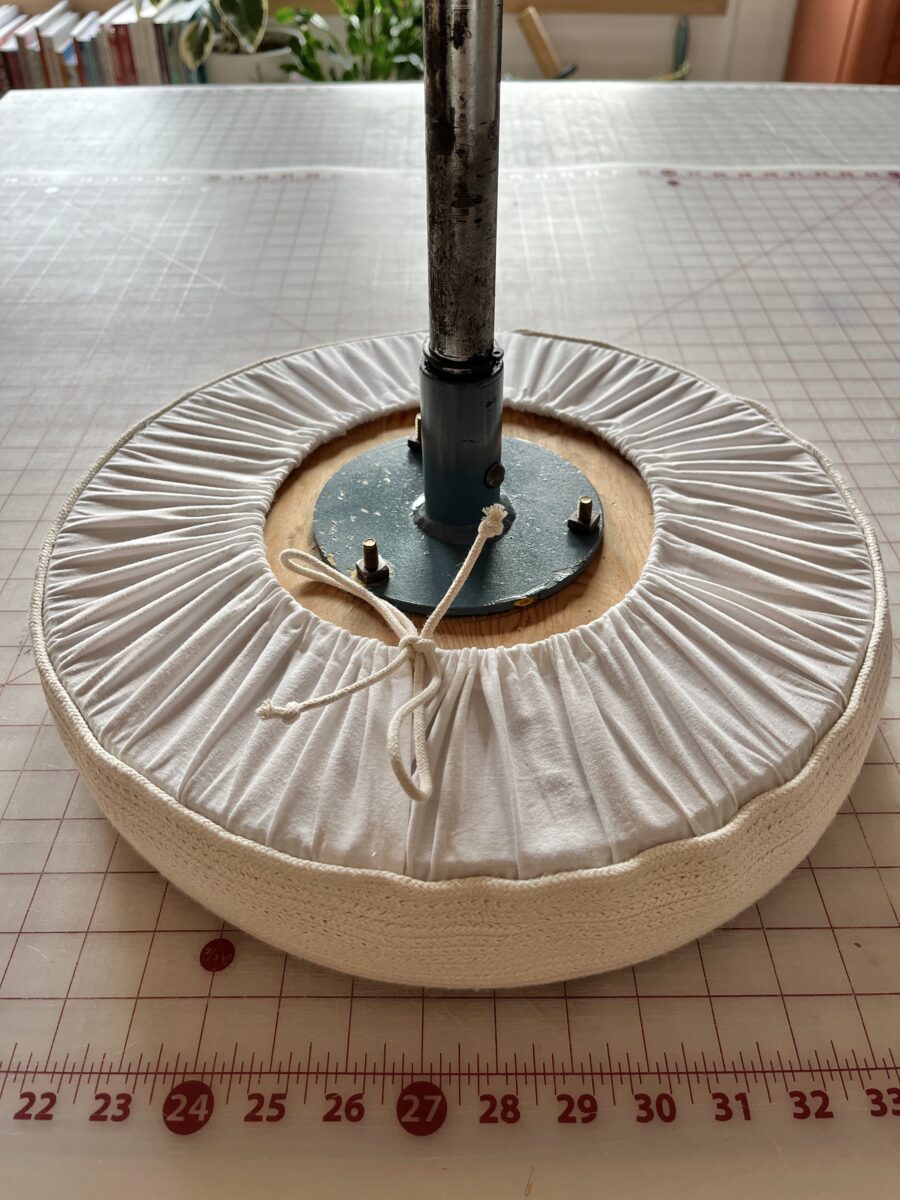
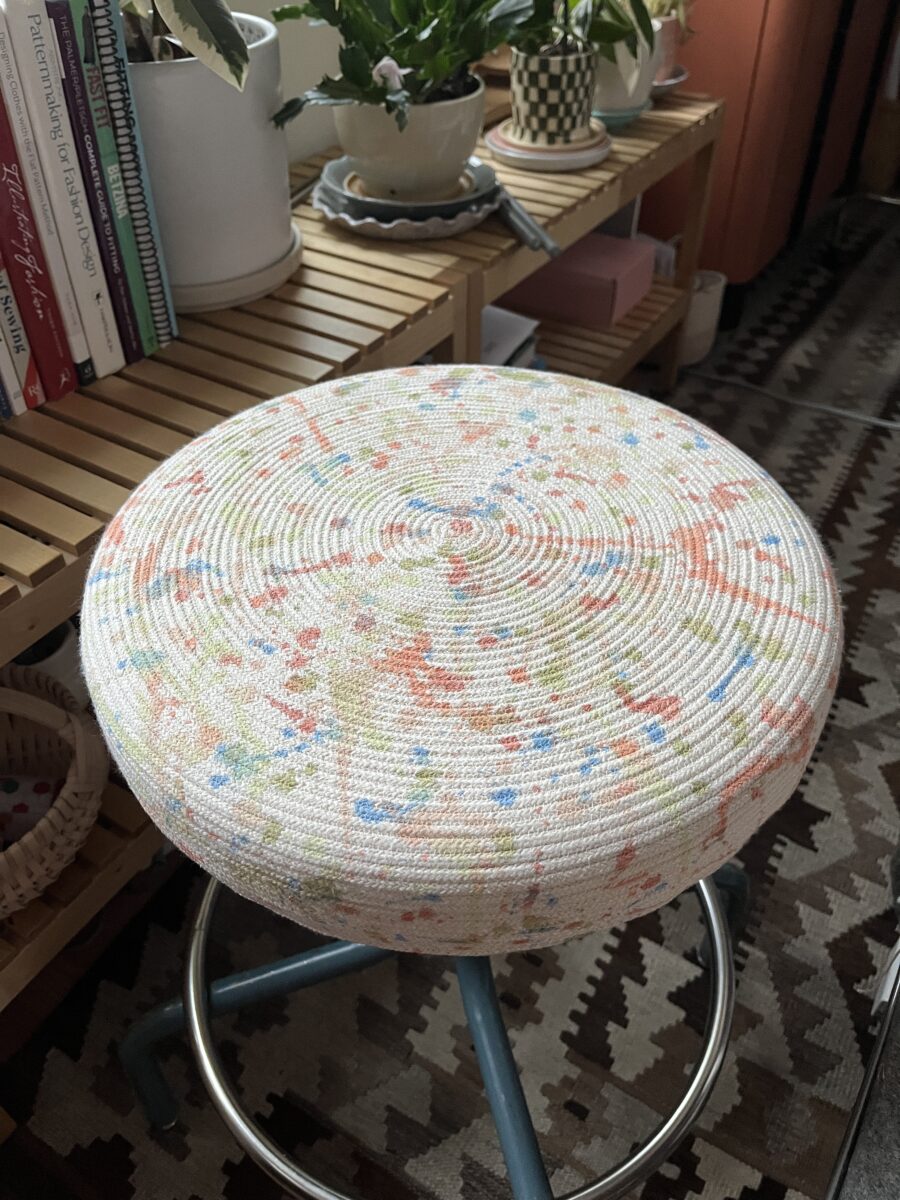
This thrifted stool got a much comfier seat. The rope basket turned cushion cover was already made, but I added the fabric and drawstring bit to keep everything in place. There’s now 2″ of foam too since the plywood was much too hard of a seat. I finished this project by splattering some acrylic paint on it because why not?
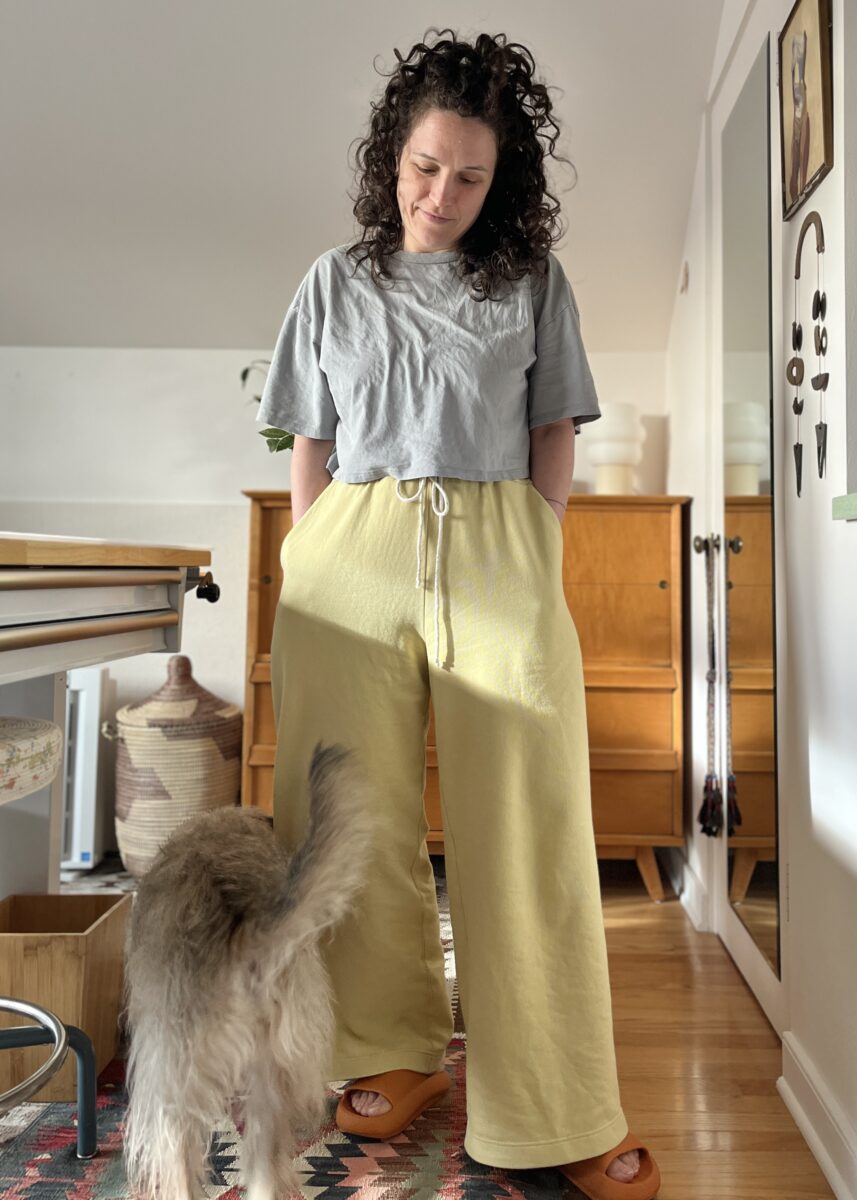
I’ve actually been finishing some sewing projects outside of work! I made a dress out of fabric that’s been in my stash for YEARS, a quilt coat with fun yarn ties, several new machine covers (also using old stash fabric), these amazing mellow yellow Cloud Sweatpants, some basic tees, and I batch cut out like ten more projects. I’m planning to share more about some of these makes in upcoming posts.
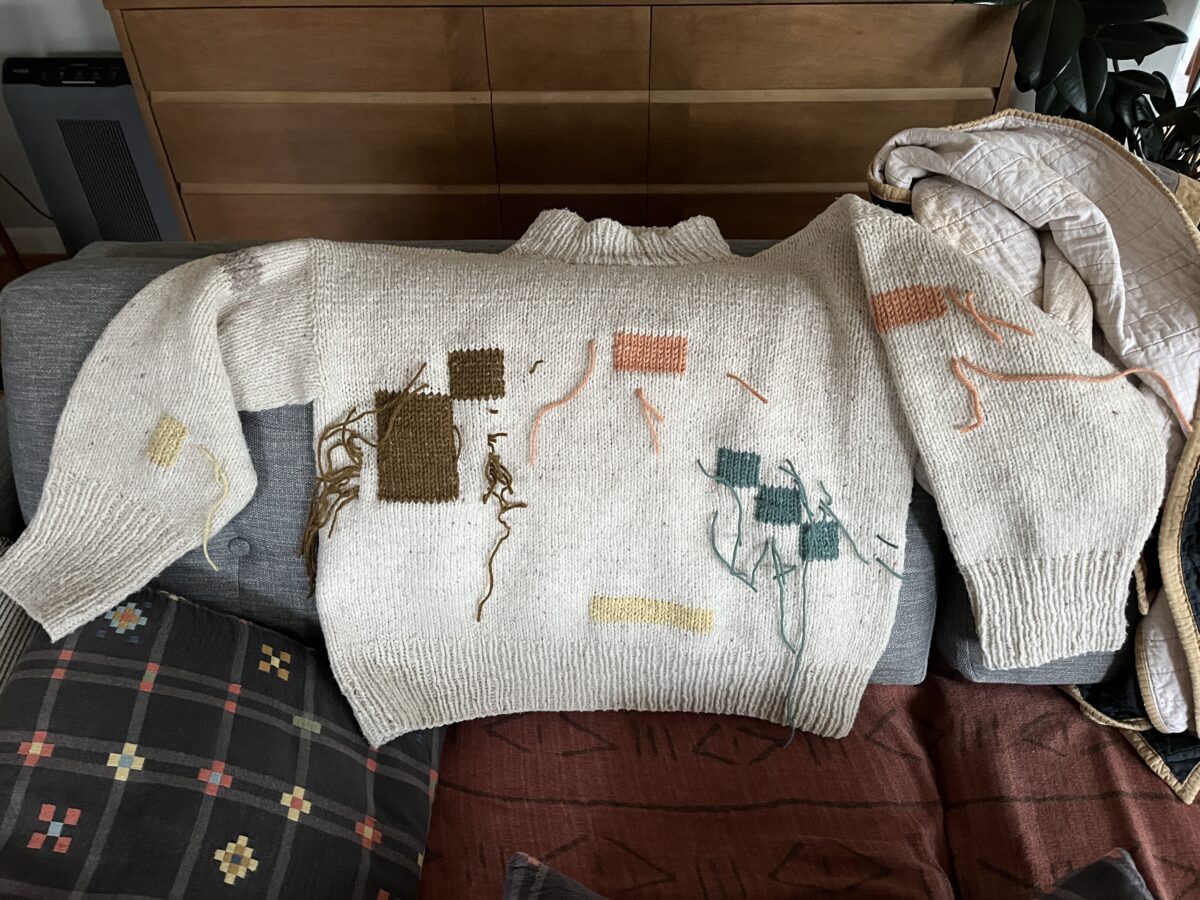
I finished two sweaters in December and started playing around with duplicate stitch.
I got out my tufting gun and was a total beginner again. This process is so challenging and I hate not being in control, but I’m willing to keep going! The ultimate goal is to make little rugs for all the steps leading upstairs for Otis.
And I’m trying super hard to reestablish my logbook practice. In 2018, I captured a trip in one of these sketchbooks and I’ve missed so many travel adventures since. This practice is one of my proudest accomplishments and I’m determined to pick it back up.
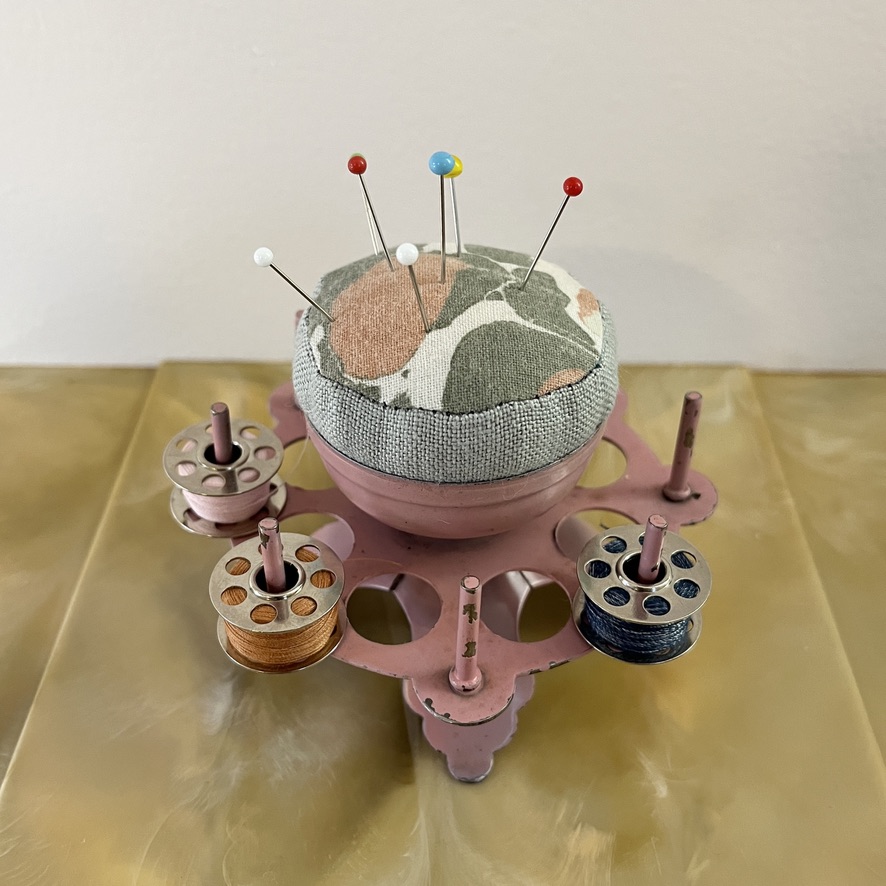
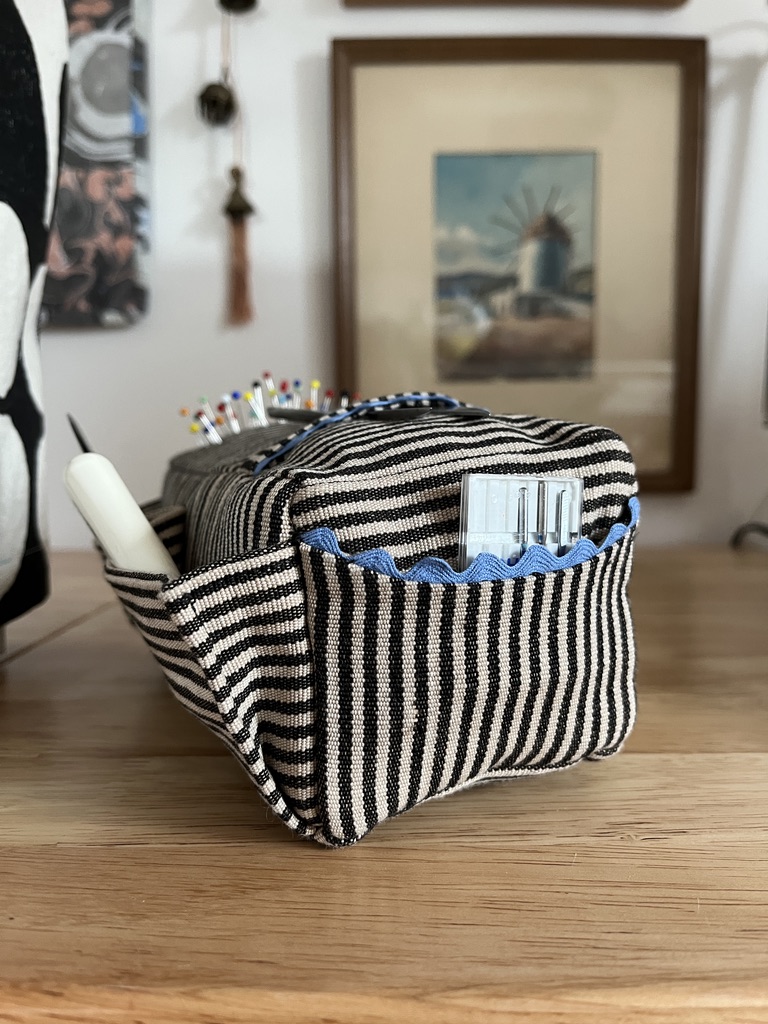
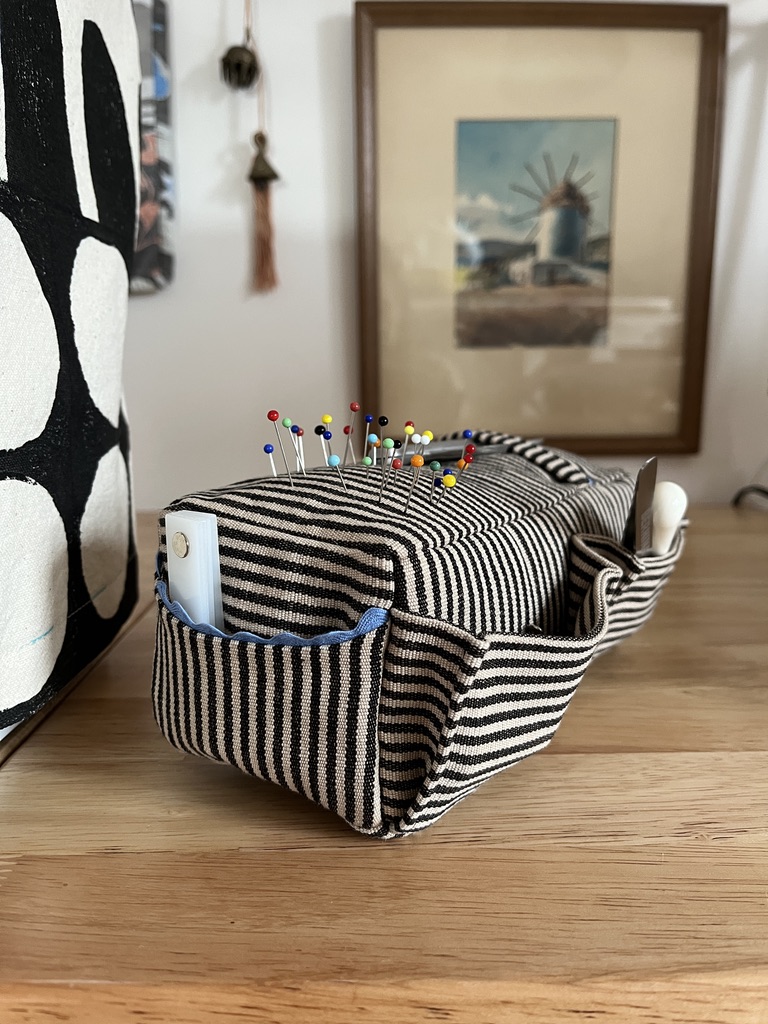
I found this cute bobbin holder at an antique mall. The paint is chipped and it doesn’t really serve a good purpose in my space, but I have a hard time passing up old sewing accoutrements. I’m thinking about painting it another color, but in the meantime, I made this goofy pincushion top for it. It’s not the best construction (I even used black thread) but I just wanted to test out the idea. I did use some precious marbled fabric that I made, which maybe I should have saved for the second iteration.
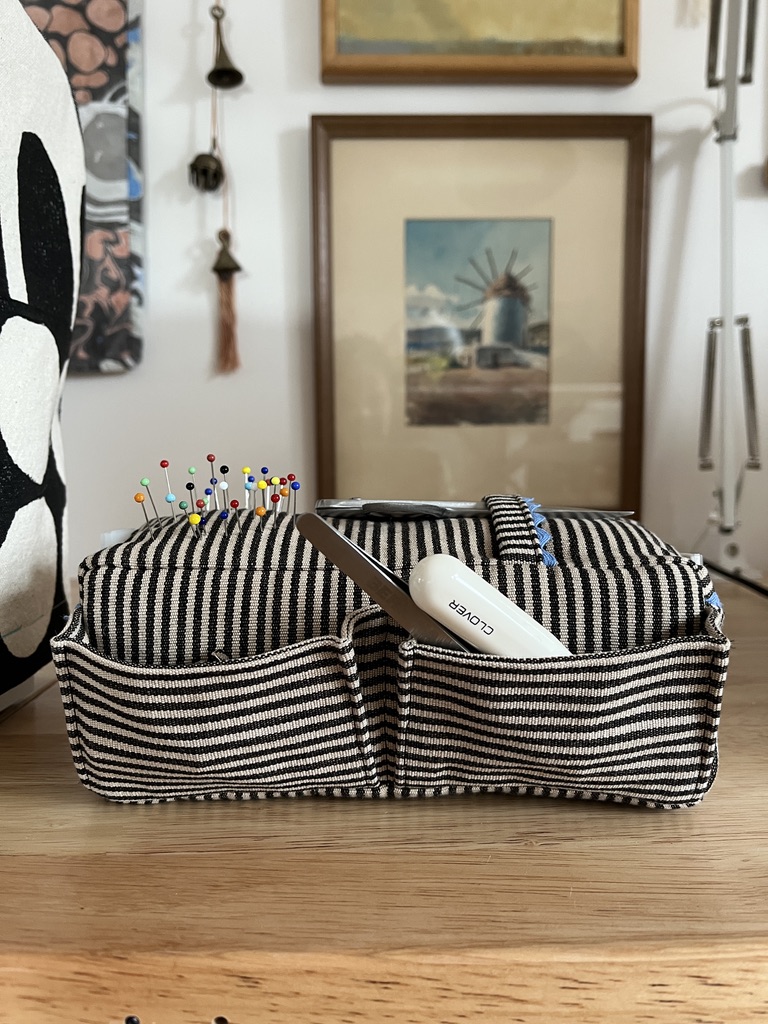
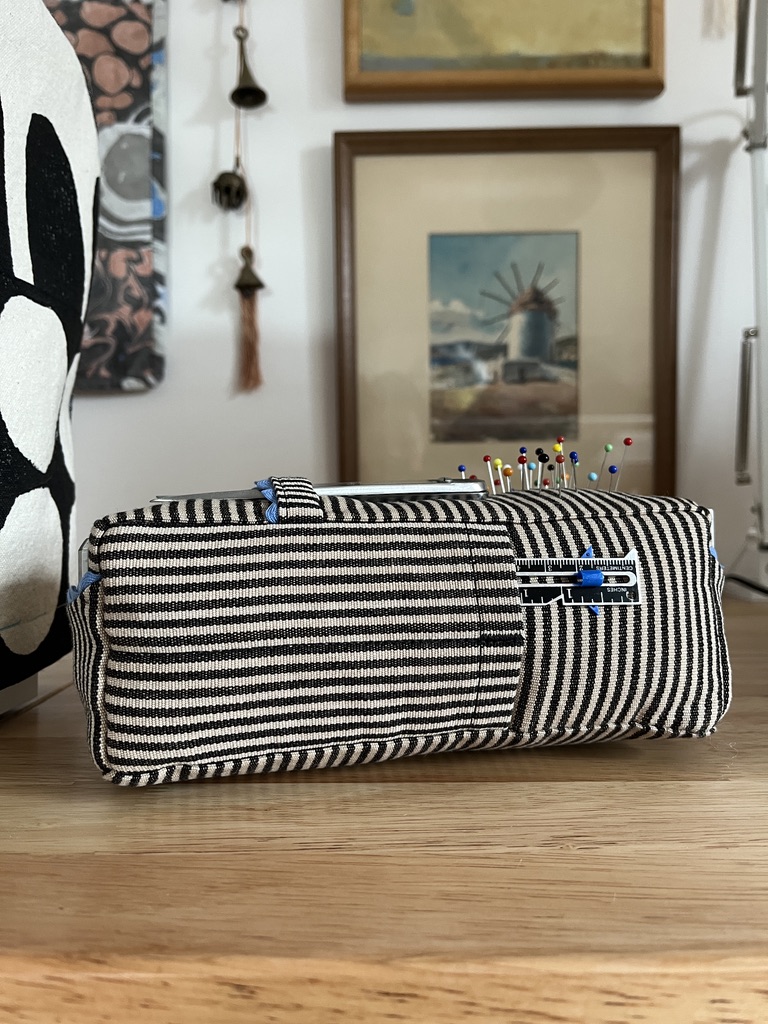
The bobbin carousel pincushion inspired me to make something that I did need – a second Carry-All Pincushion. Here’s the first one I made way back in 2015. It sits next to my main sewing machine and holds things like a hump jumper, seam ripper, tweezers, snips, needles, and of course, pins. This new one will sit next to my secondary machine that I mainly use for topstitching.
I’ve had this heavyweight striped fabric in my stash since 2014. It’s thrifted yardage from Savers that I used in some of my first sewing projects. I kinda wish I still had this laptop sleeve but the tote is still with me. It’s a little too heavyweight for this project, but I made it work. I do wish I’d added more blue rickrack.
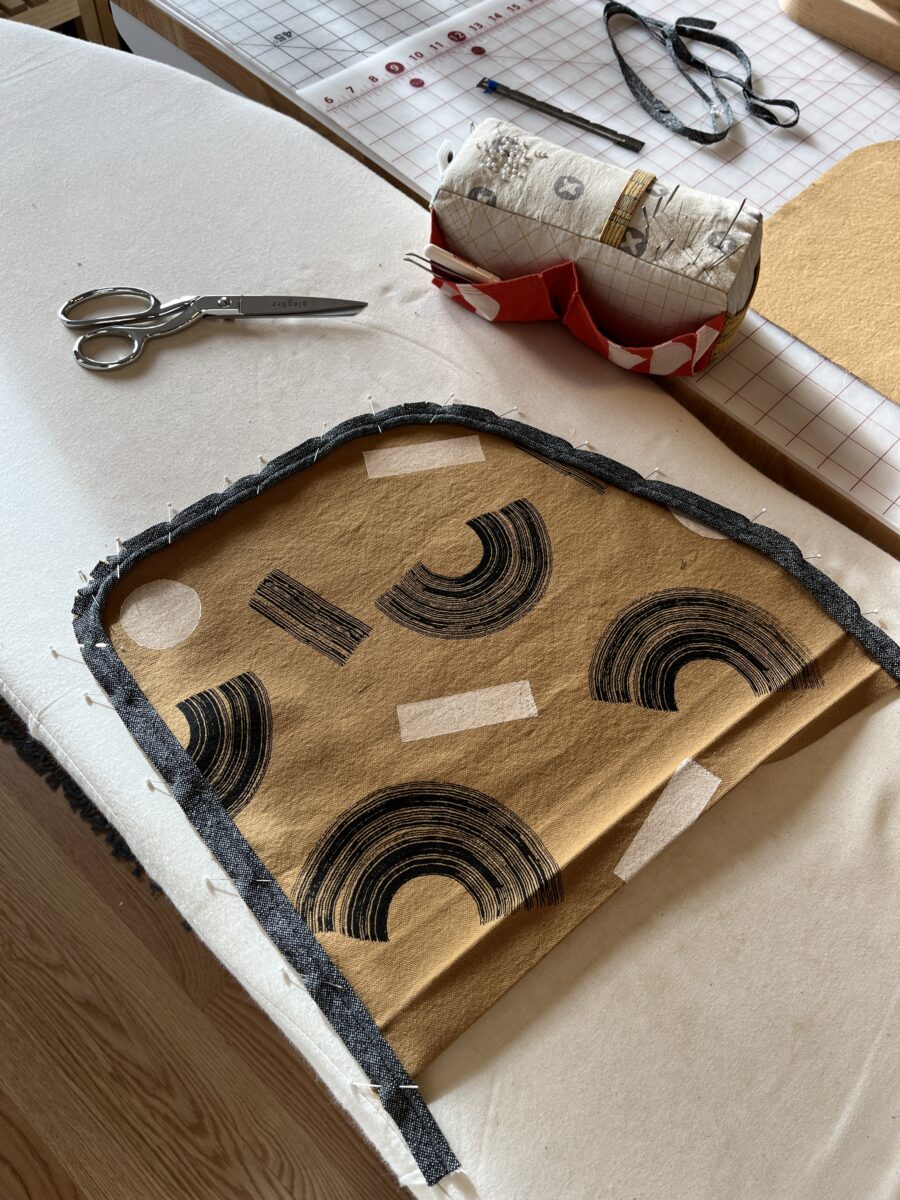
Oh hey – there’s that original pincushion above! I’m also remaking my sewing machine covers to include pockets to hold the tables and knee lifts. Making them has gotten me back into block and screen printing and it’s exciting! Hoping to finish them over winter break.
I’ve been a weird combination of highly motivated / can’t be bothered to sew for several years, which has resulted in a bunch of partially completed projects. Why finish a project when you can start a new one?! I’ve also accumulated a small pile of things that needed minor fitting tweaks, which are never as exciting as starting a fresh project.
But a couple weeks ago, I’d apparently had enough and dedicated a Sunday to tackling the stack. I set a goal of completing or fixing five doom pile projects and, to my utter shock, completed four. Here’s what I did…
The first garment was this Seamwork Madhu that simply needed longer lengths of elastic in the sleeves. The sleeves were squeezing my arms, so I’d stopped wearing it.
I had already unpicked and replaced the elastic but lost steam when it came to stitching up a grand total of 1 inch on the casings. While I had white thread in my machine, I also put some tacks in the neckline elastic to keep it in place.
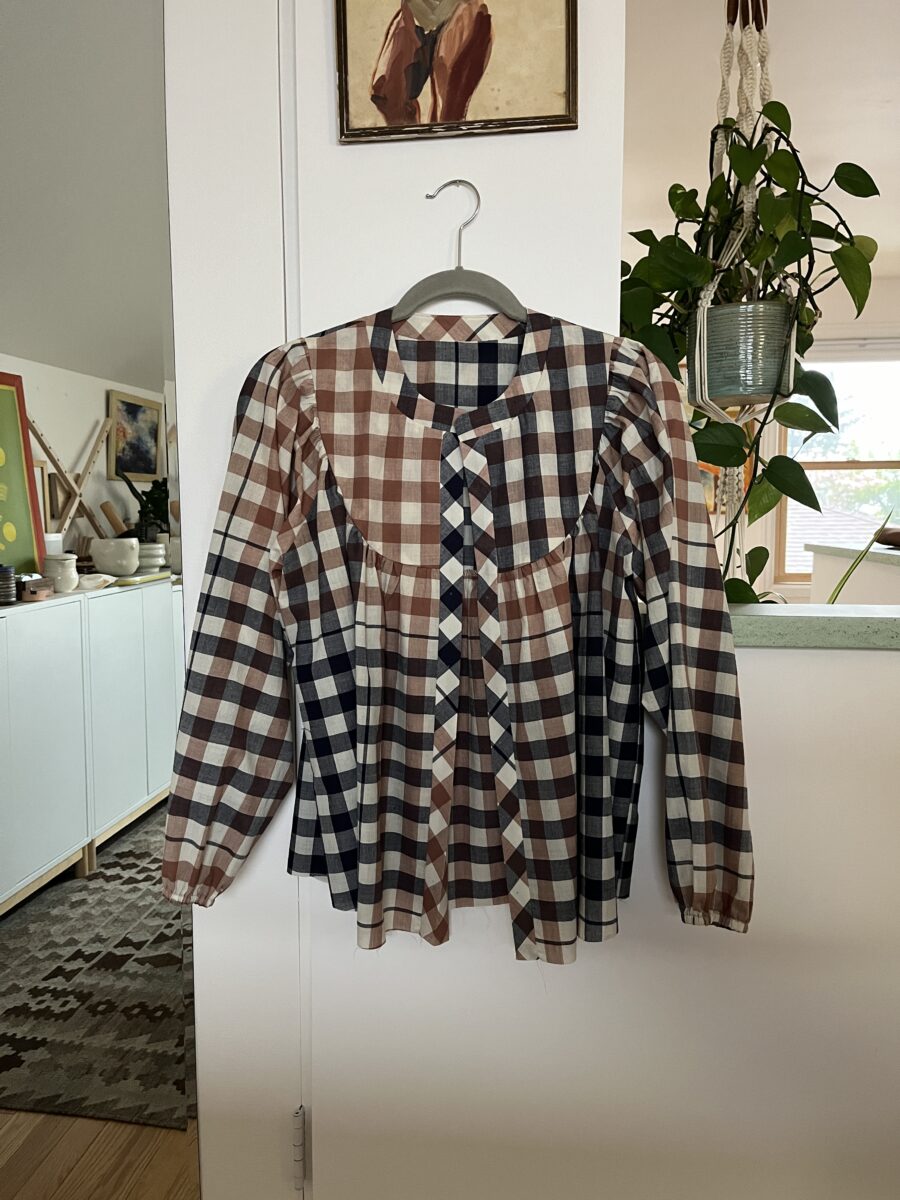
The second project was a also a Madhu, but an Ace & Jig inspired hack! I raised the neckline, lengthened the sleeves, modified the waist hem, and planned to finish the neckline and sleeves with bias binding.
All the construction was completed but I’d pooped out at the finishing steps, including creating the bias tape. I’m pretty pleased with this hack!
Next, was this top. It’s the Seamwork Aims and while it looks flipping cute on others, I’ve learned I don’t feel great in tops with even the slightest amount of poof at the shoulders. But I wanted to finish it, even if it ultimately gets donated. It needed the hem and placket stitched, plus buttons and buttonholes. It’s a little yeehaw but I’m kinda into it?
The last thing I was able to squeeze into this weekend WIP party was taking in the center back seam on this Isola jumpsuit. My fabric kinda bagged out and was flapping in the wind making me not want to wear them. It was a subtle change but made a big difference!
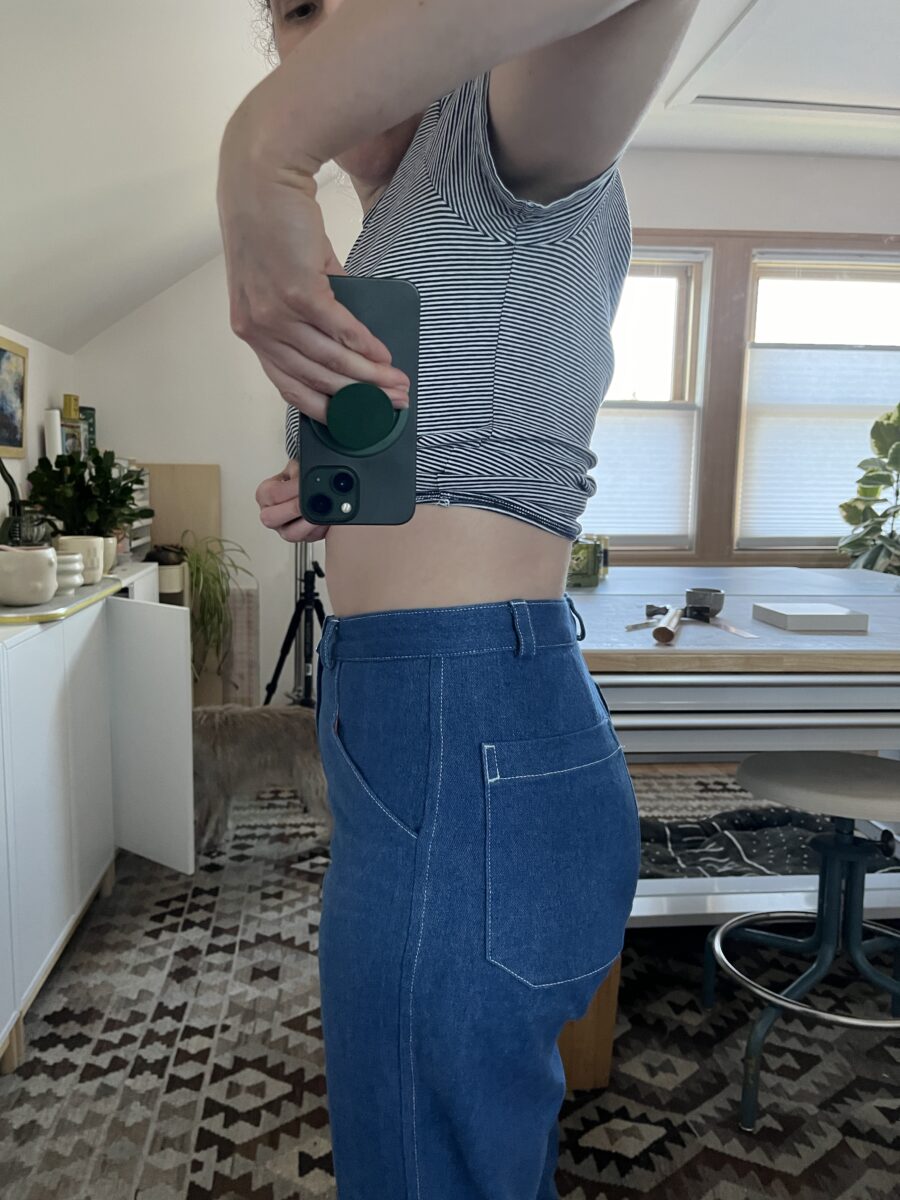
The following weekend I was still riding the WIP pile high and decided to fix the fit on these Shop Pants. Despite previously making these in the same fabric (just a different dye) the fit was completely different at the back waist. I had also placed the back belt loop off center and was happy to have the opportunity to fix it. I took about an inch out of the center back and was able to hide all the backstitching under the belt loops. I’m so excited to have another pair since I wear this pair all the time!
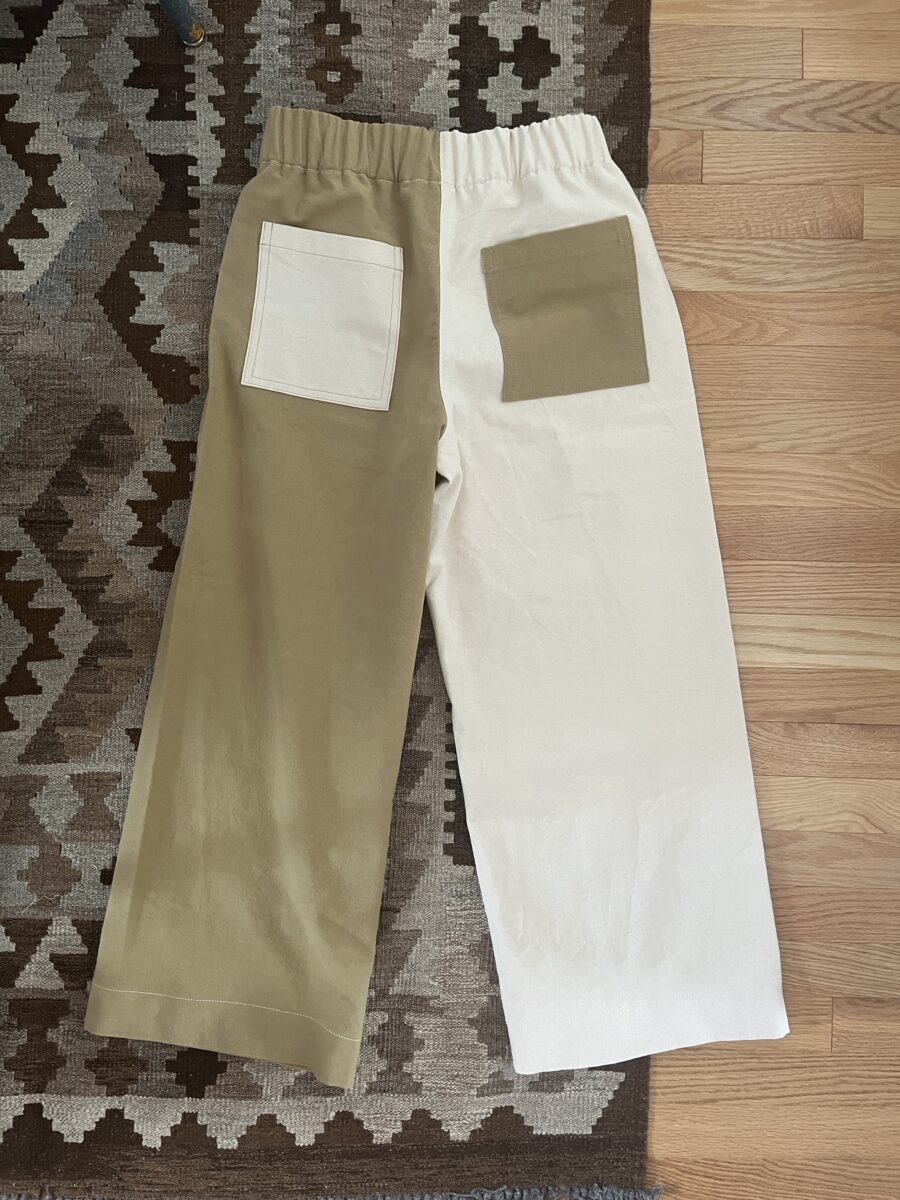
And then this past weekend I tackled this incredibly old WIP. It’s seriously old, like multiple years old. These canvas Pomona pants needed the inseam, hems, and waistband sewn. After finishing them, I unpicked the front patch pocket because it looked weird.
Believe it or not, there are still WIPs to be finished! And I’m committing to not starting any new projects (except for simple pointelle t-shirts, I gotta have some fun) until the pile is conquered!
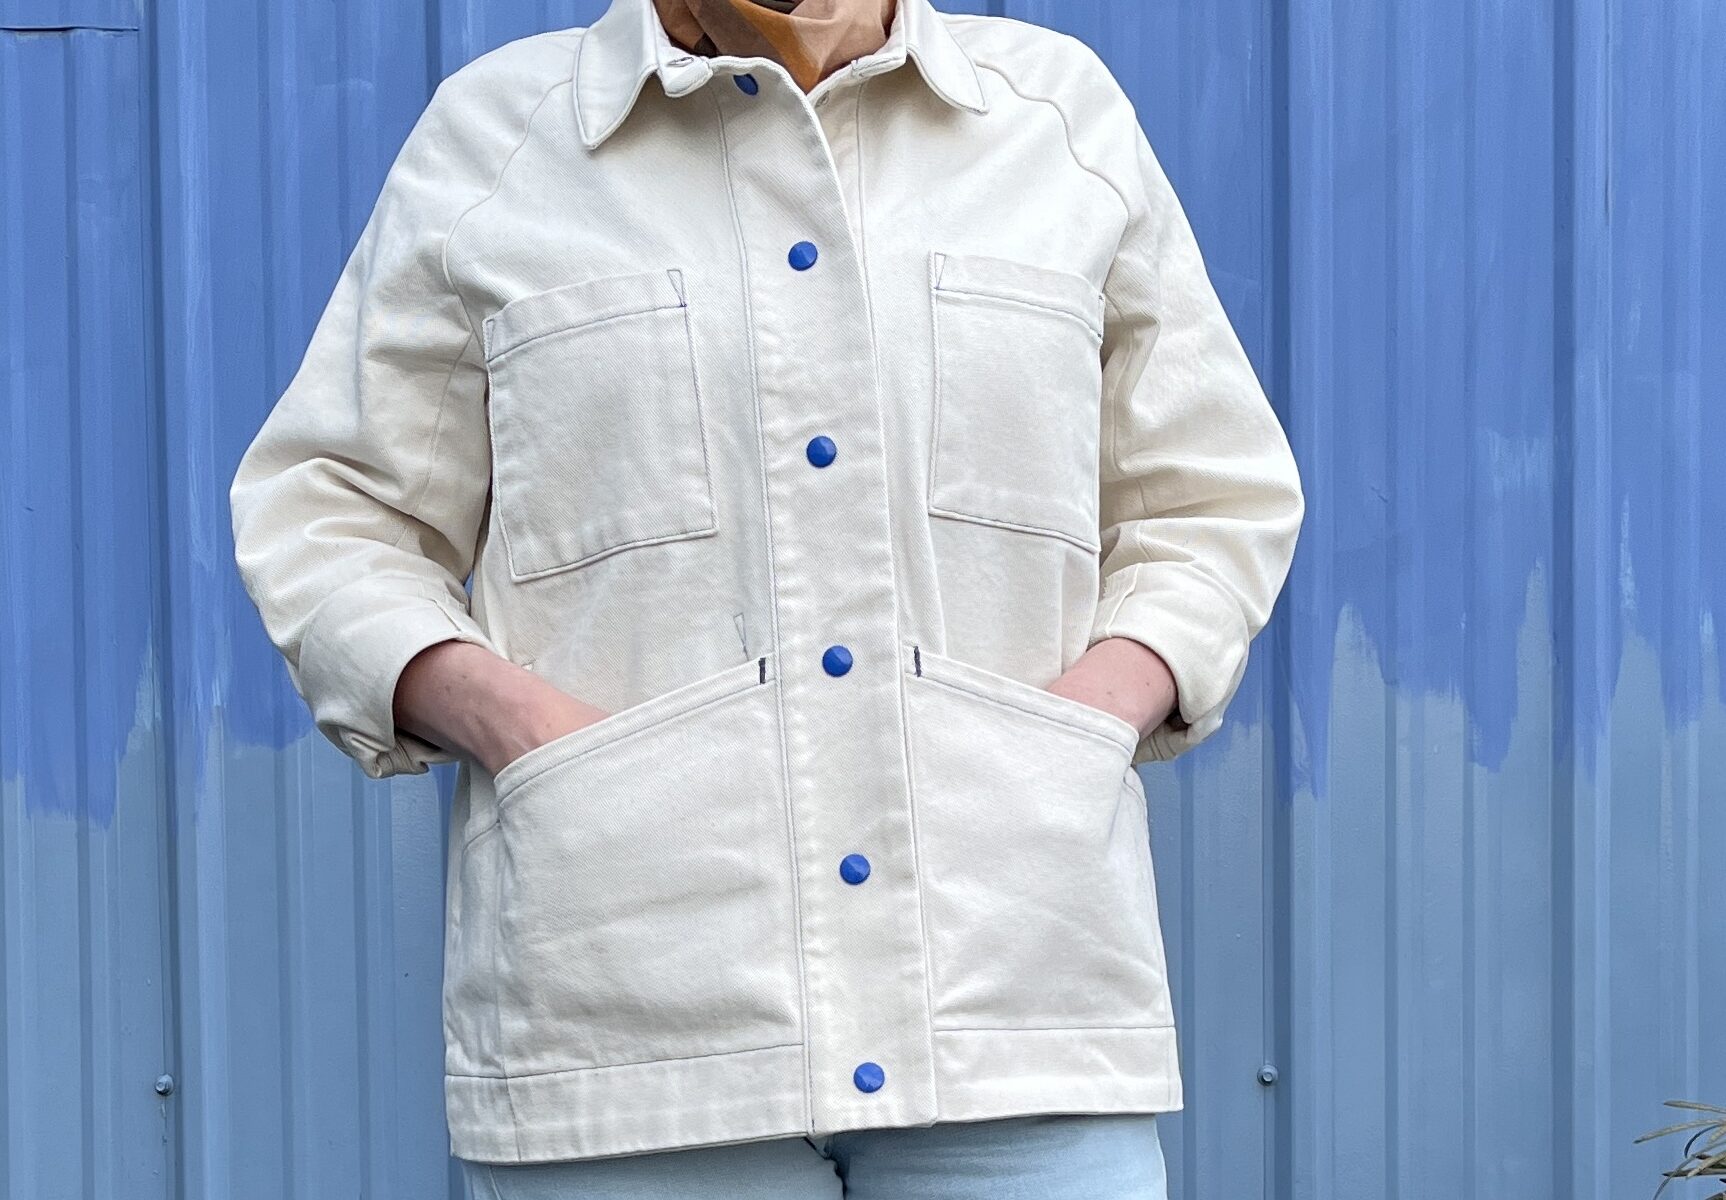
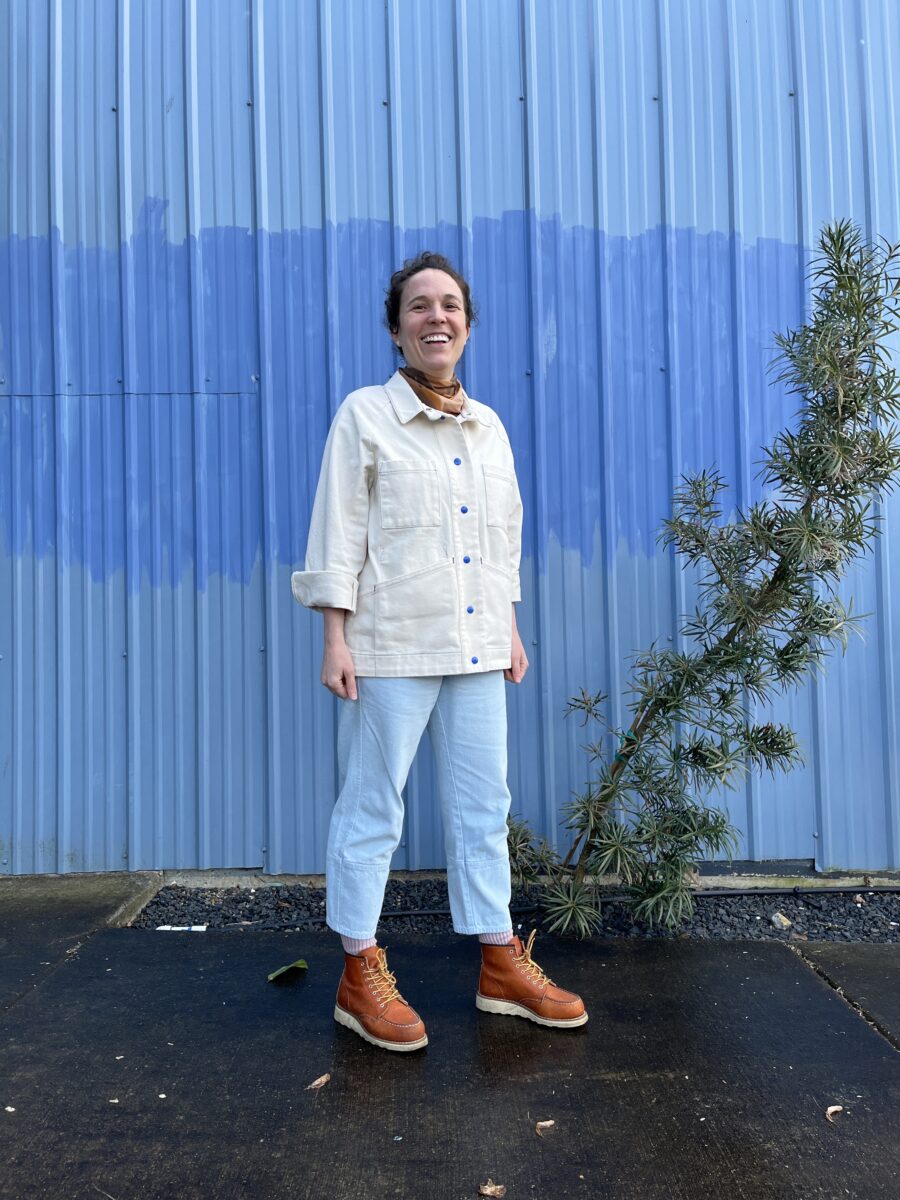
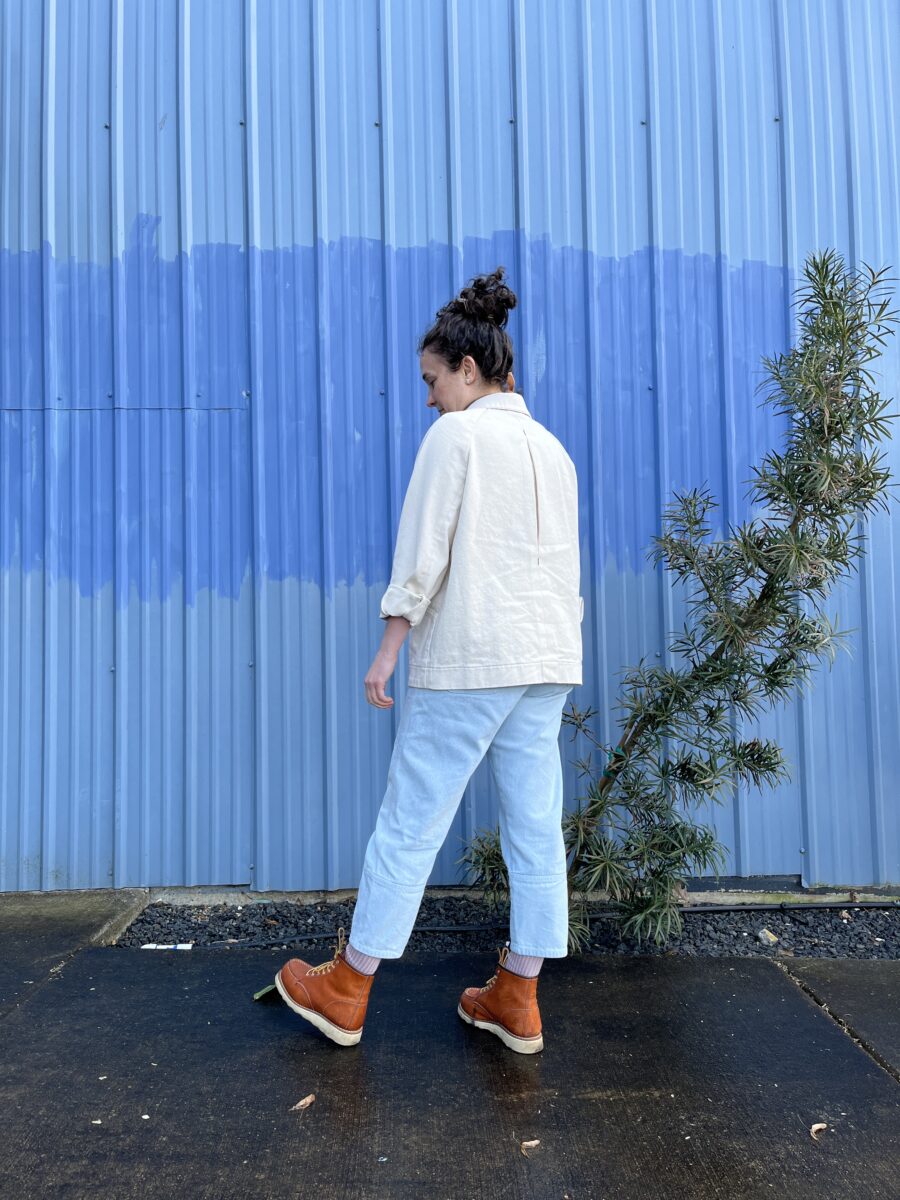
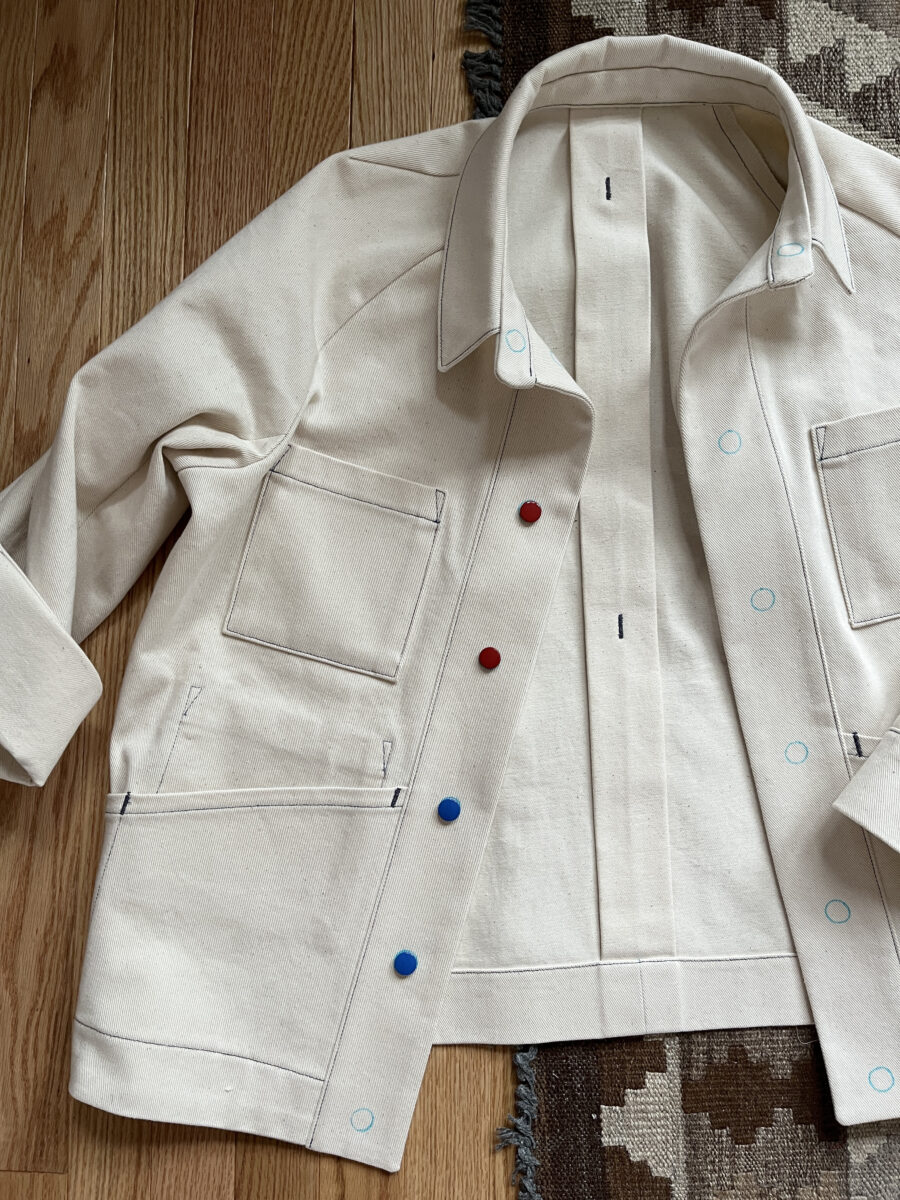
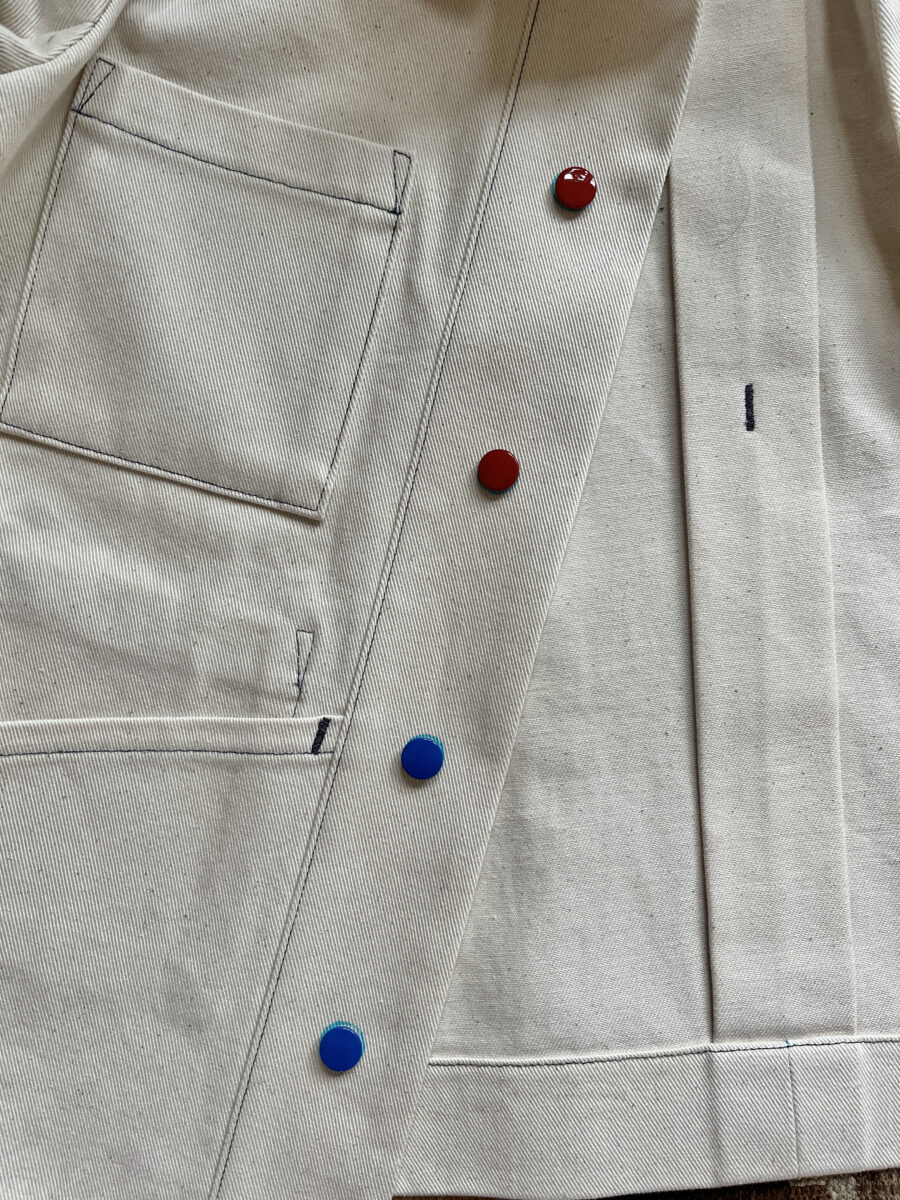
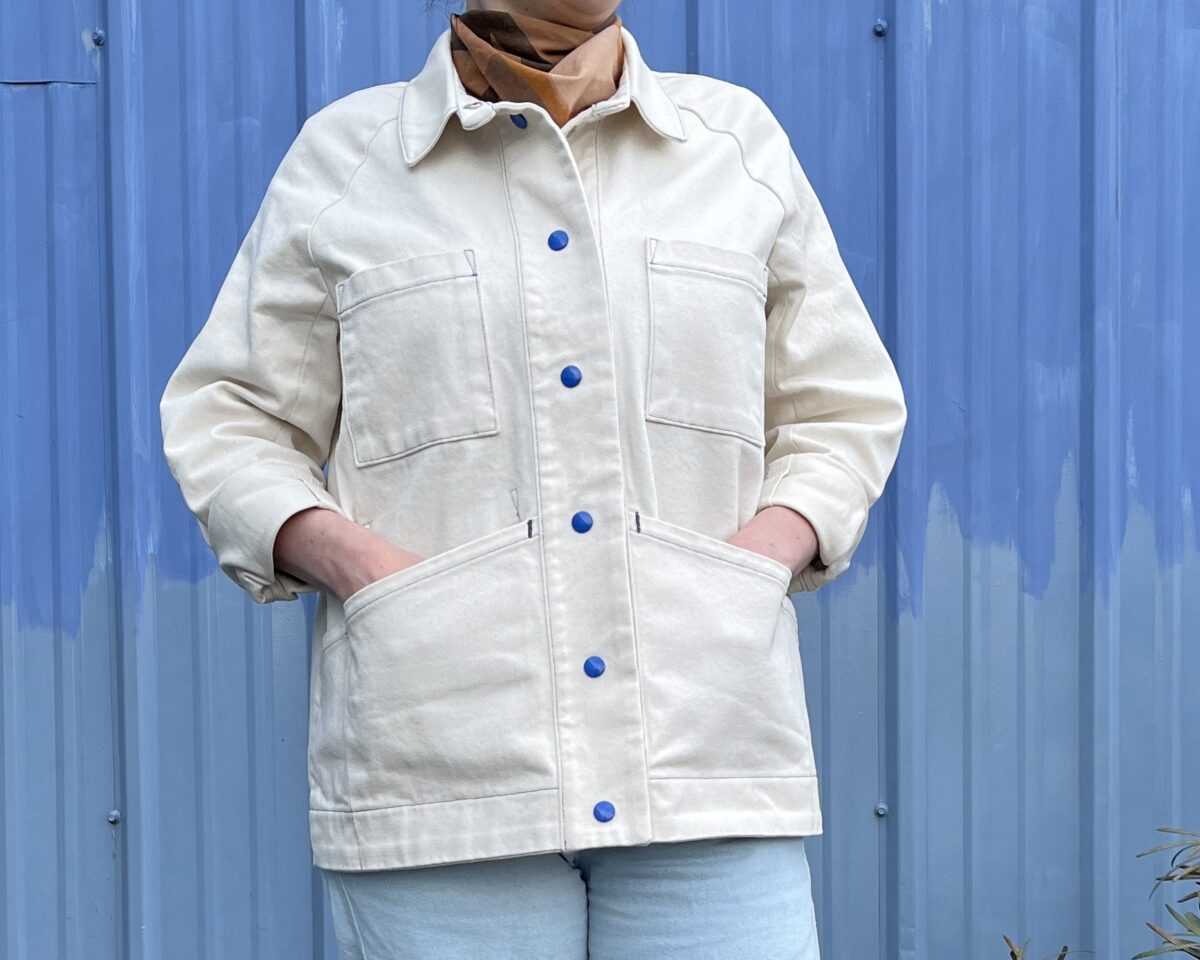
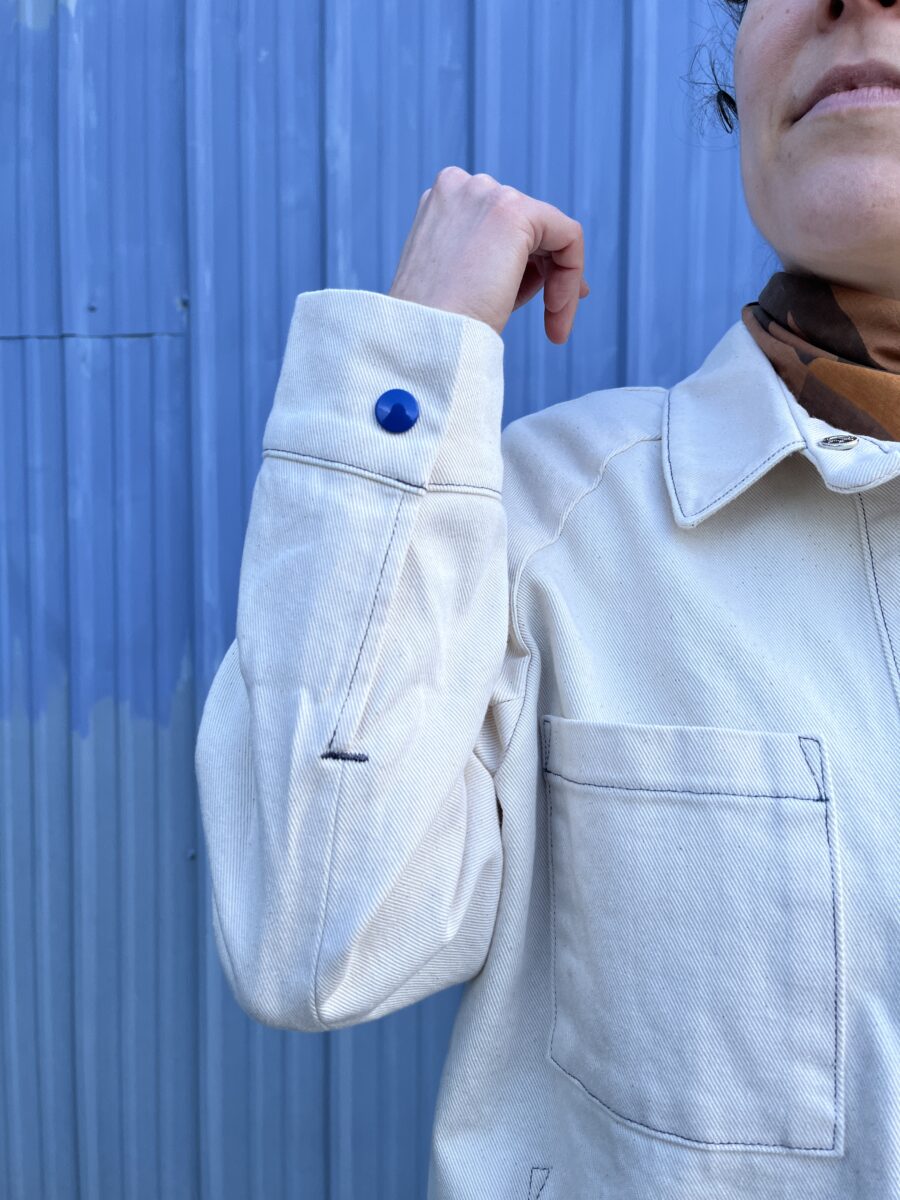
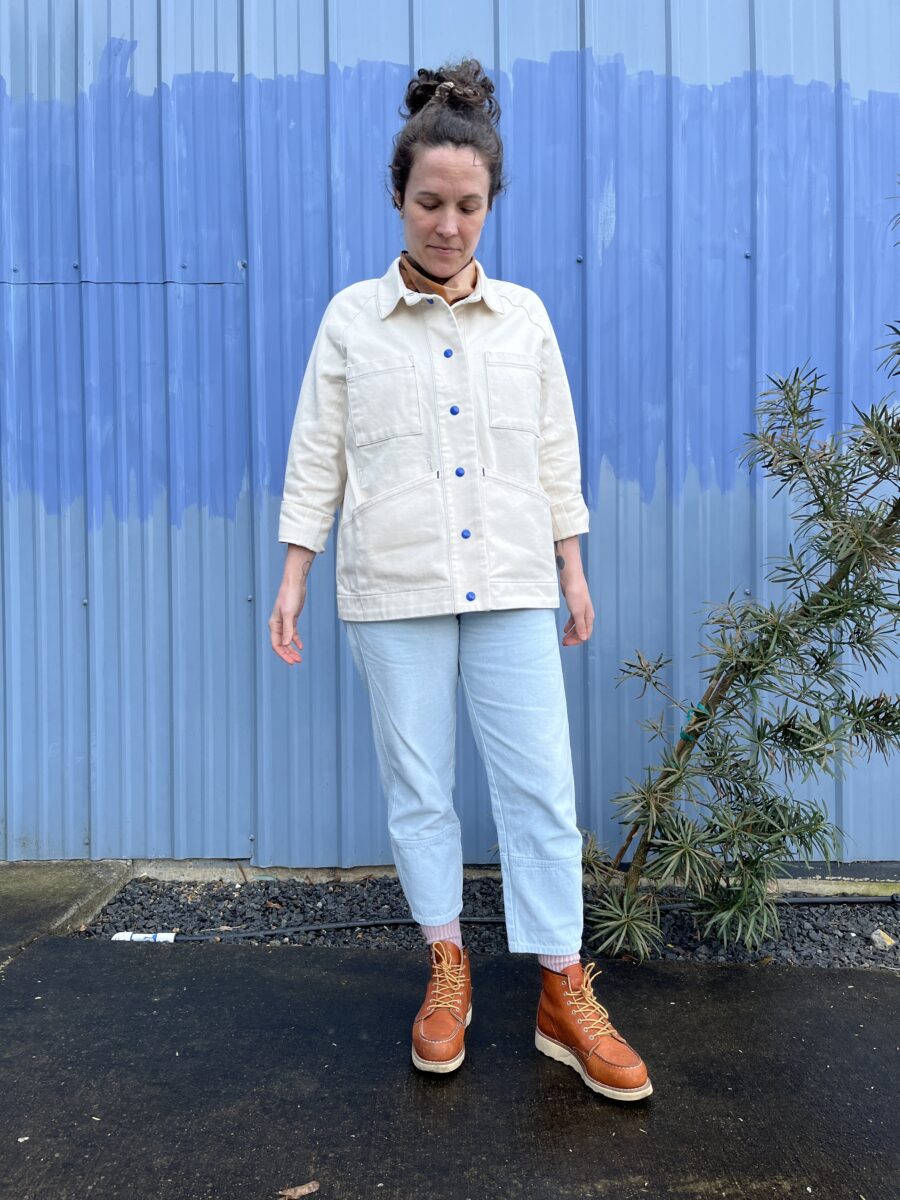
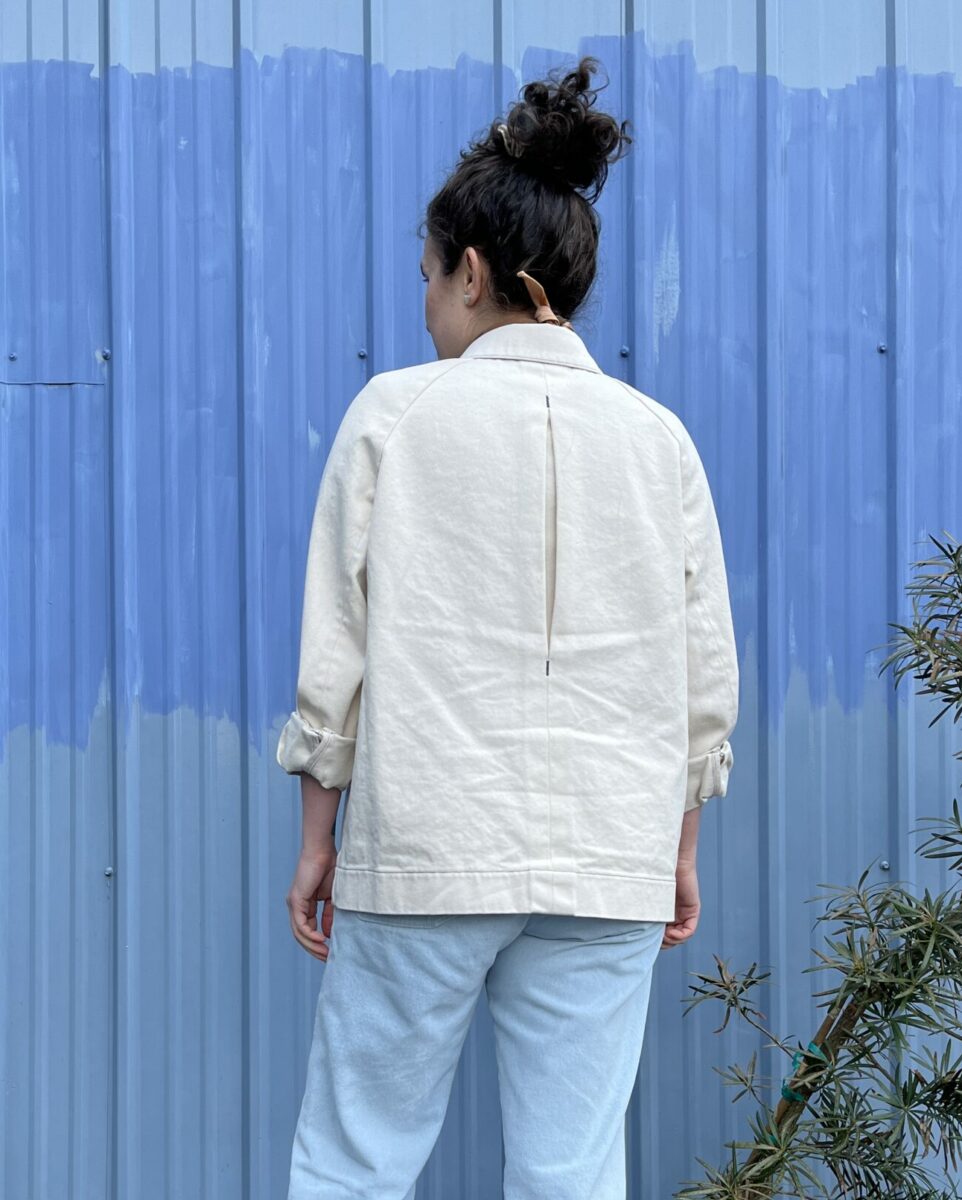
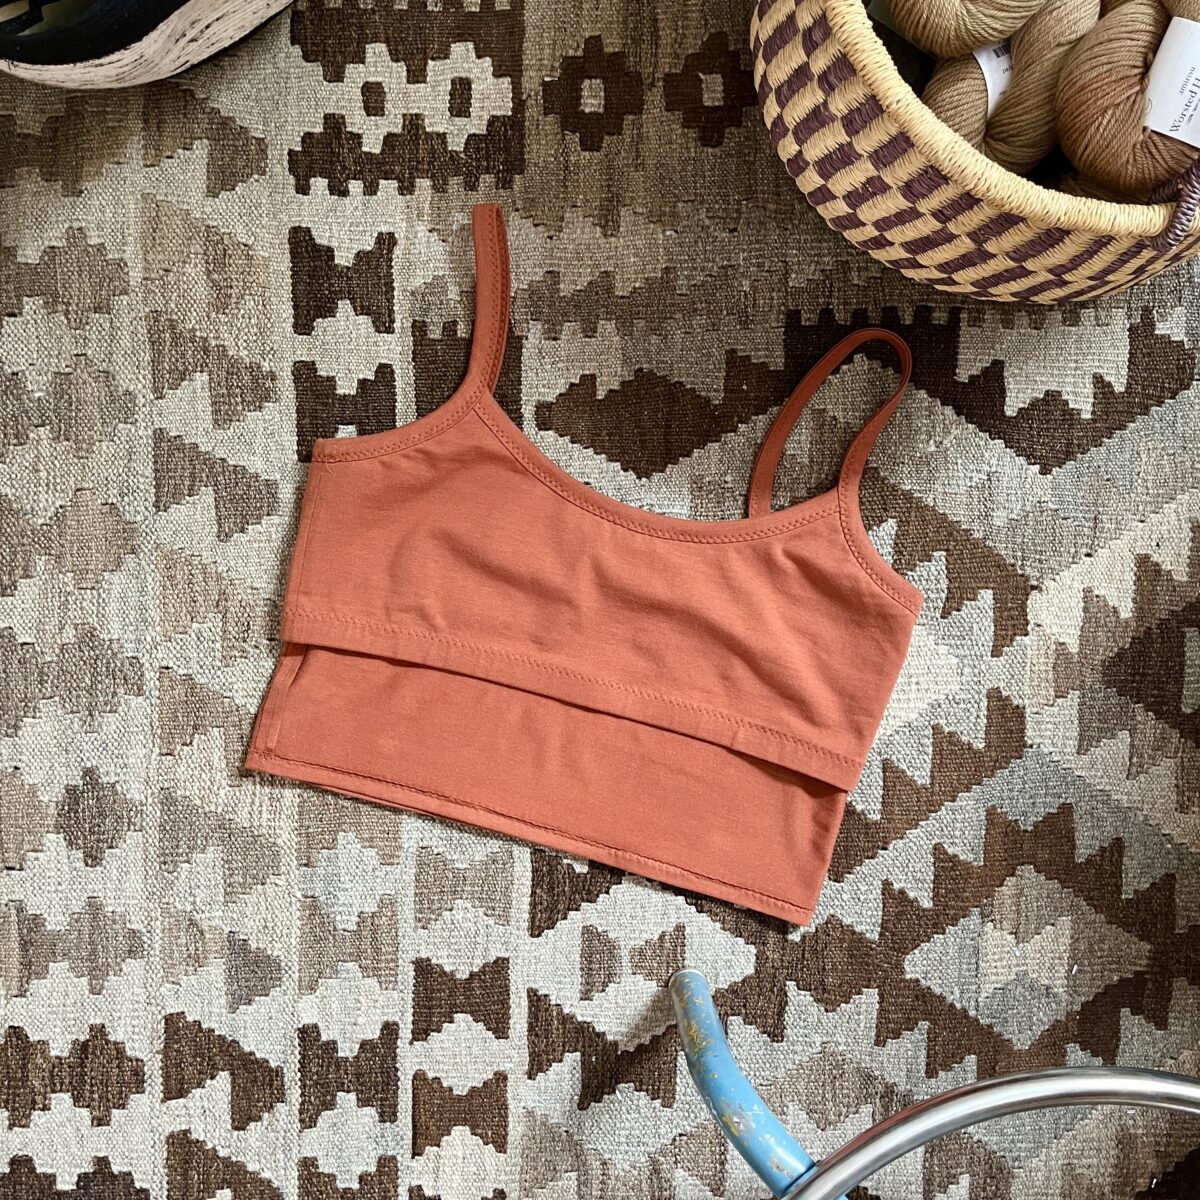
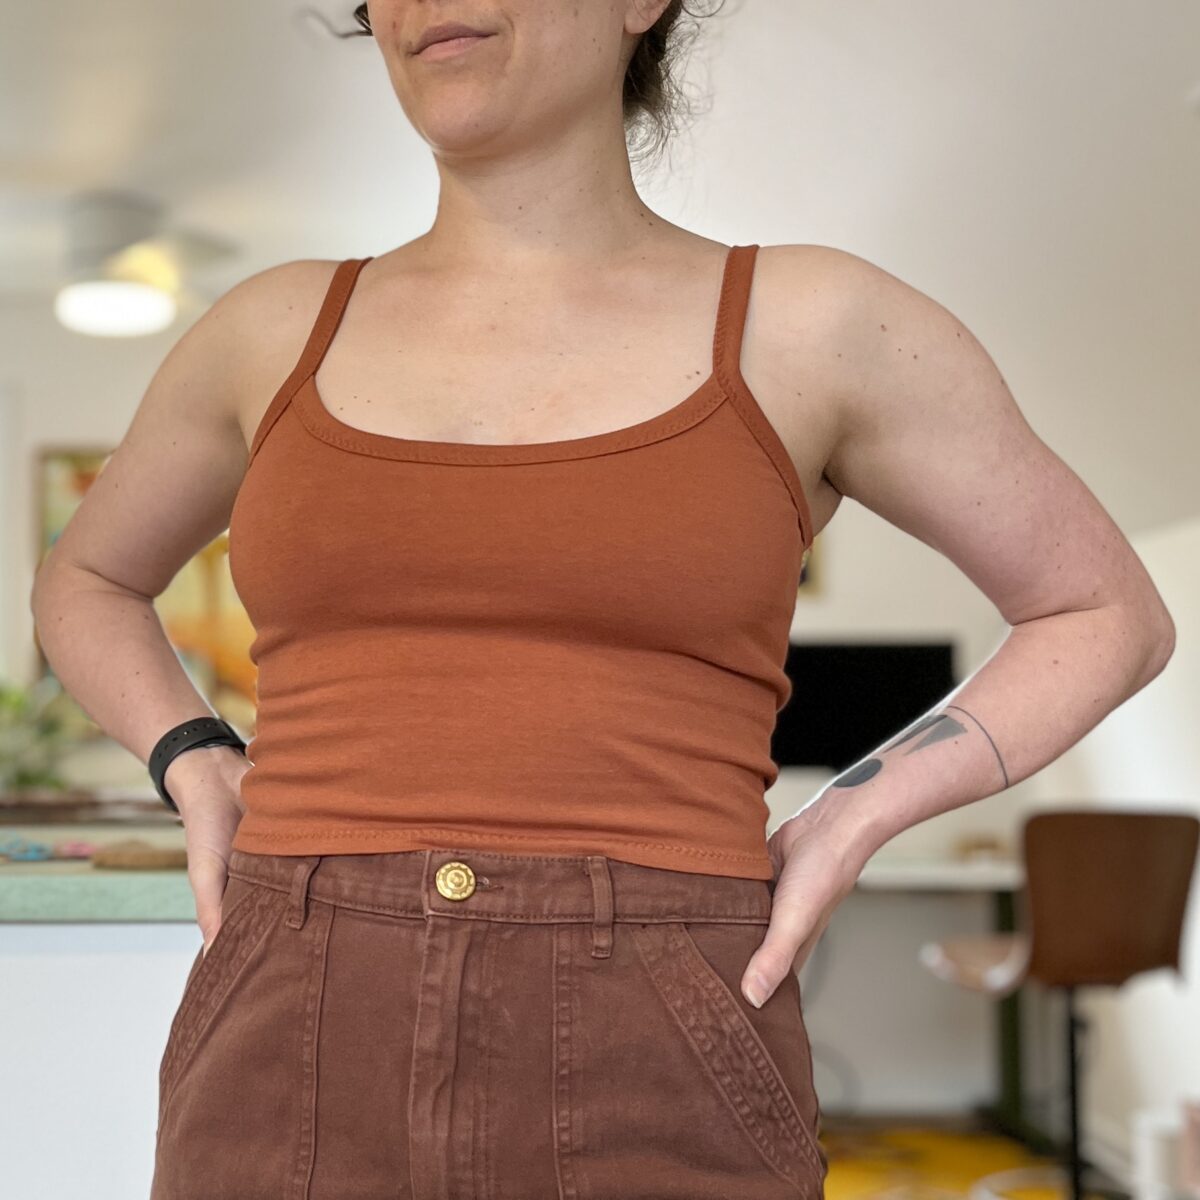
I know, I know. Neutrals are my favorite, but sometimes a primary pop is what a project needs.
This subtle splash of color was inspired by the jacket itself. While constructing, I thought it looked like a painter’s smock sans paint. Inspiration hit and I thought maybe some colorful snaps could stand in for paint smears.
After a quick google, I found both red and blue snaps and ordered. I ended up choosing the blue to coordinate with the dark blue topstitching.
This jacket is very easy to throw on and I’ve been wearing a lot. It features raglan sleeves, angled pockets that go all the way to the side seams creating FOUR POCKETS, a back pleat, stand collar, a perfect straight cut, and cuffs.
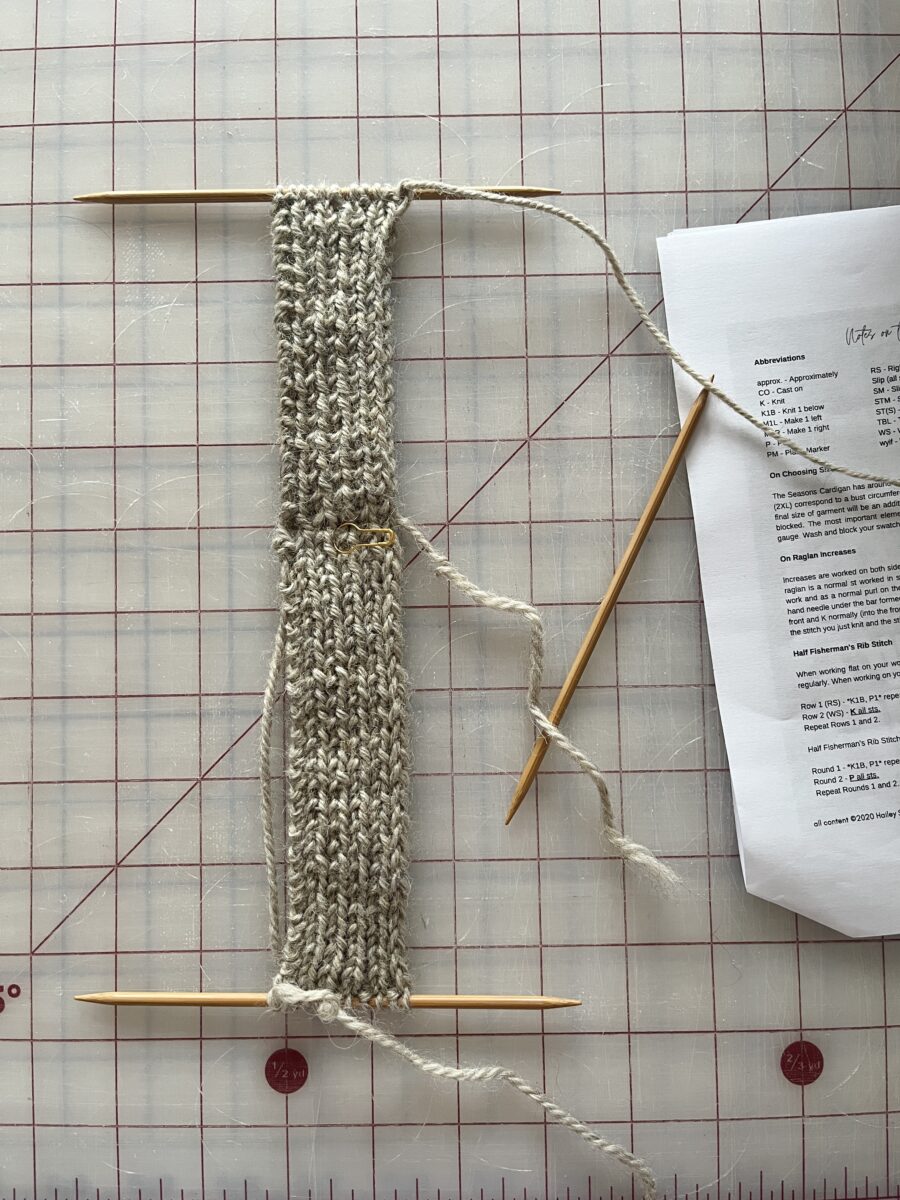
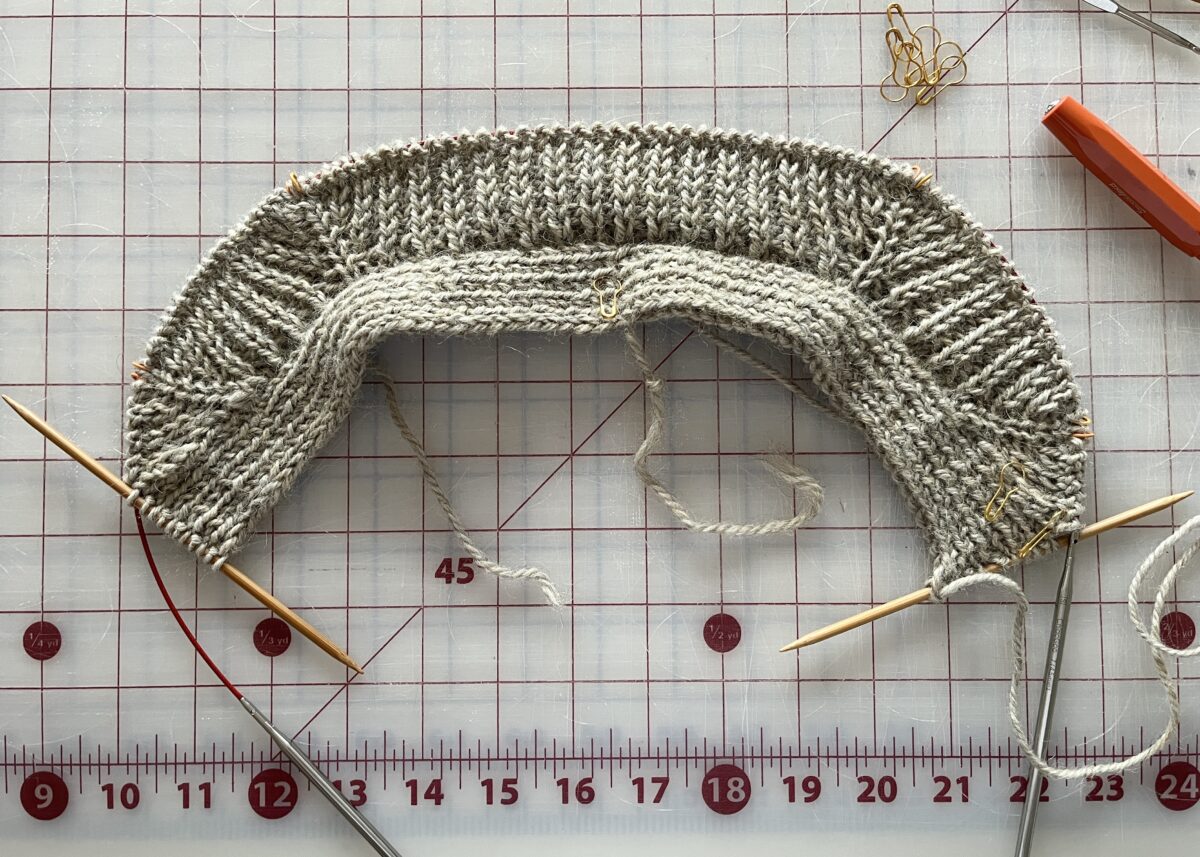
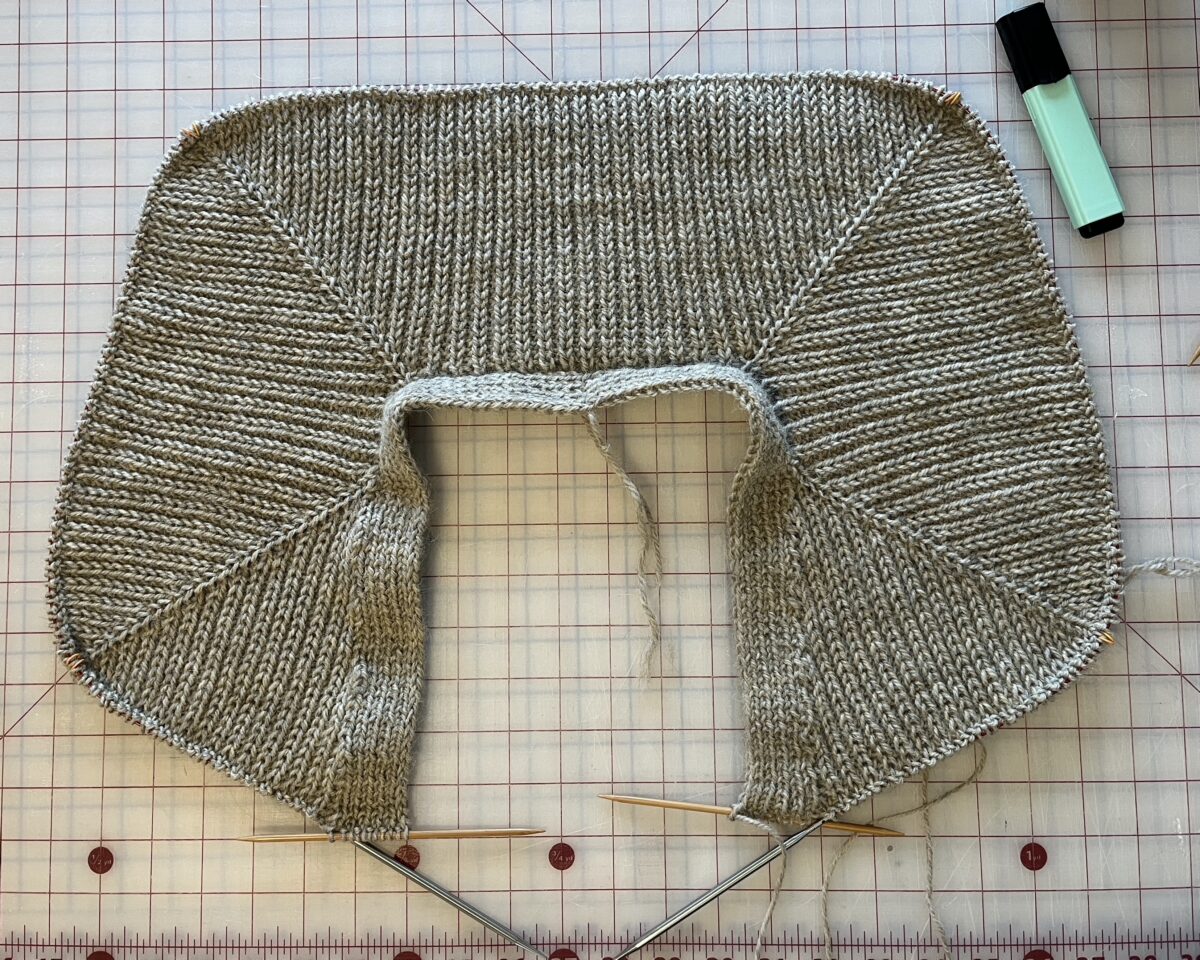
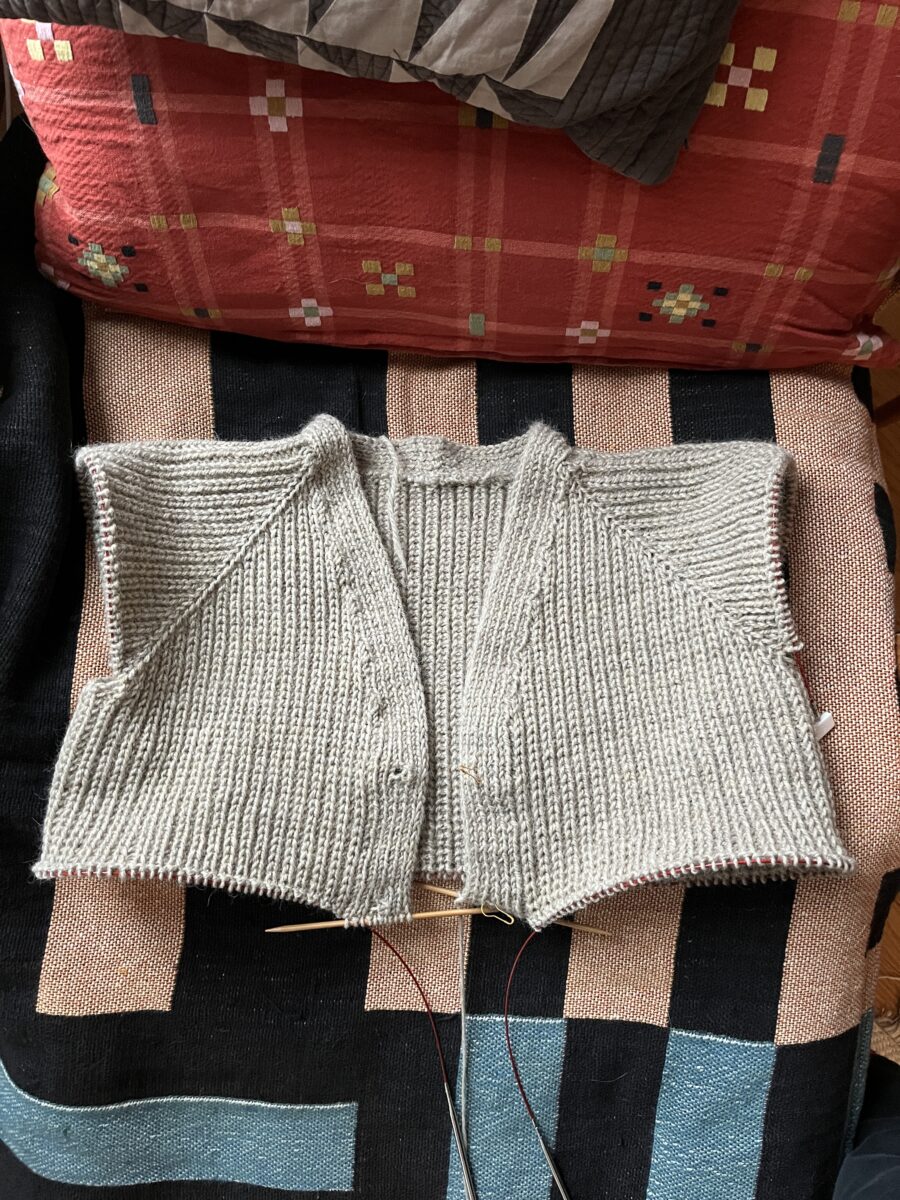
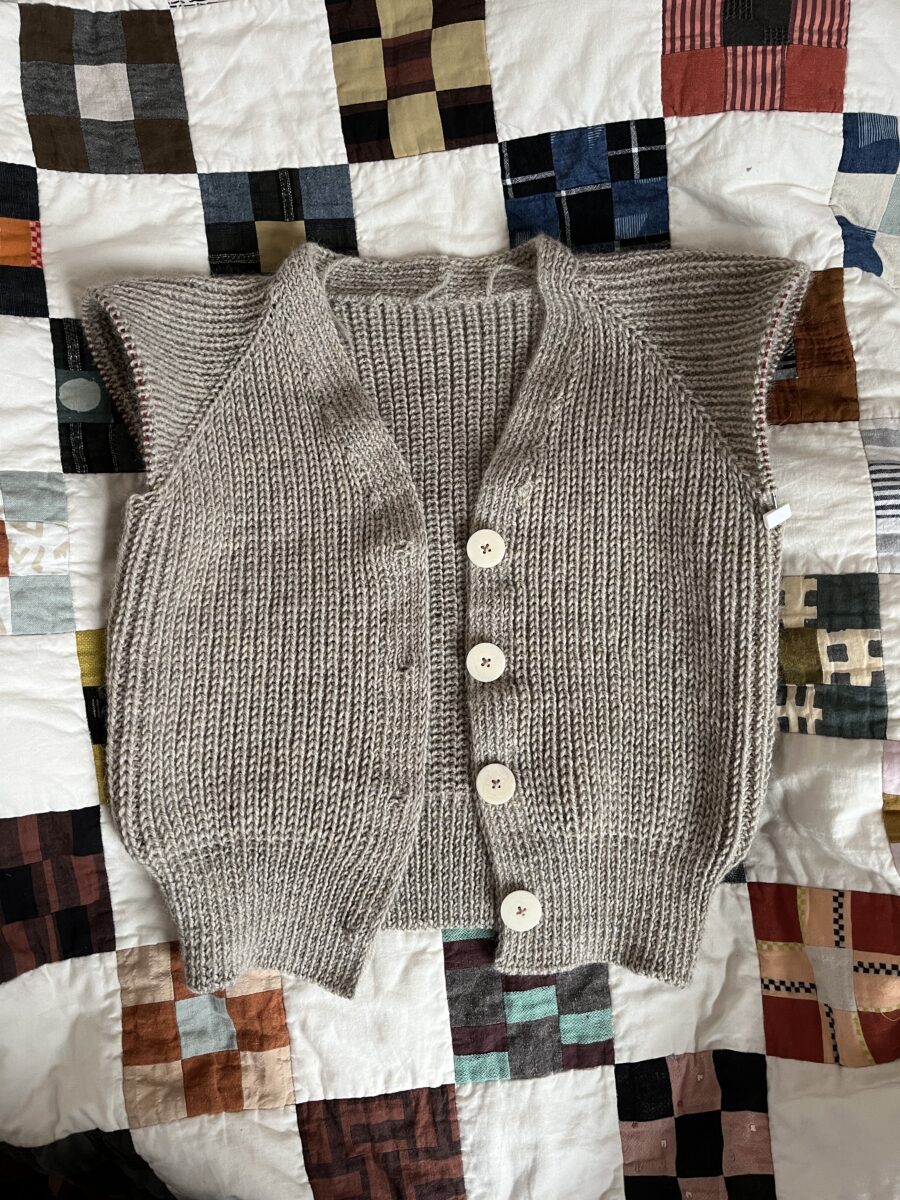
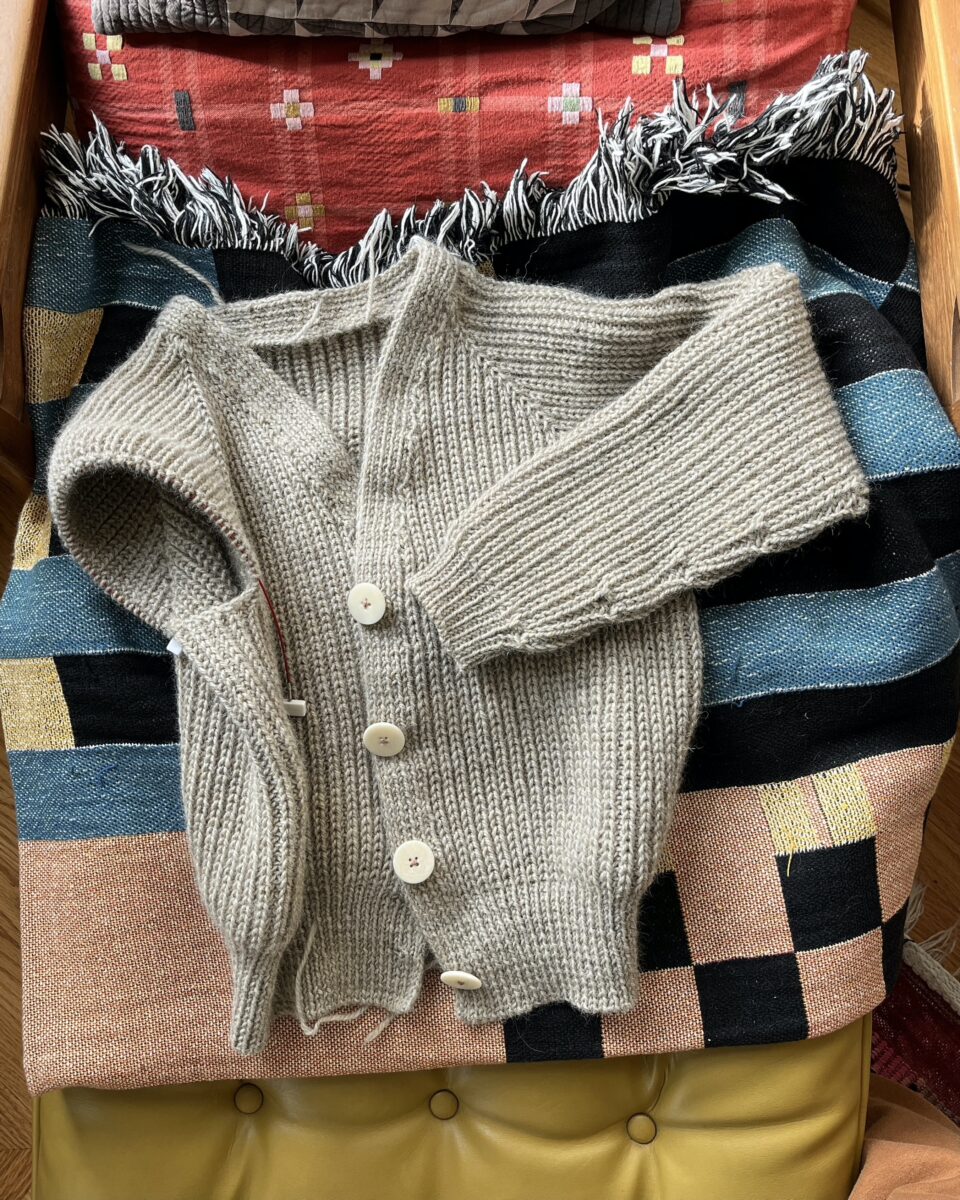
This project taught me an important lesson – one can’t just assume the steps and start knitting. I just didn’t read the instructions and had to redo the neckband multiple times. Once I finally realized it wasn’t just a simple K1, P1 repeat (by reading), it took off and was a pretty fun knit.
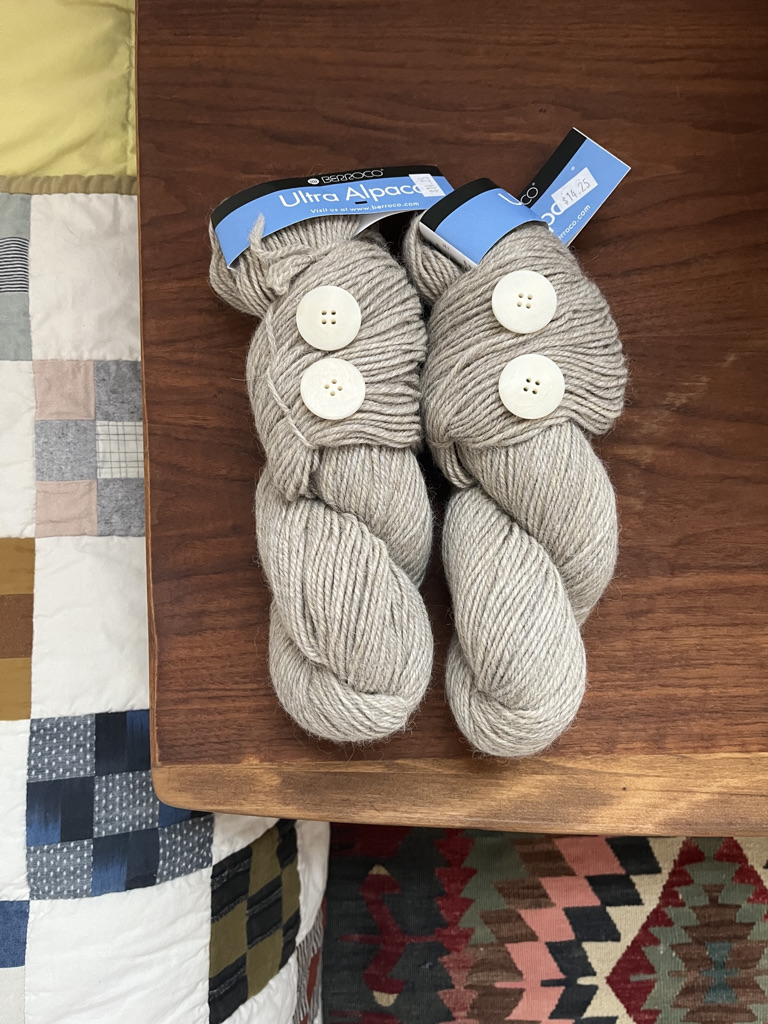
I bought the yarn and buttons over a year ago, but didn’t feel ready for the pattern until completing the pullover version. Now that I’ve knit both, I think the cardigan is actually easier – the short rows in the pullover kinda broke my brain.
The coolest part of this pattern is that the neckband is knit with the body. I used Berroco Ultra Alpaca in Barley and made a size M.
I shortened the sleeve cuffs by half. The sleeves are a little longer than I’d like after blocking but not enough to redo.
This sweater is a classic and it’s going to get a lot of wear. I’m considering making the oversized version at some point but definitely need a break from half fisherman’s rib for a bit.
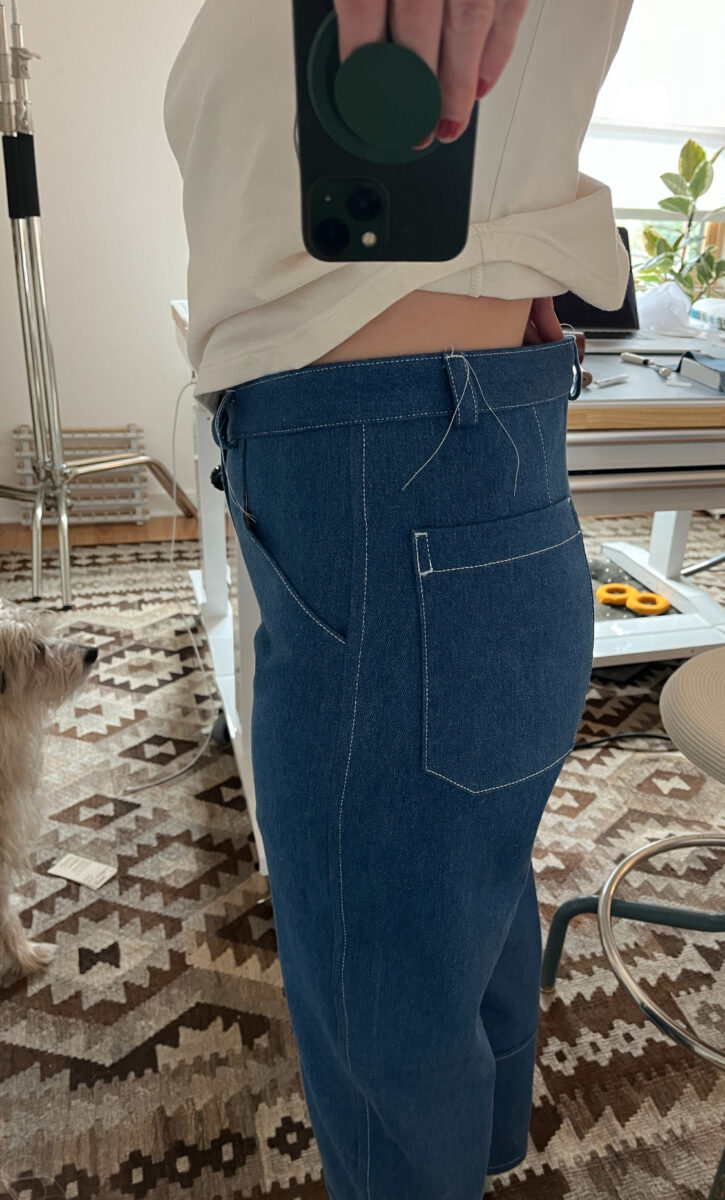
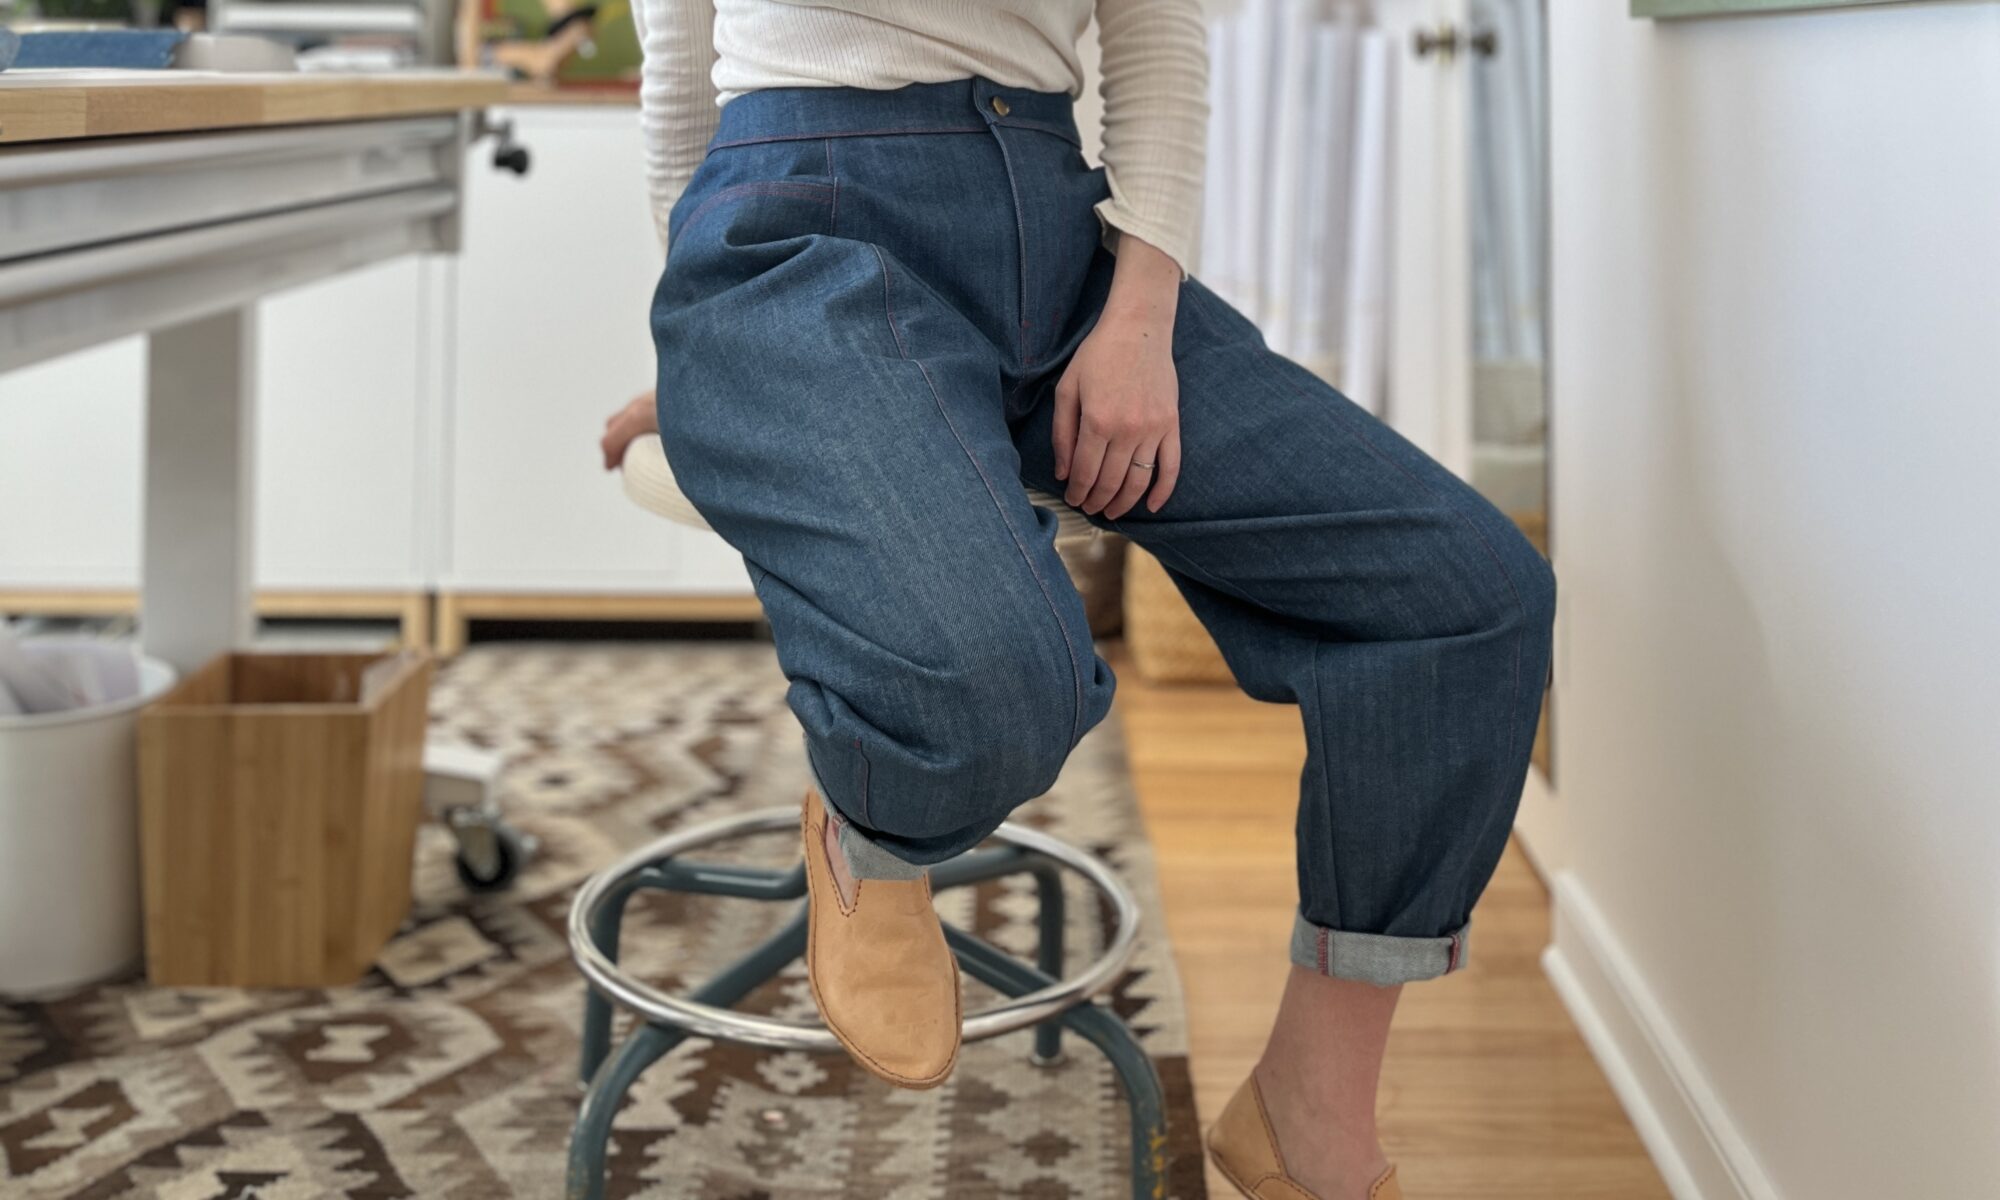
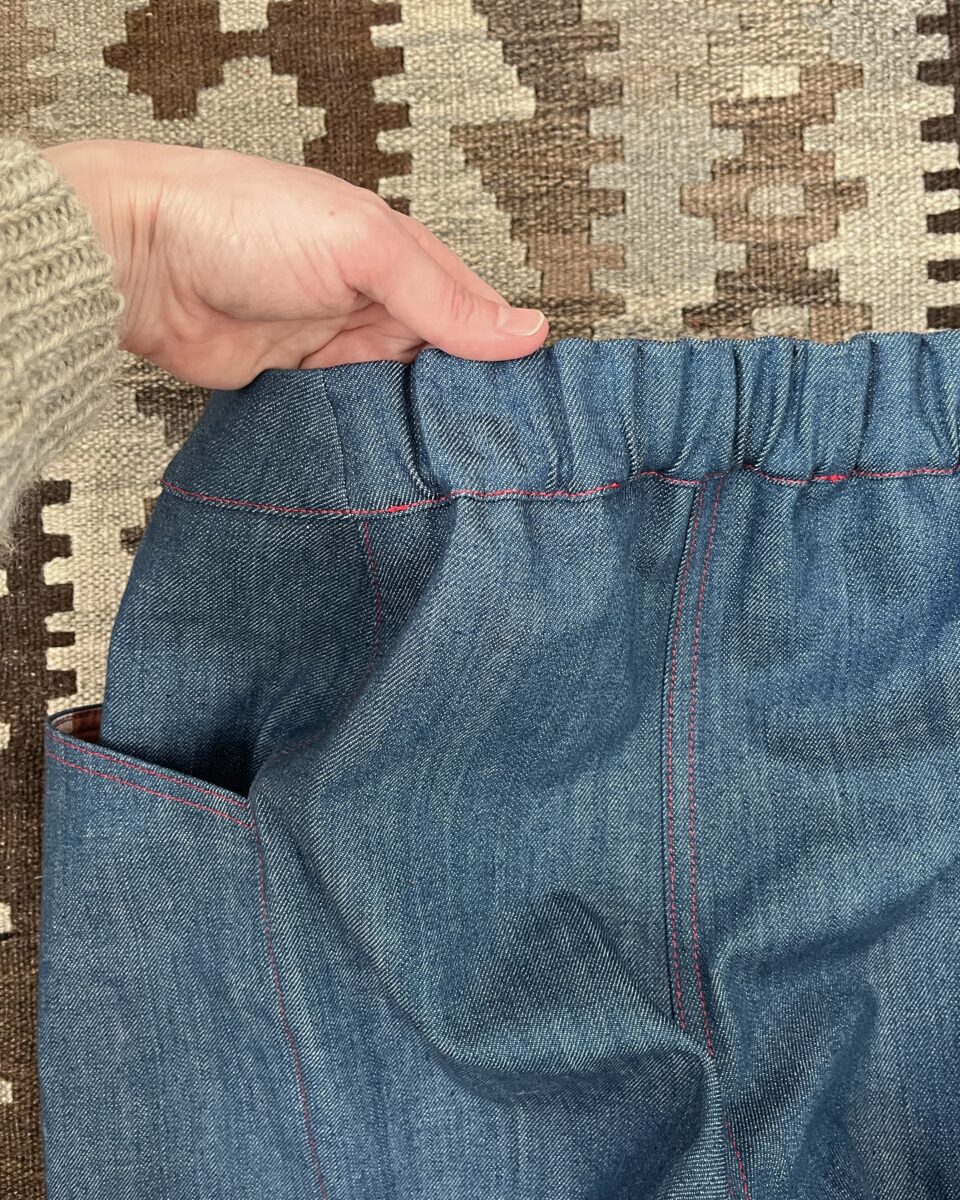
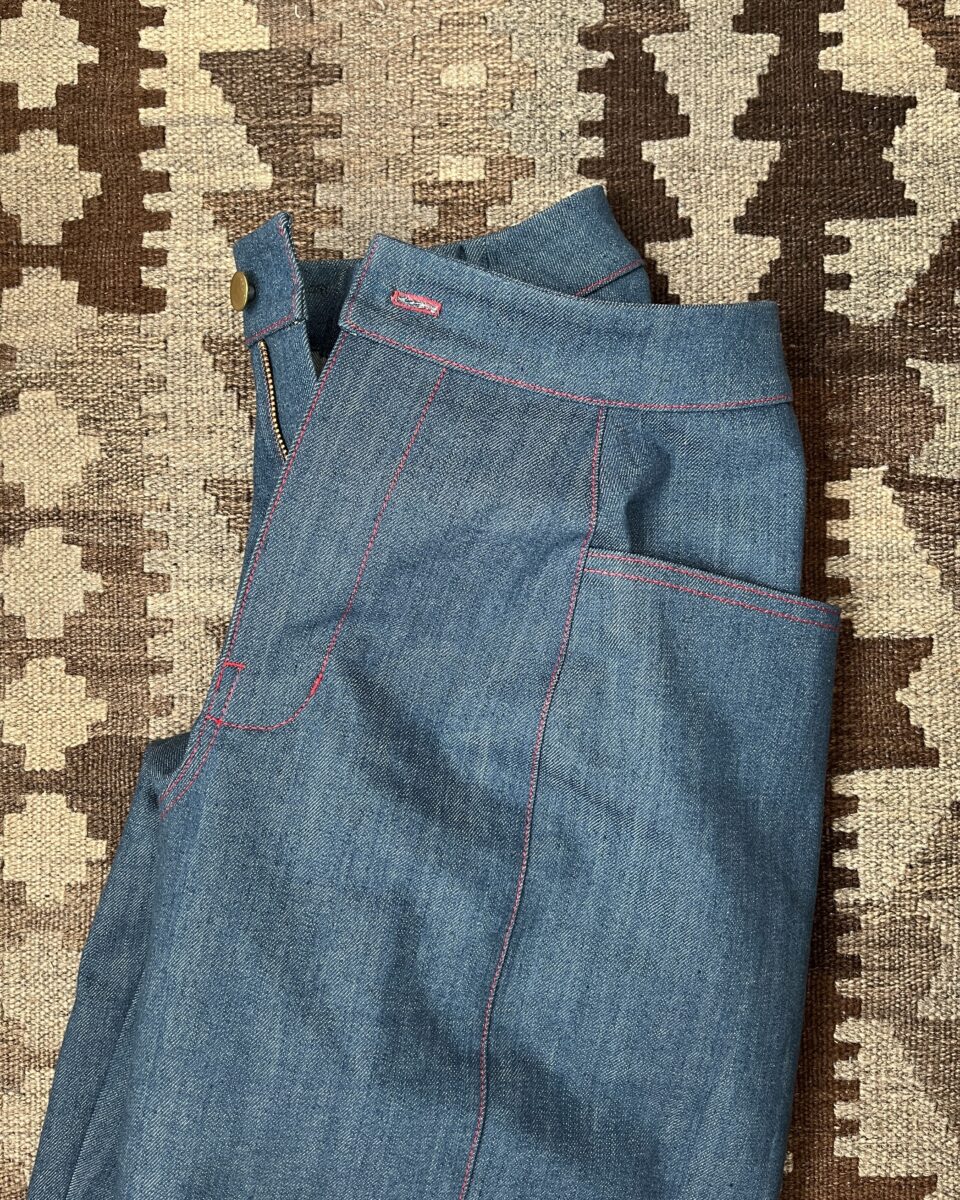
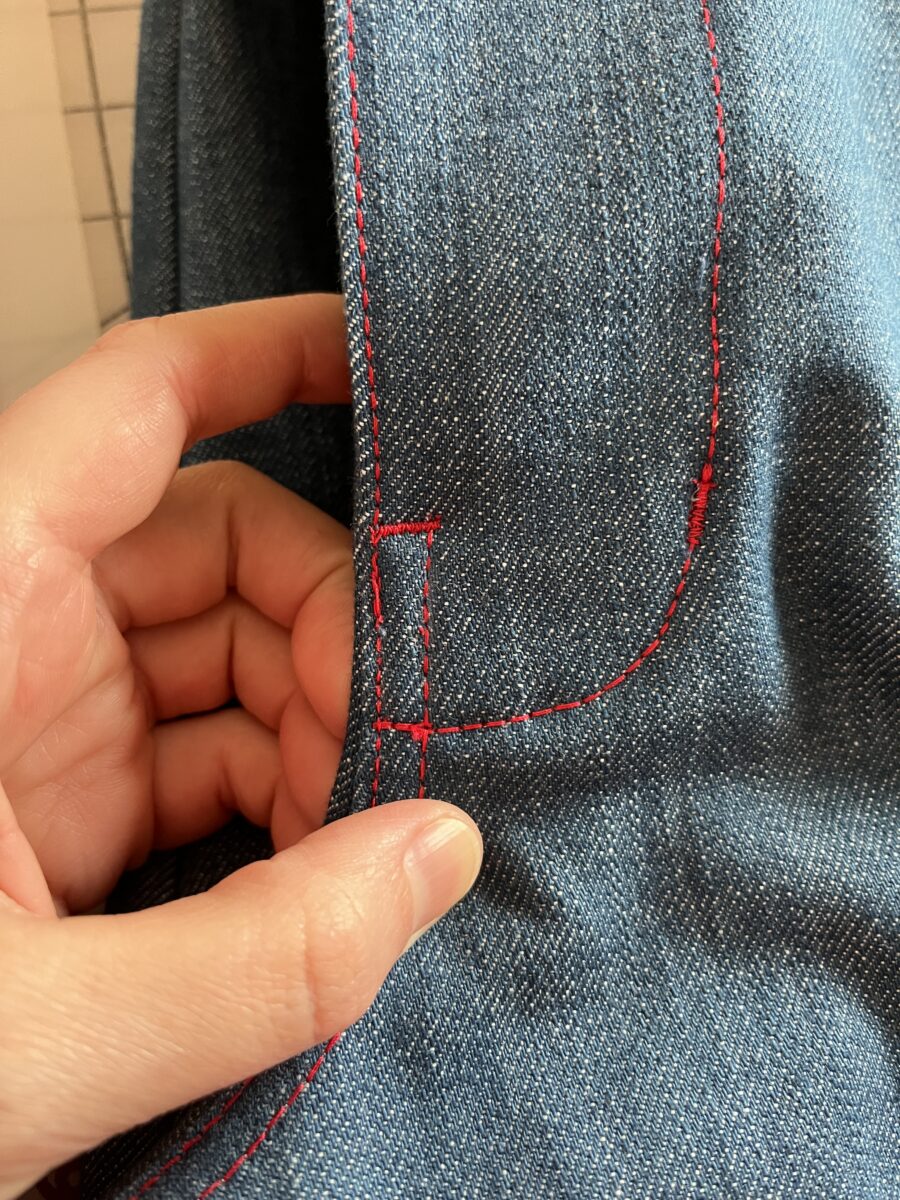
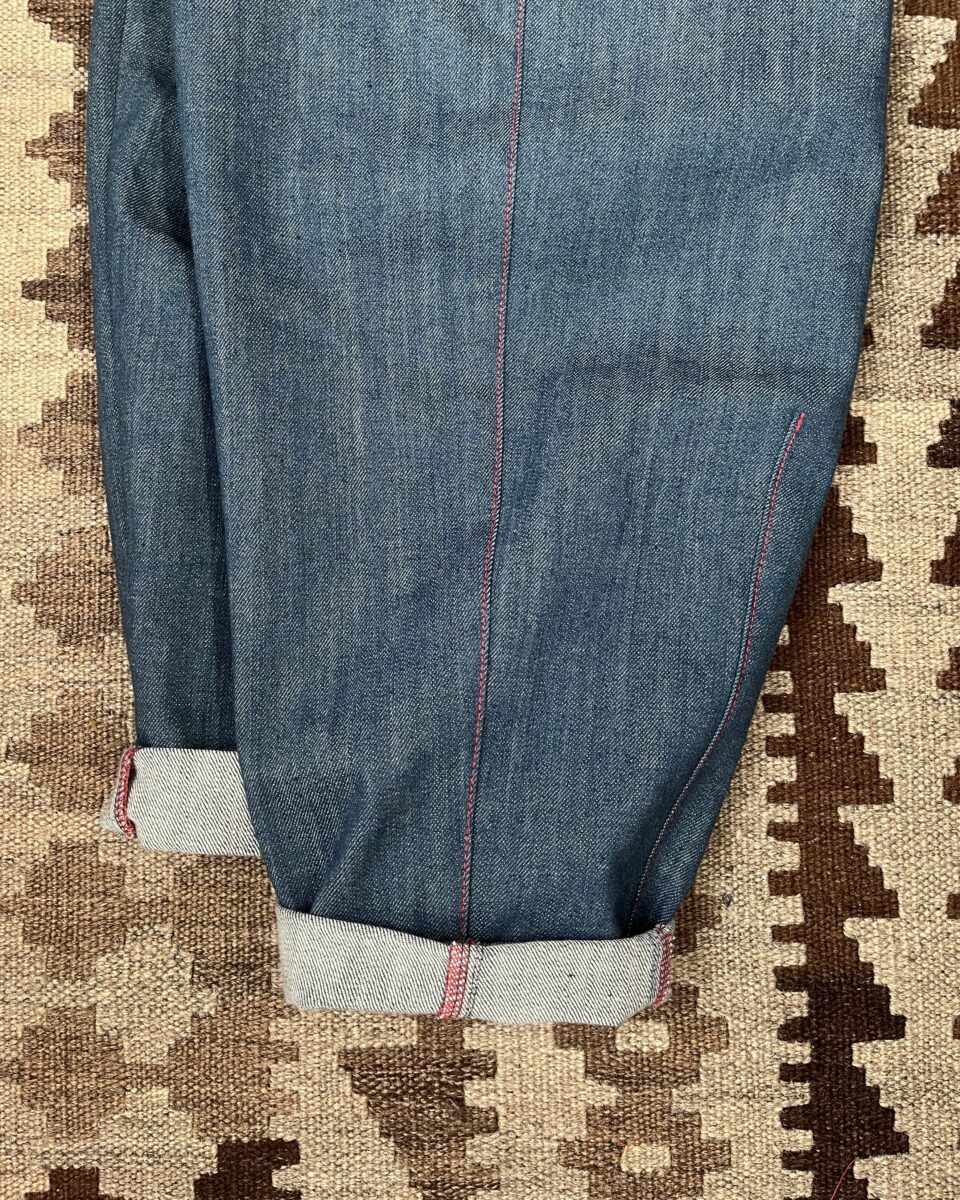
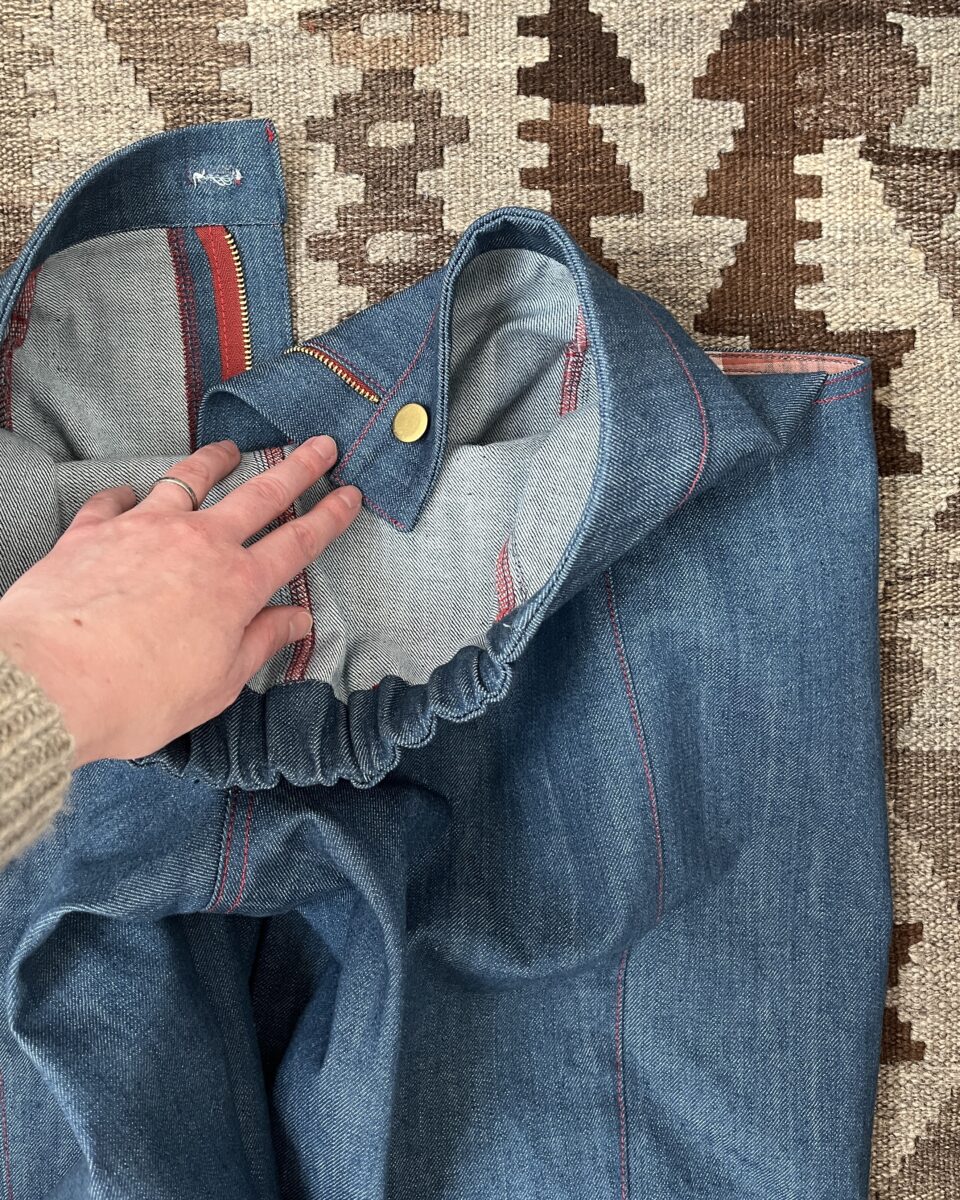
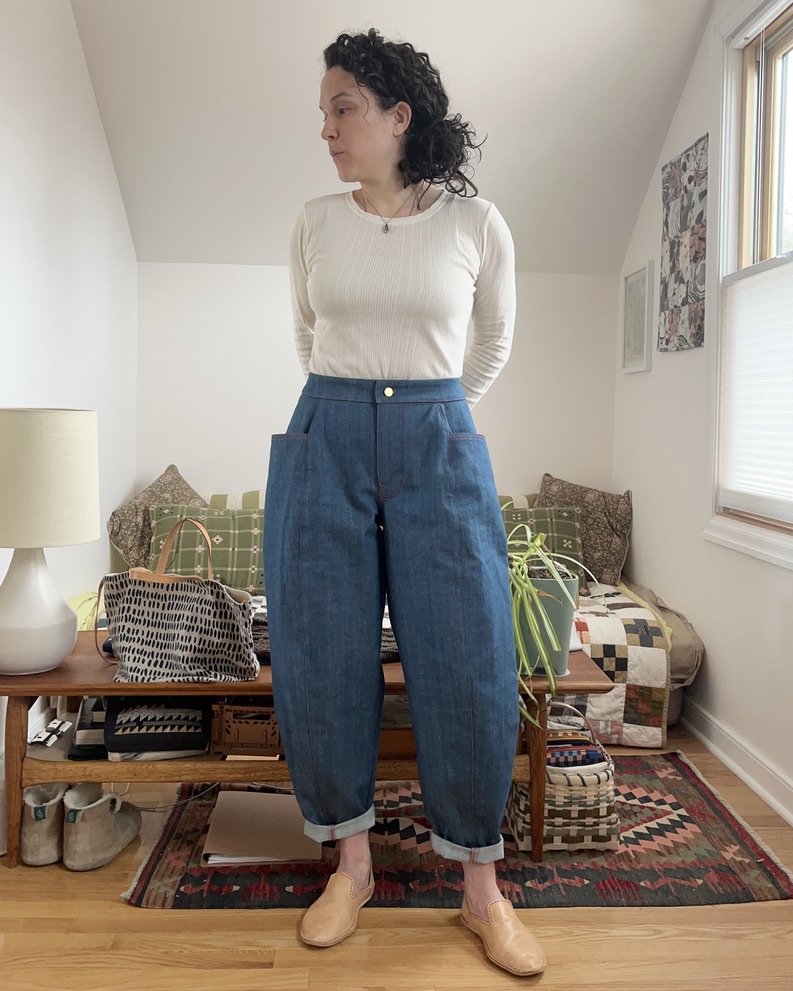
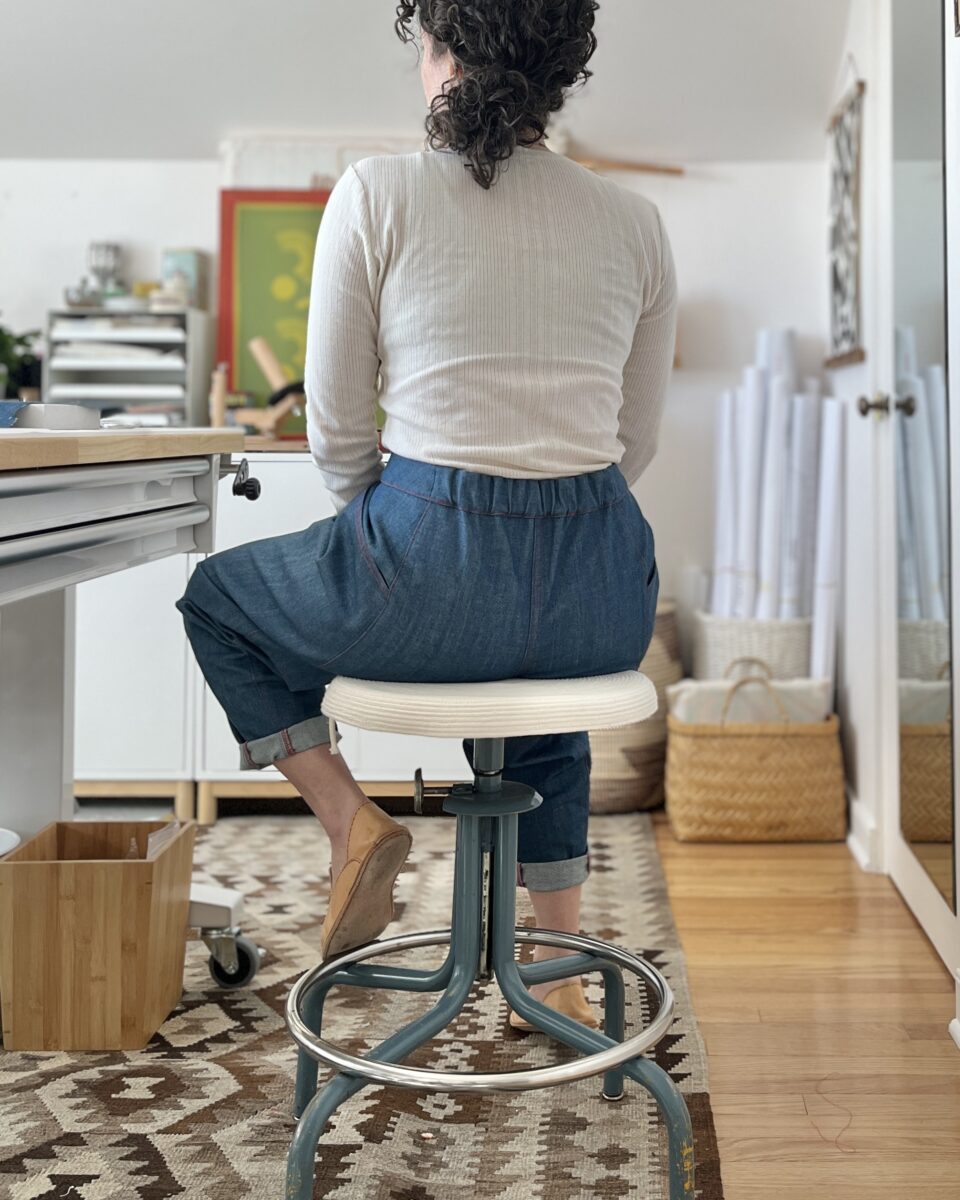
Iggy Pants | Seamwork
My stomach hates tight waistbands so I fricking LOVE pants with elastic backs. Also love a weird leg shape!
A pair of pants from Big Bud Press got the idea of red topstitching stuck in my head and this pattern seemed perfect for a pop of red. Plus, I already had a red zipper in my stash.
I first made a size 8 but then realized I hadn’t taken my measurements in a while. The 8 fit but didn’t have the waistband comfort I wanted, so this denim pair is a size 10. I did need to pull the elastic a little tighter to get the fit just right.
A few ways I deviated from the instructions:
Serged off the dart uptake to make the hem less bulky.
Pressed the seams to one side and topstitched.
Added more topstitching overall (pockets, fly, rise, darts).
Attached waistband to inside of pants first, then topstitched the fold and added elastic from the outside.
Used one tack button instead of two regular buttons.
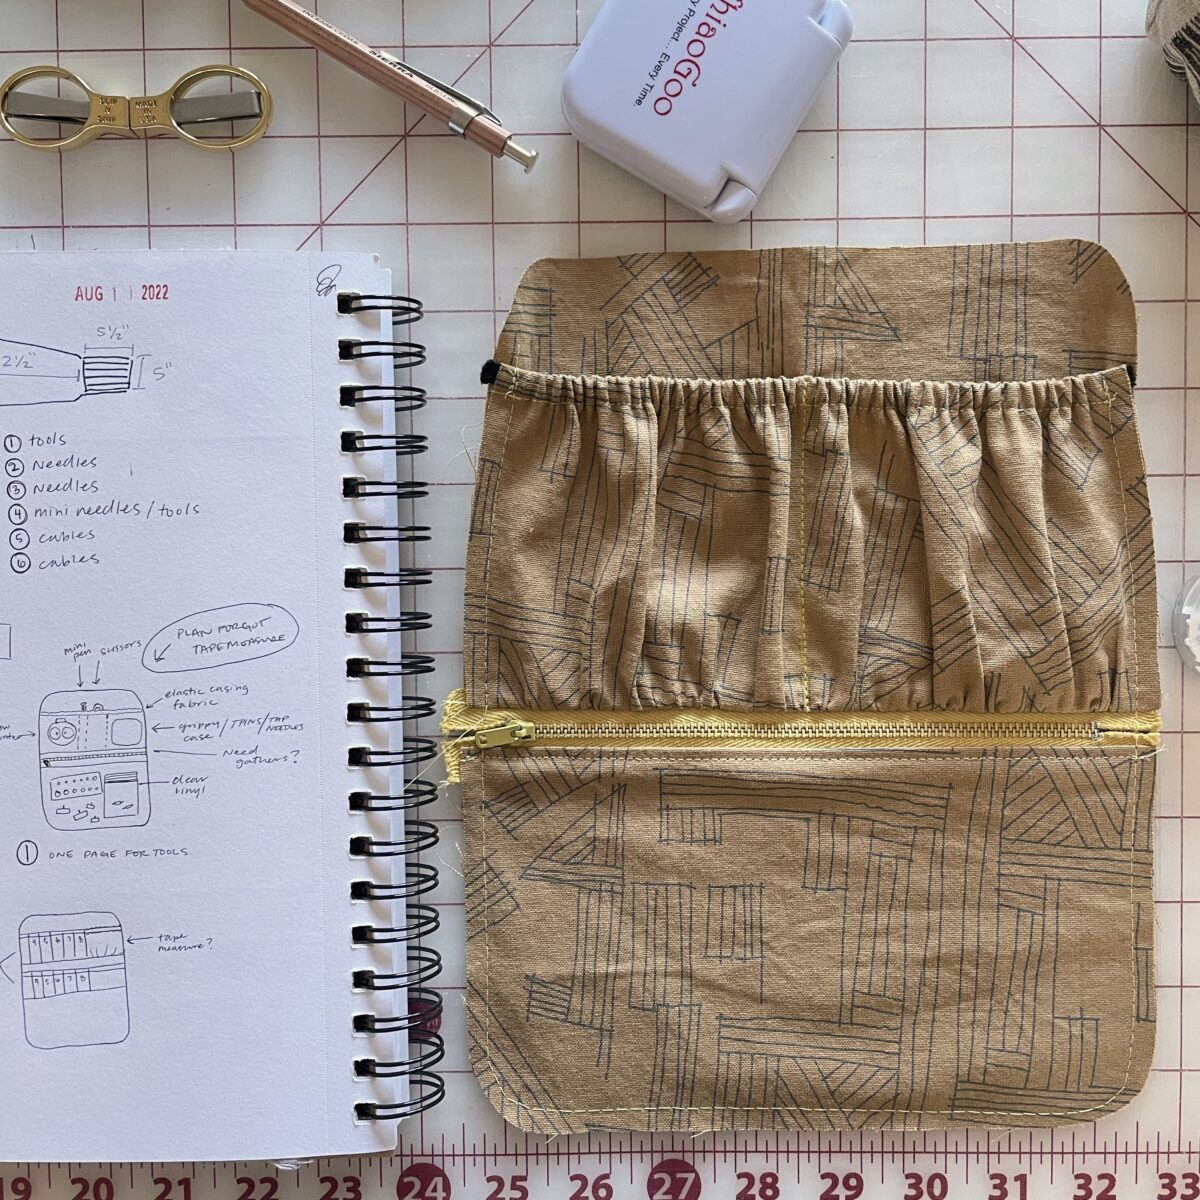
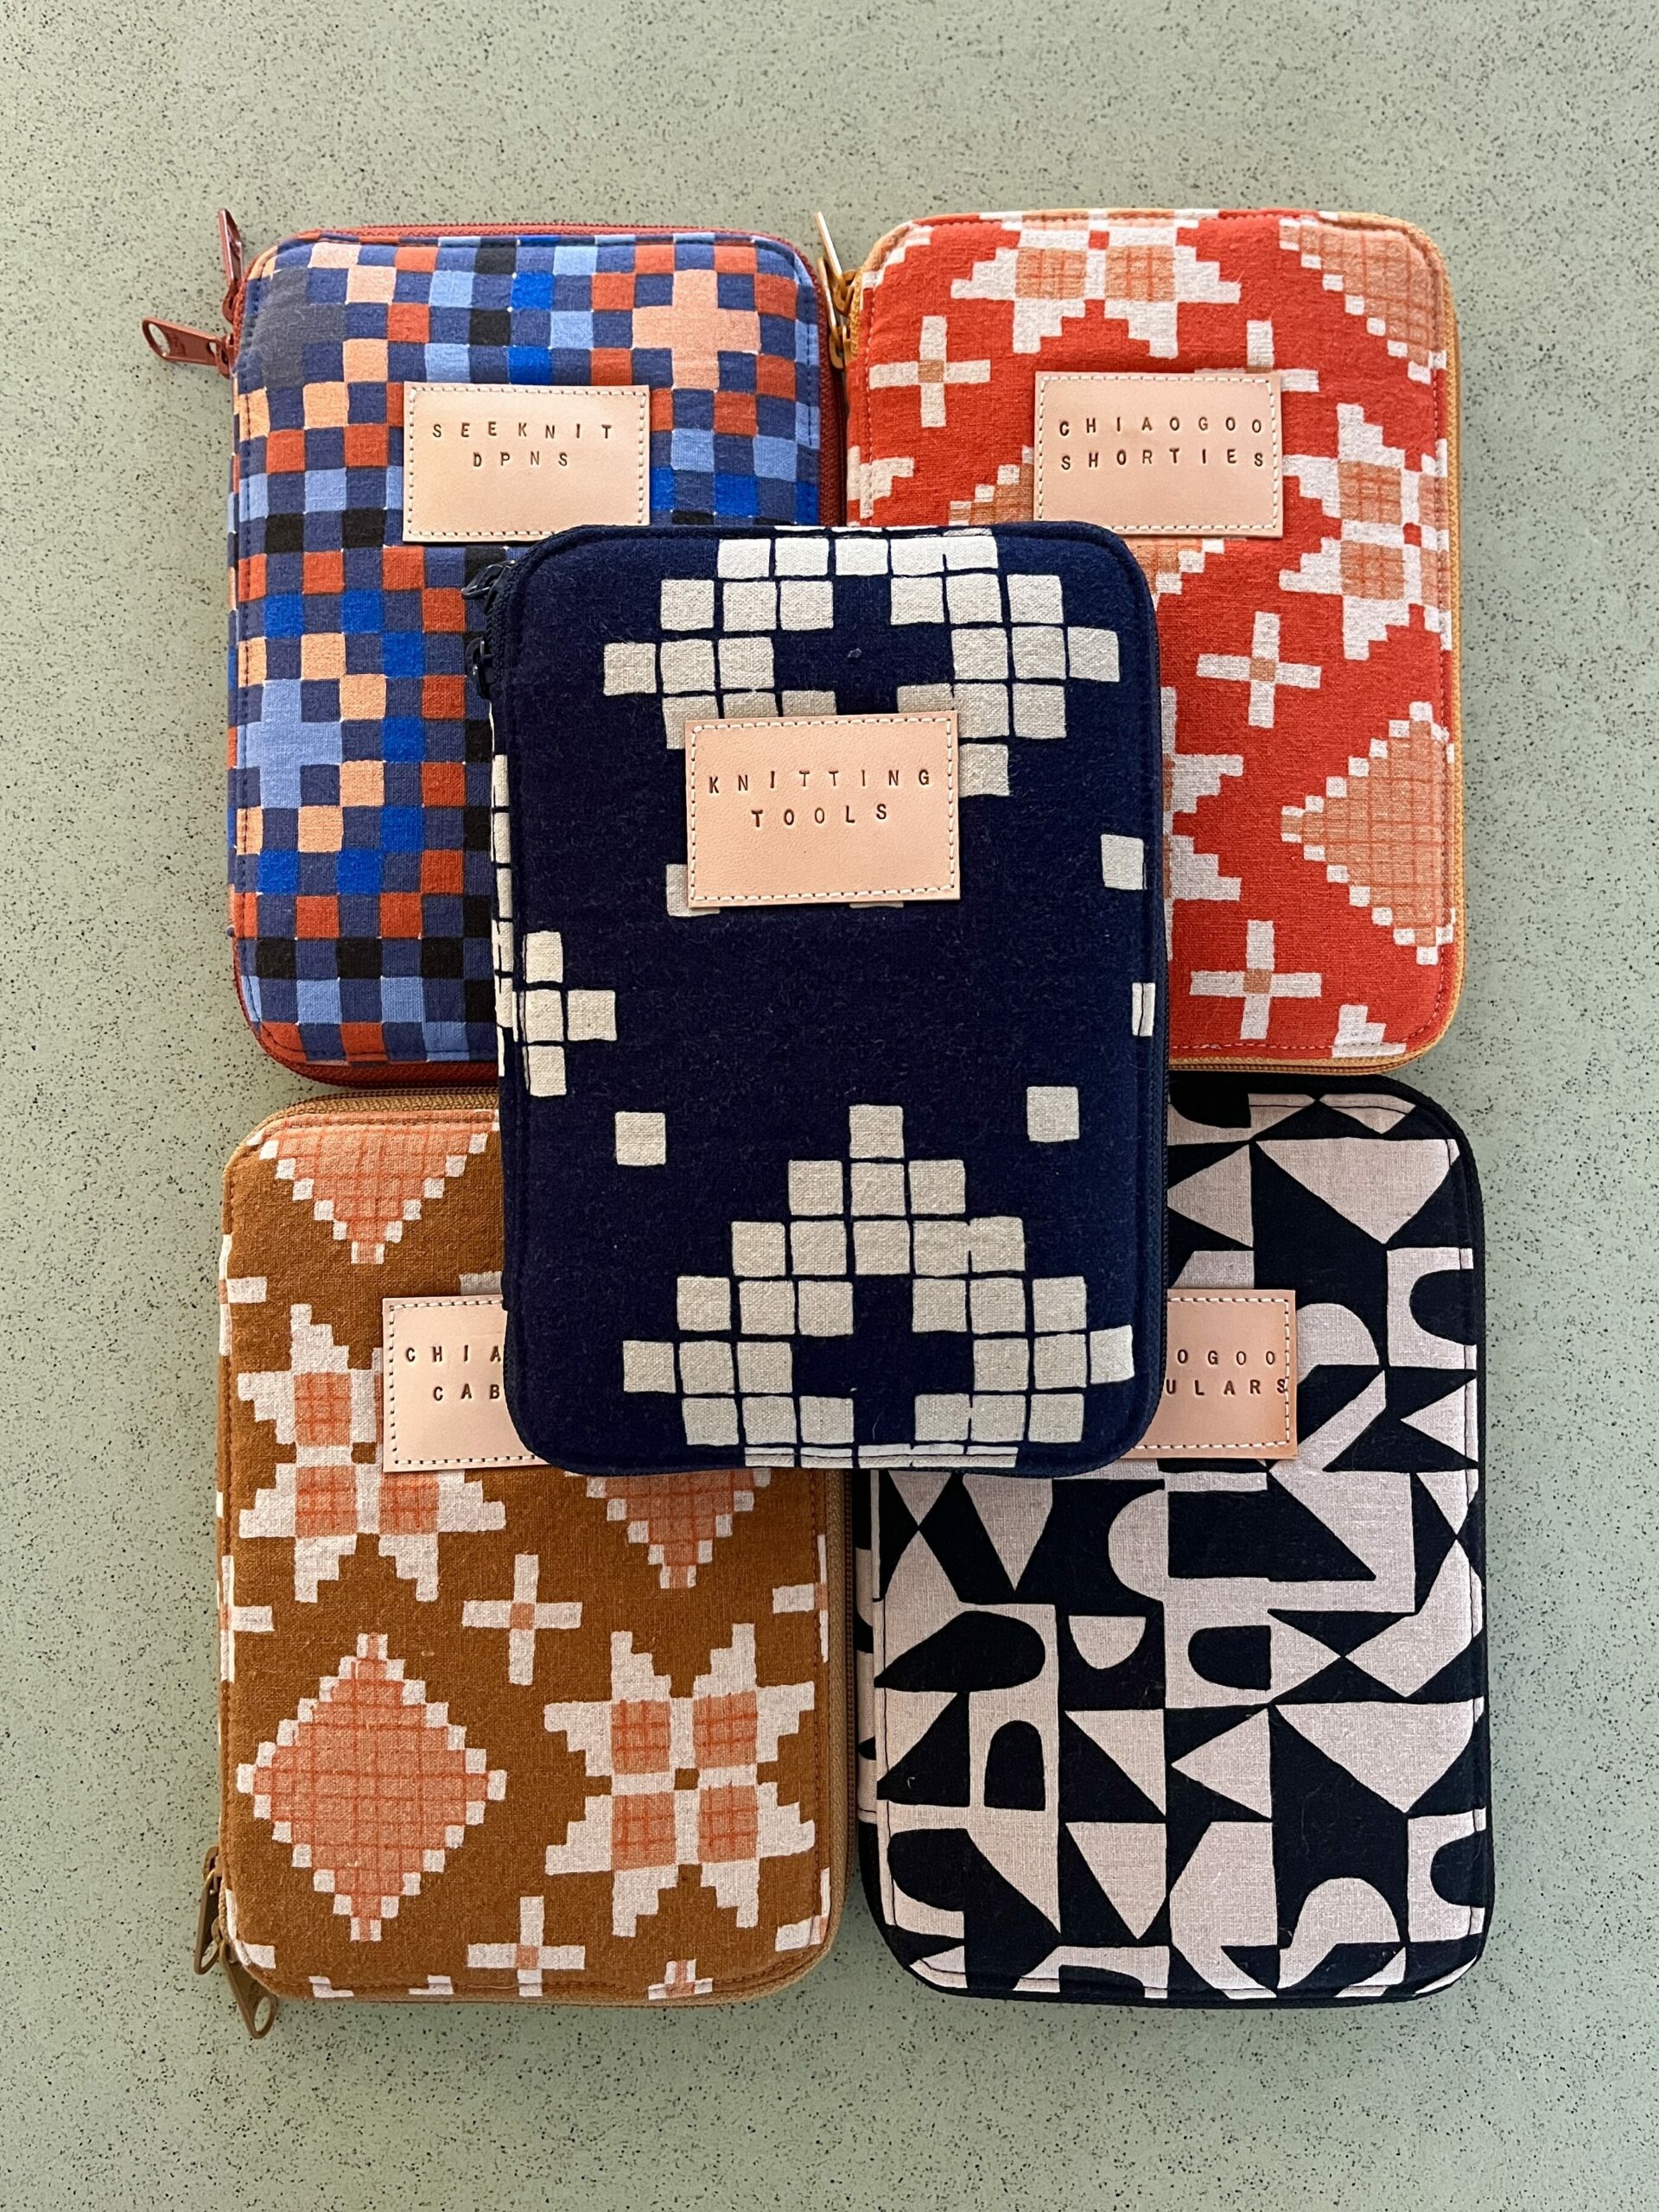
I started planning an ‘ultimate’ knitting case project in September of 2022 mainly because I hated the case my interchangeable set came in. The case’s function was fine, but I did not enjoy the way it looked. It also didn’t hold everything I like to have on hand for knitting.
I planned to use this pattern so that everything could live in one multi-layer case. After months of thinking about the pages, I finally started assembly in December. Everything was going great until I needed to attach the middle section to the first. I tried, but the combination of chunky zipper pulls, the B770’s giant presser feet, and my desire for neatness meant I needed to abandon this plan.
Initially I was really bummed. I’d spent money on supplies, cut up two shirts, spent so much time planning, and endured months of not knowing where anything was. I also thought having everything in one case was the best option.
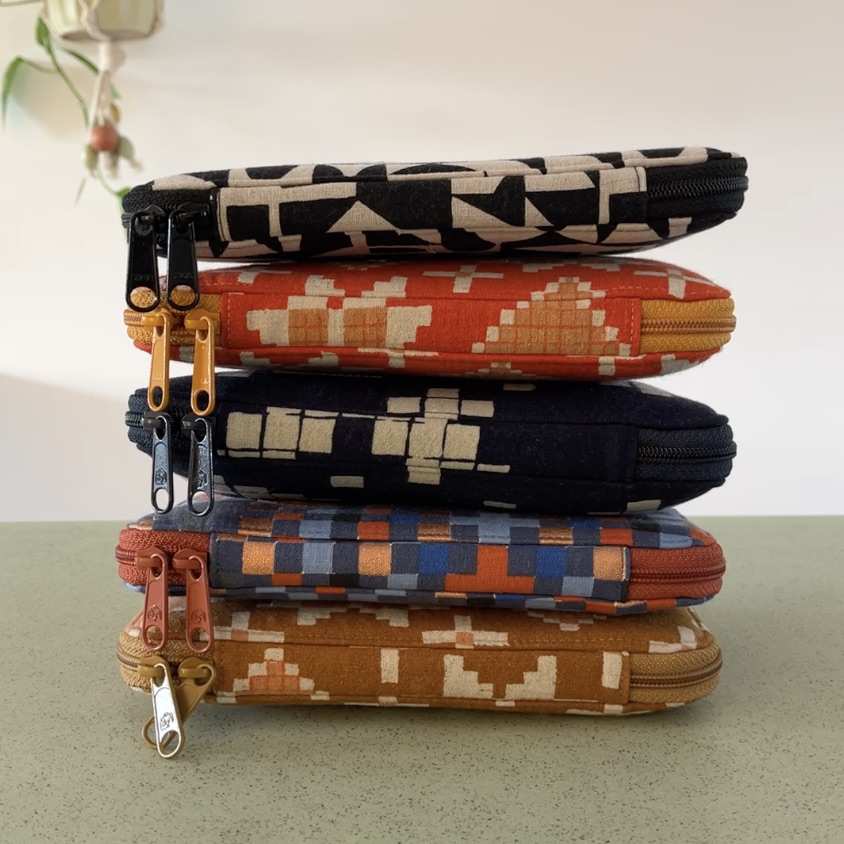
Since I had discarded the original Chiaogoo case, I had to do something. So I decided to make separate cases for my circulars, DPNs, tools, cables, and shorties. And since I’d used up all of the shirt fabric on my flop, I’d use leftovers from knitting project bags. Then everything would match!
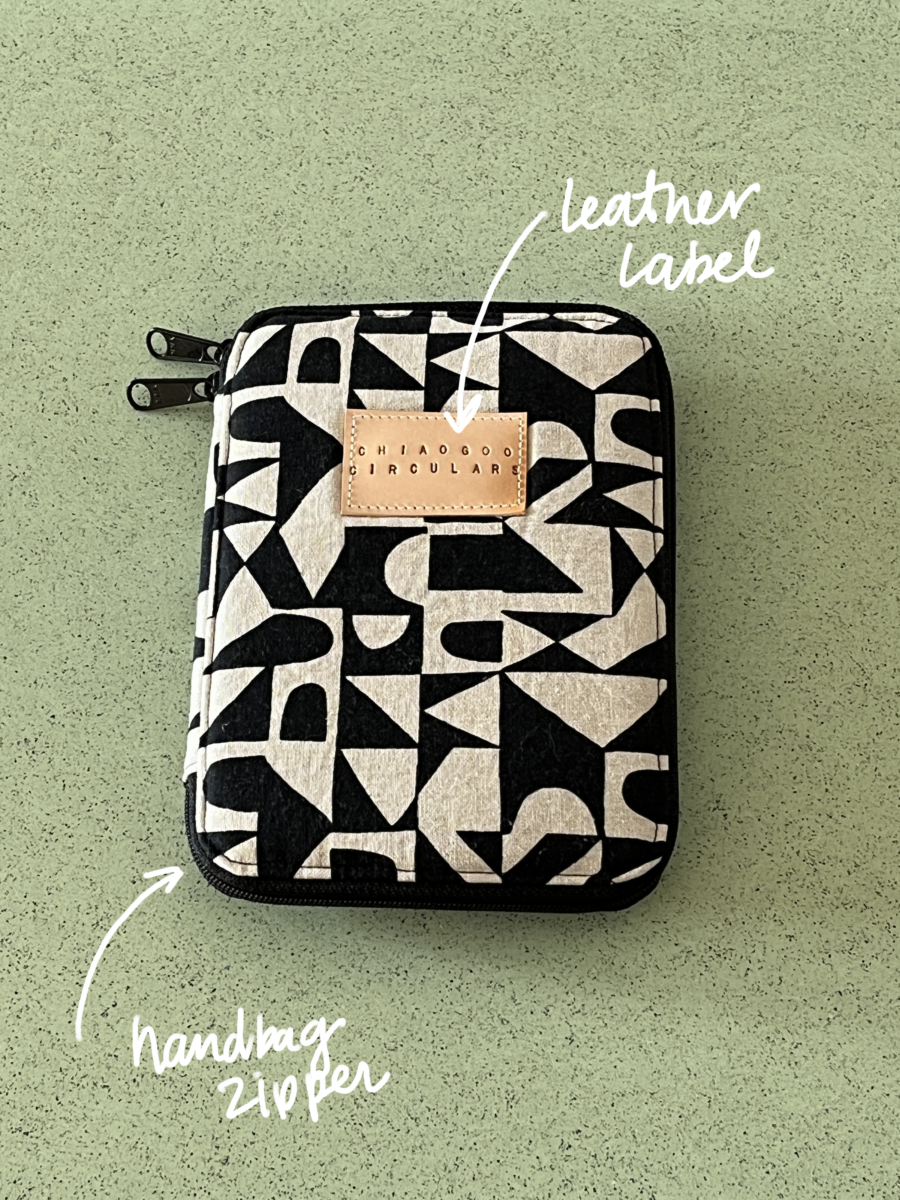
SUPPLIES: Handbag zippers and mesh from ByAnnie and leather patches from Noodlehead.
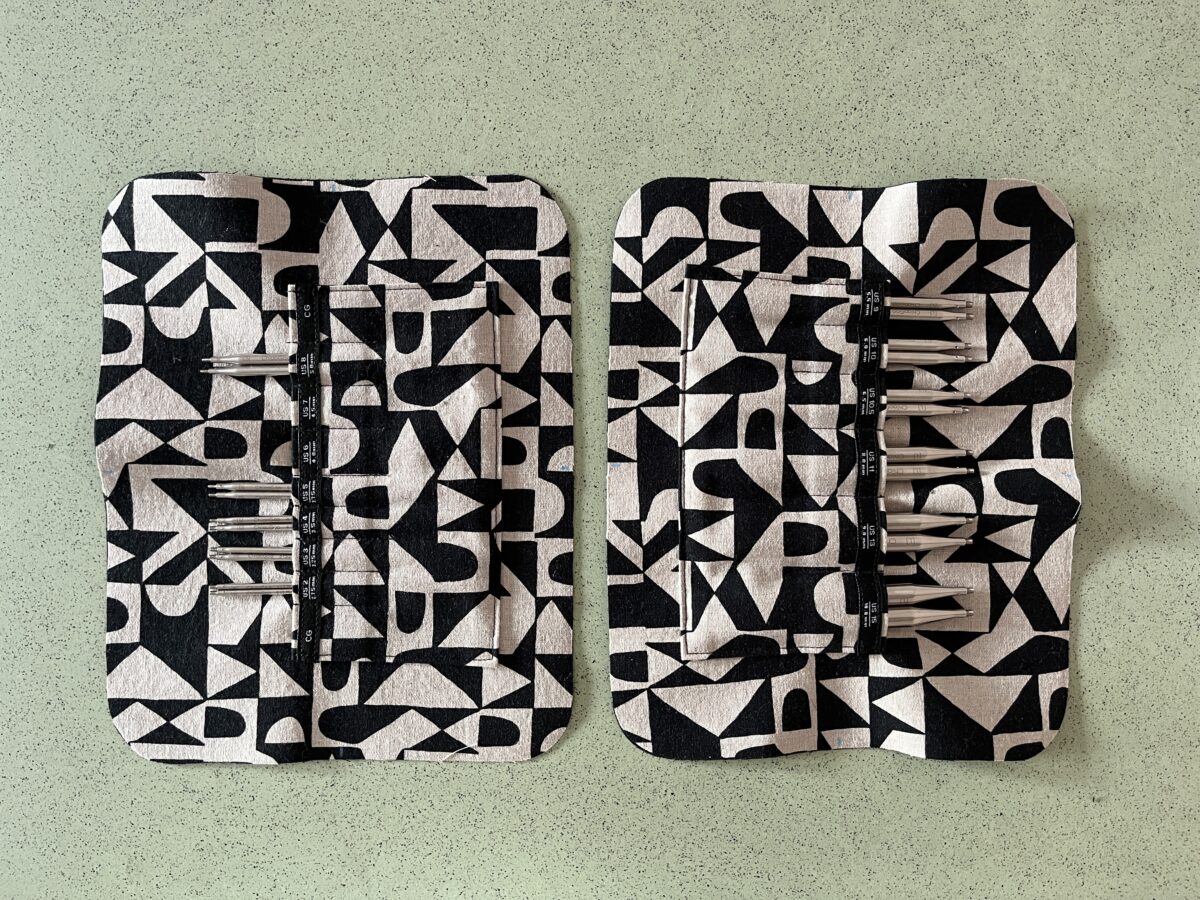
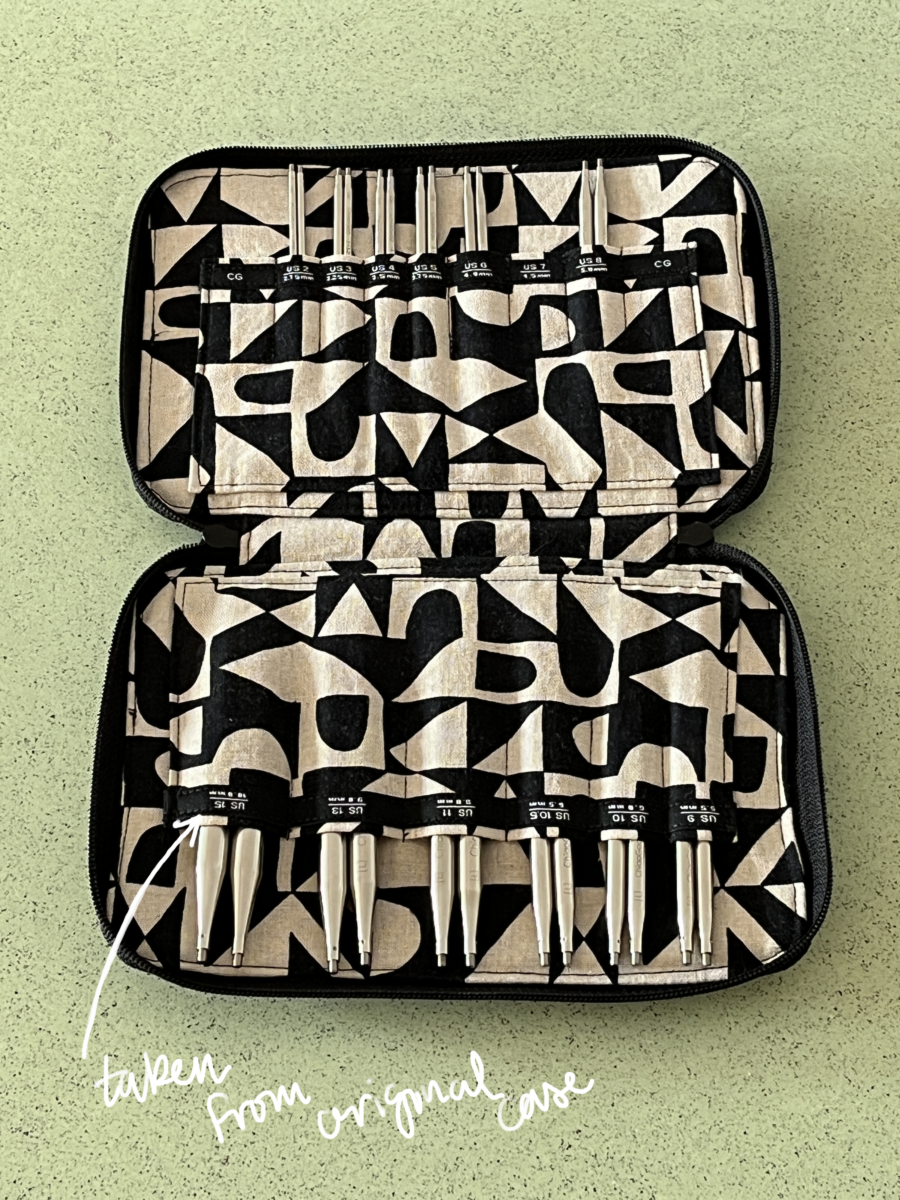
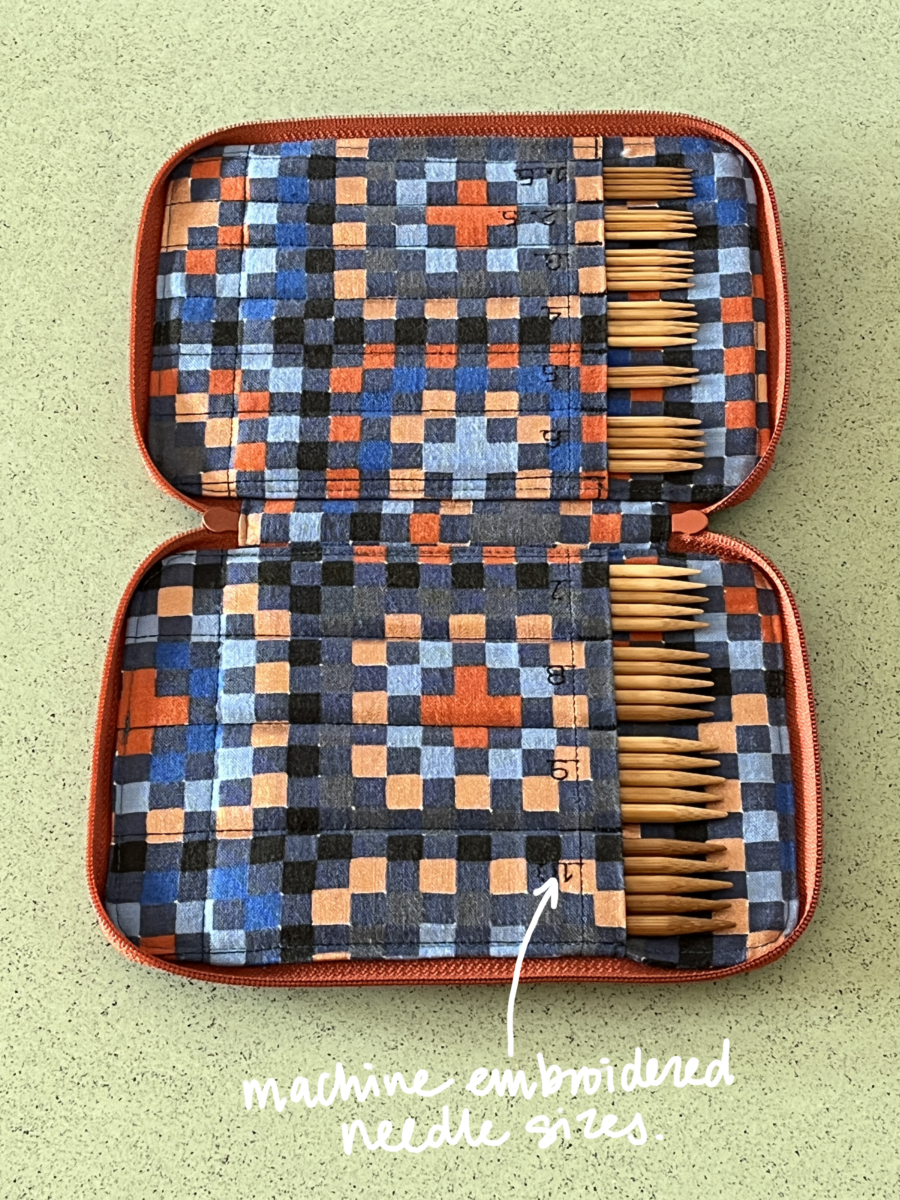
Here’s the case for my interchangeable circulars set. I was able to cut apart the flop and salvage these pages and one zipper. The fabric is by Sarah Golden for Andover Fabrics, which is no longer available.
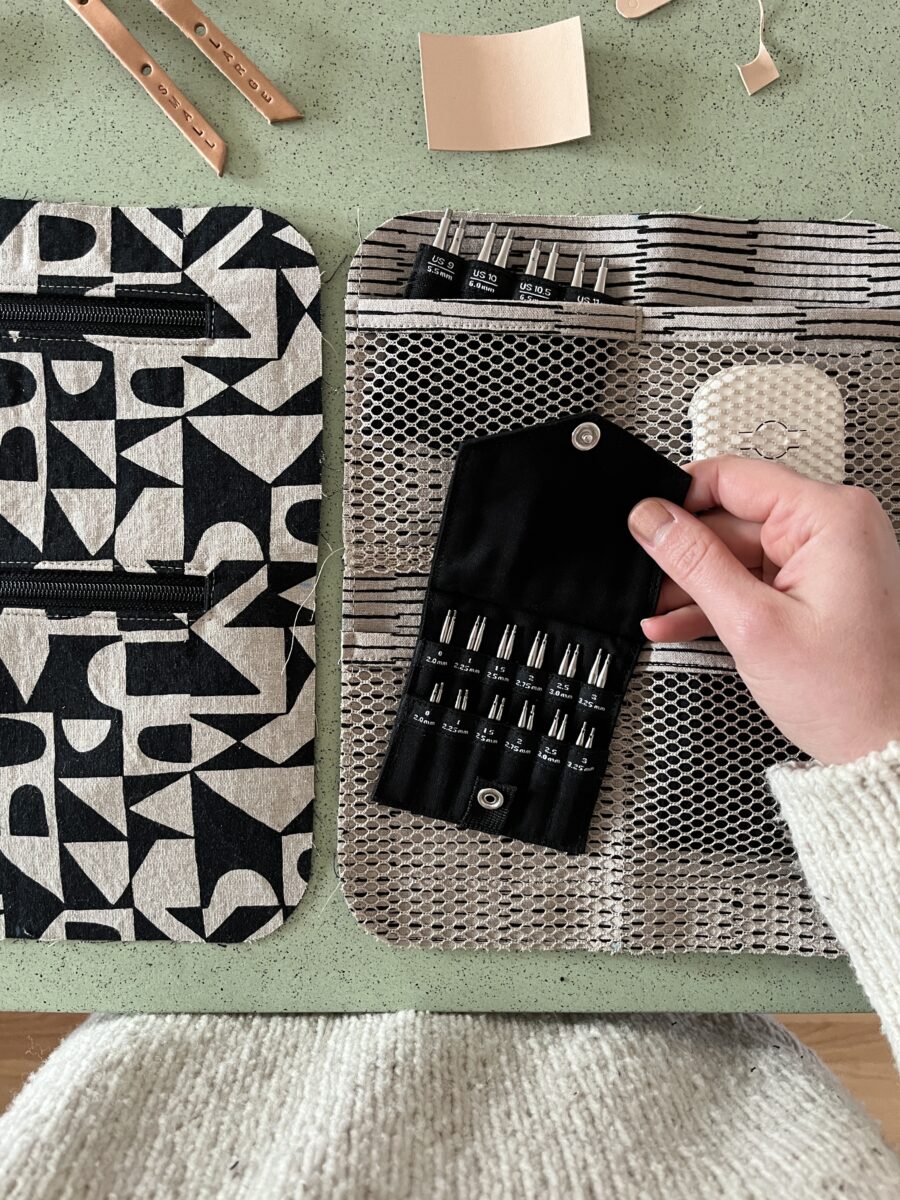
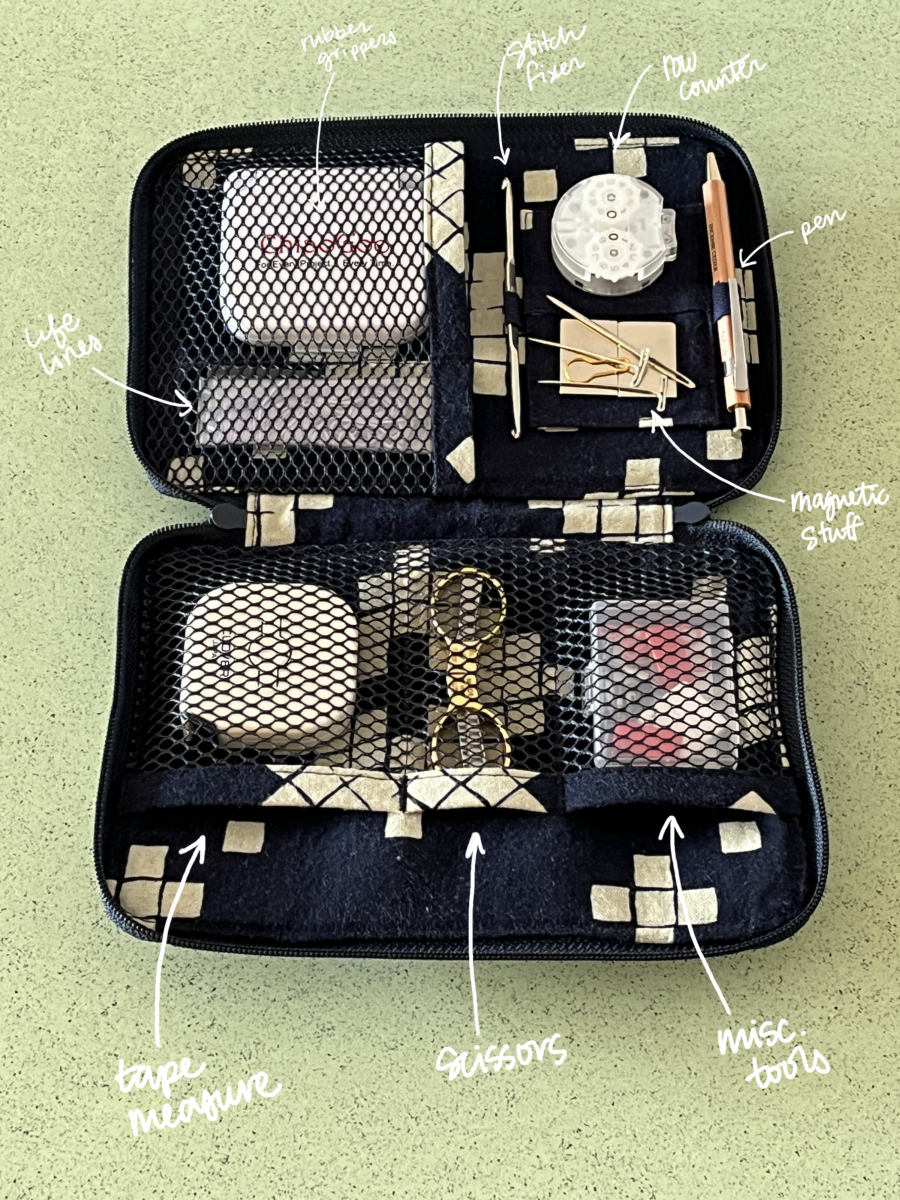
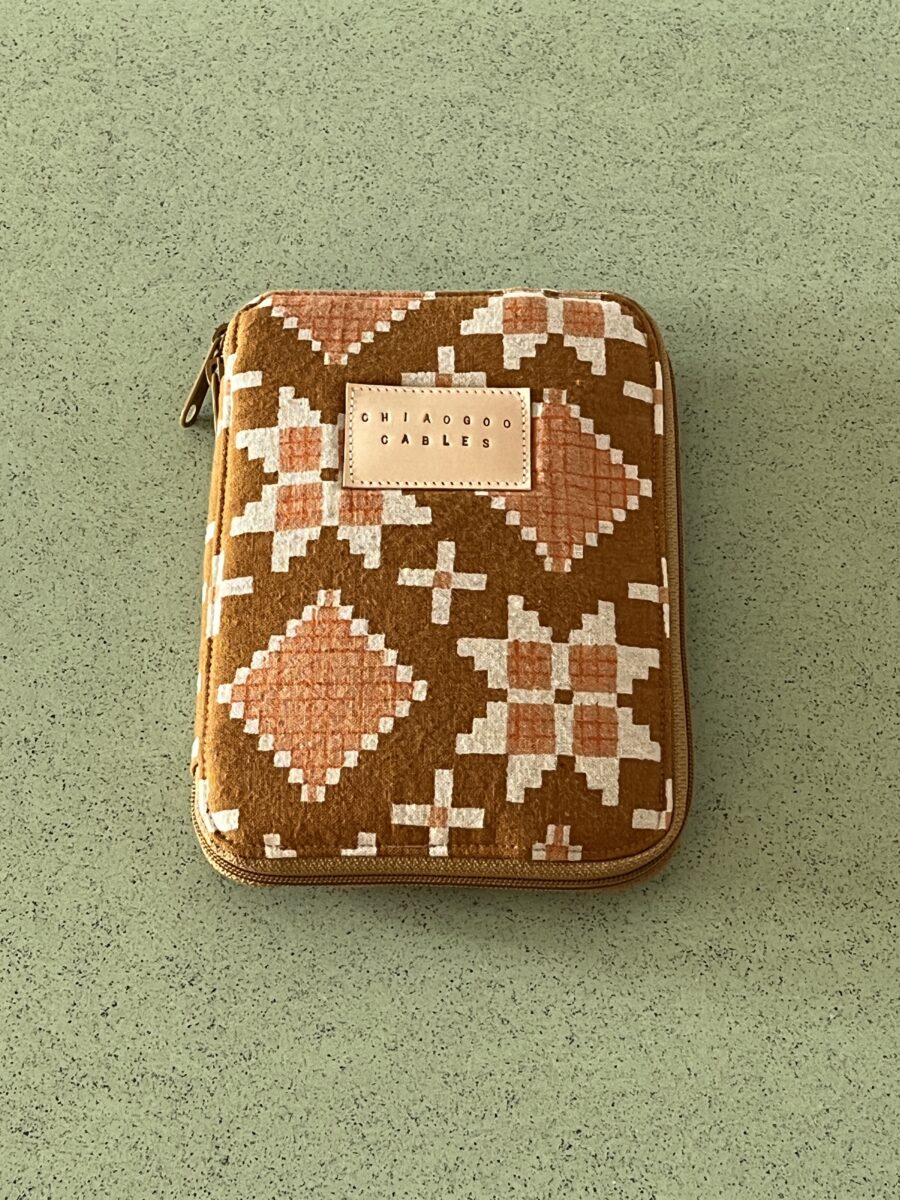
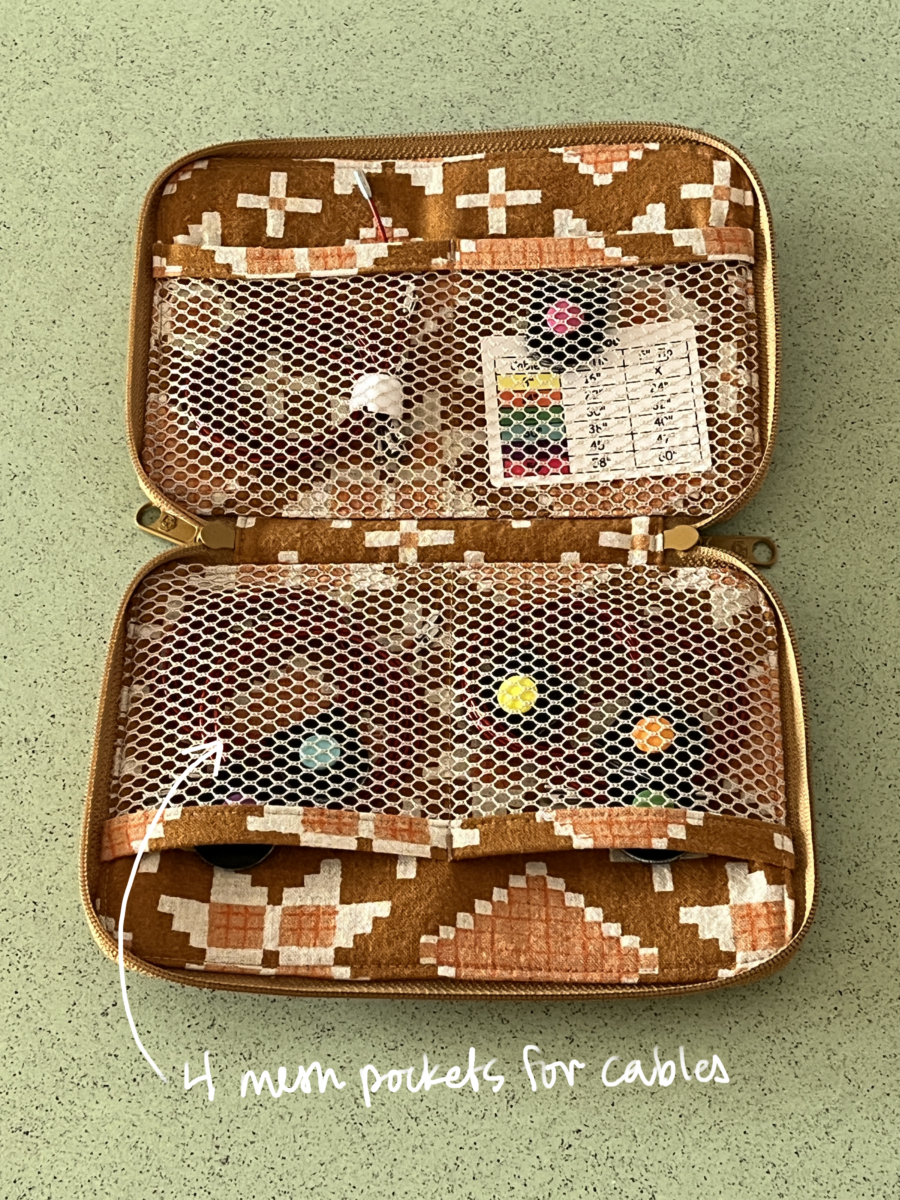
This case was the hardest one to figure out. I wanted it to house a lot and have a space for magnetic things. The fabric was designed by Alexia Abegg for Cotton & Steel, also no longer available.
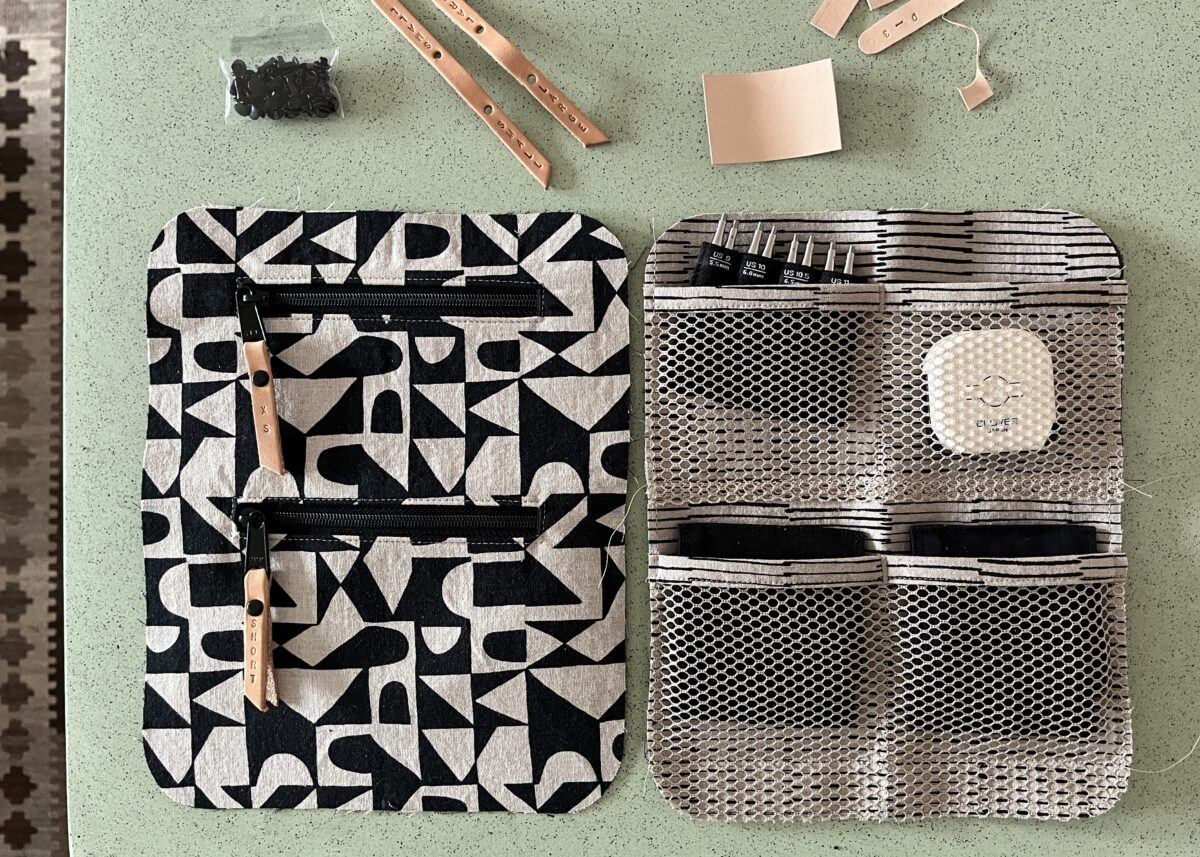
This case is for the interchangeable set’s cables. The fabric is also designed by Alexia Abegg for Ruby Star Society. This was the only new fabric I bought for this project. I needed one more case and wanted it to coordinate.
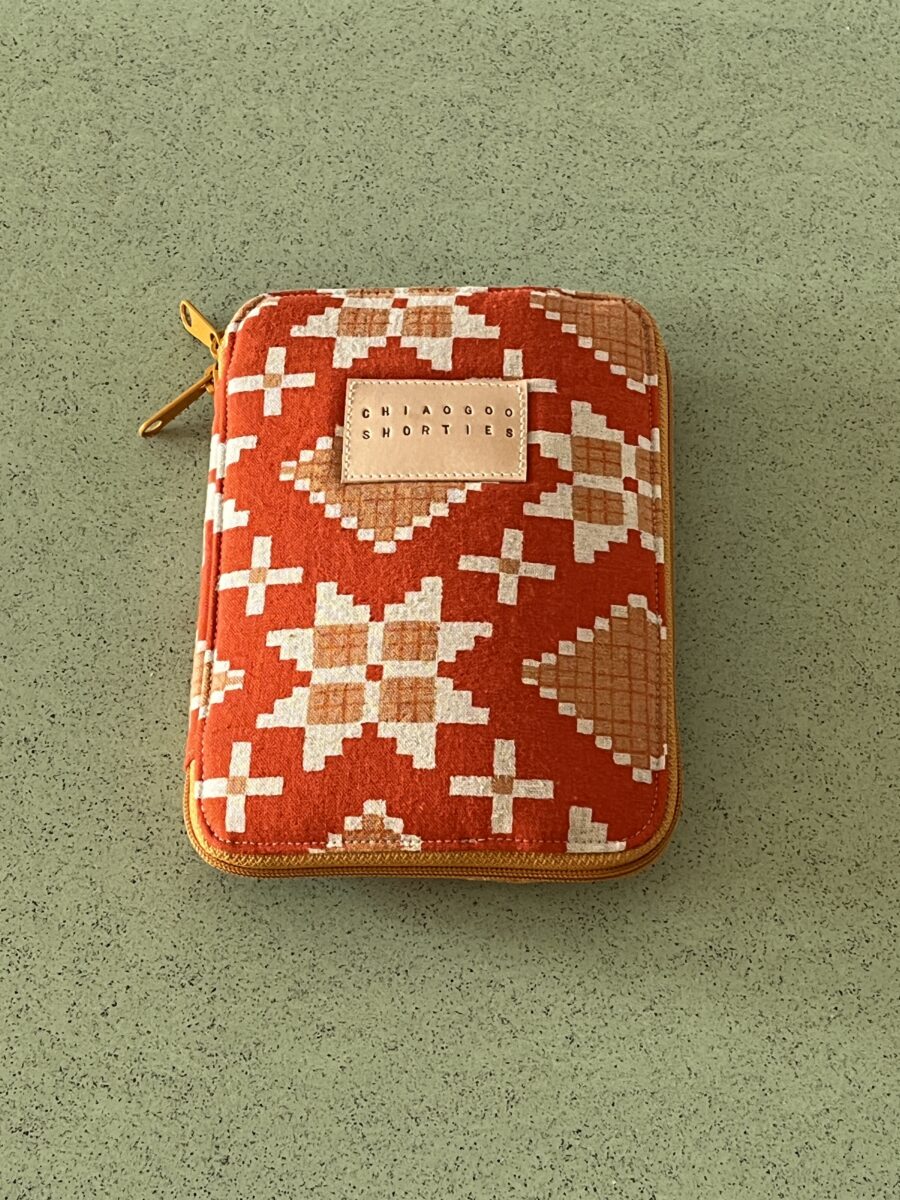
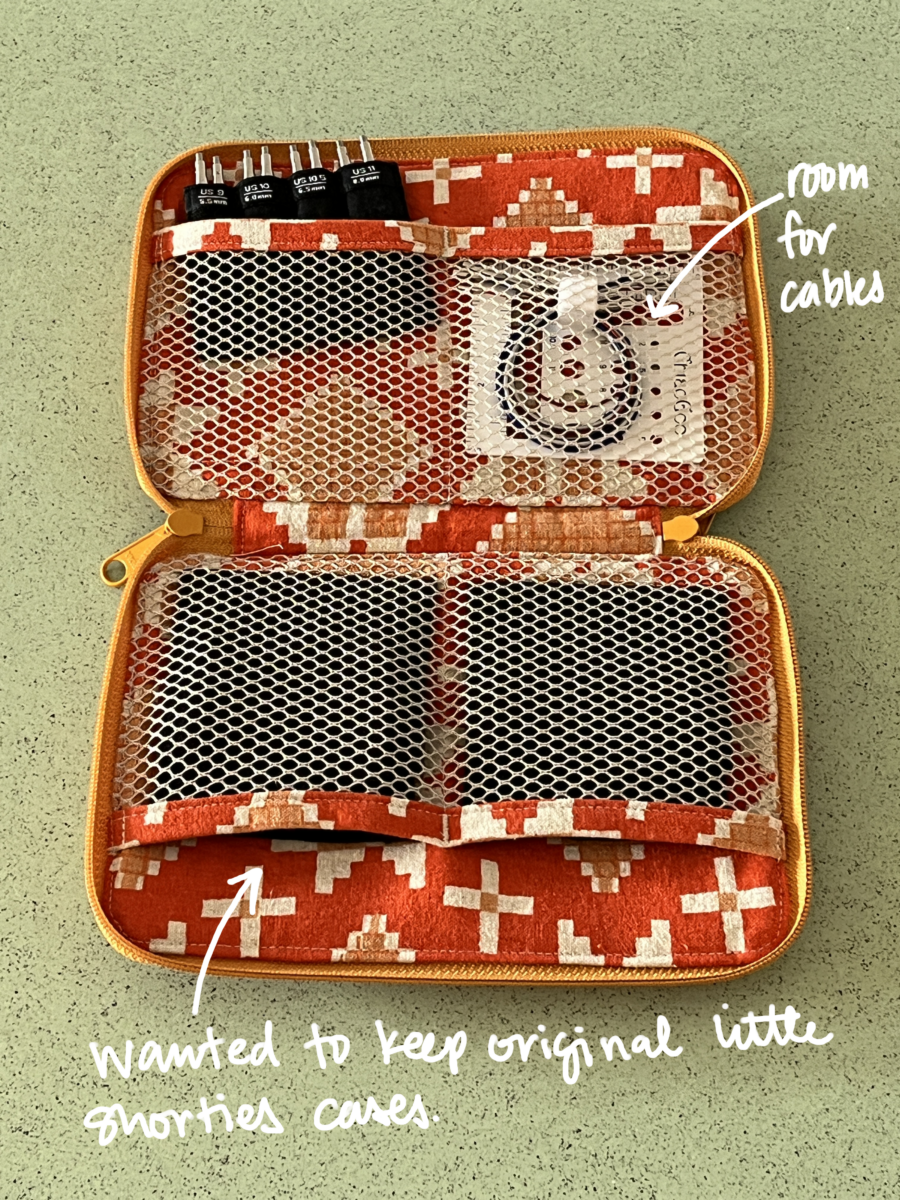
And finally, a case for my set of DPNs. I made an entire other case in the larger size for these before realizing the small would work best. The fabric is also from Alexia Abegg for Ruby Star Society.
I am SO pleased with these and I think they’re much better than what I had originally envisioned. After making seven and half cases, I’ve gotten pretty fast!
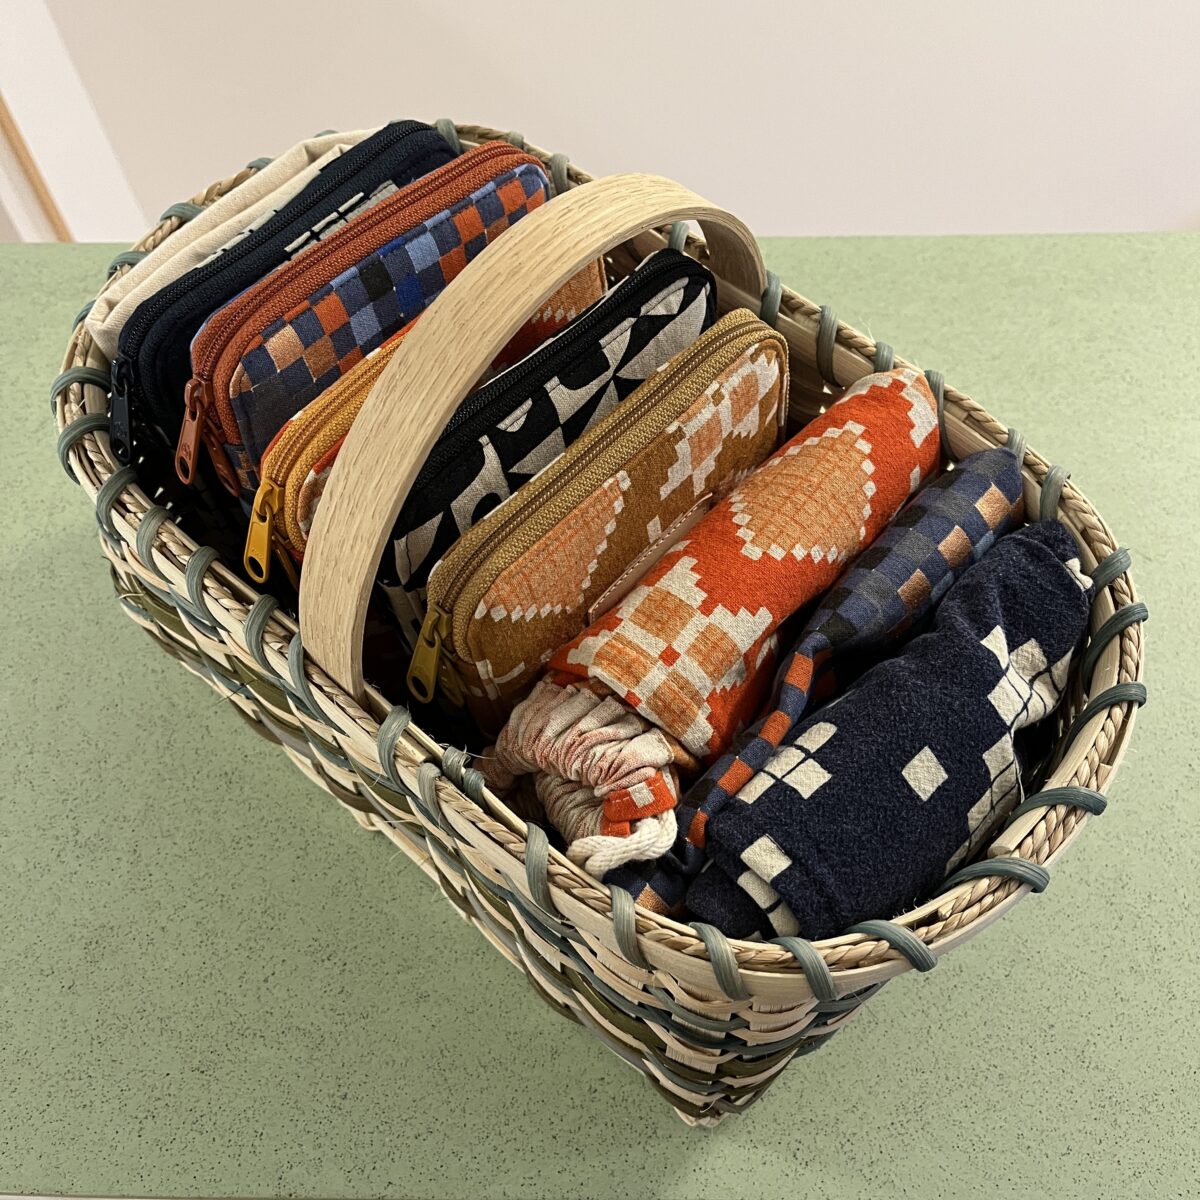
They all fit perfectly in this basket! Everything is organized and super portable now. It’s great!
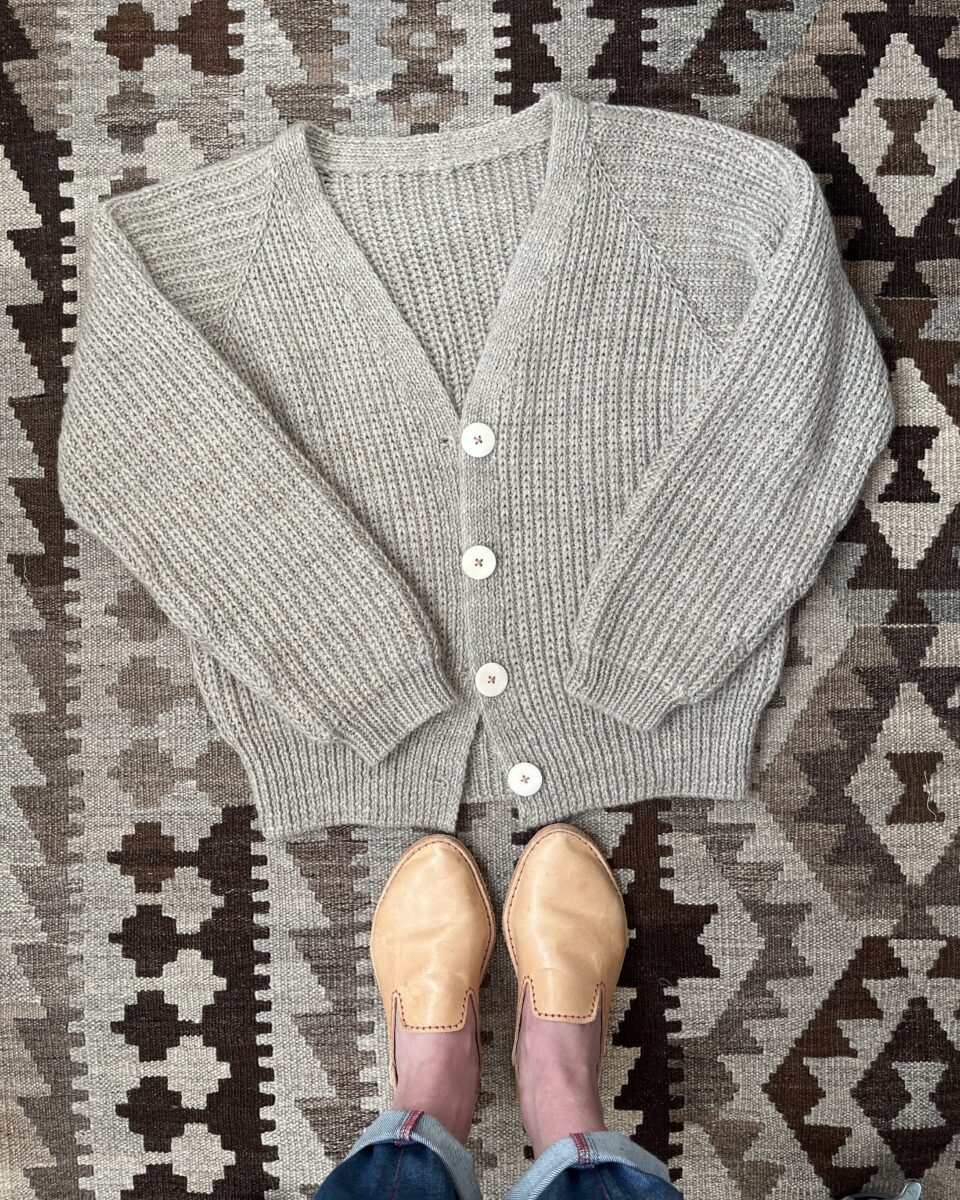
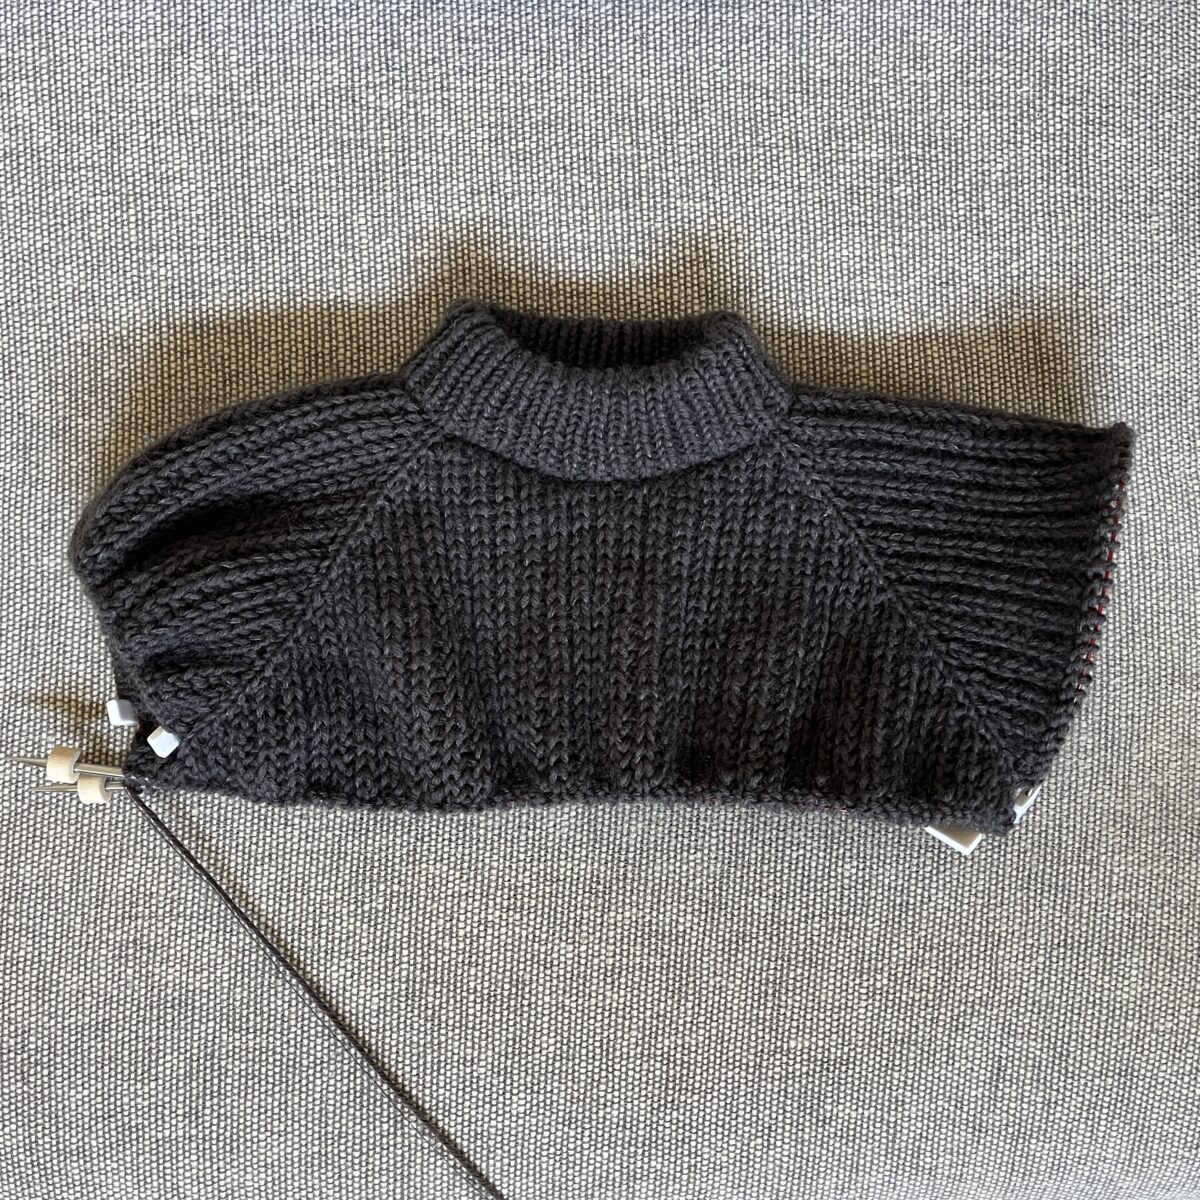
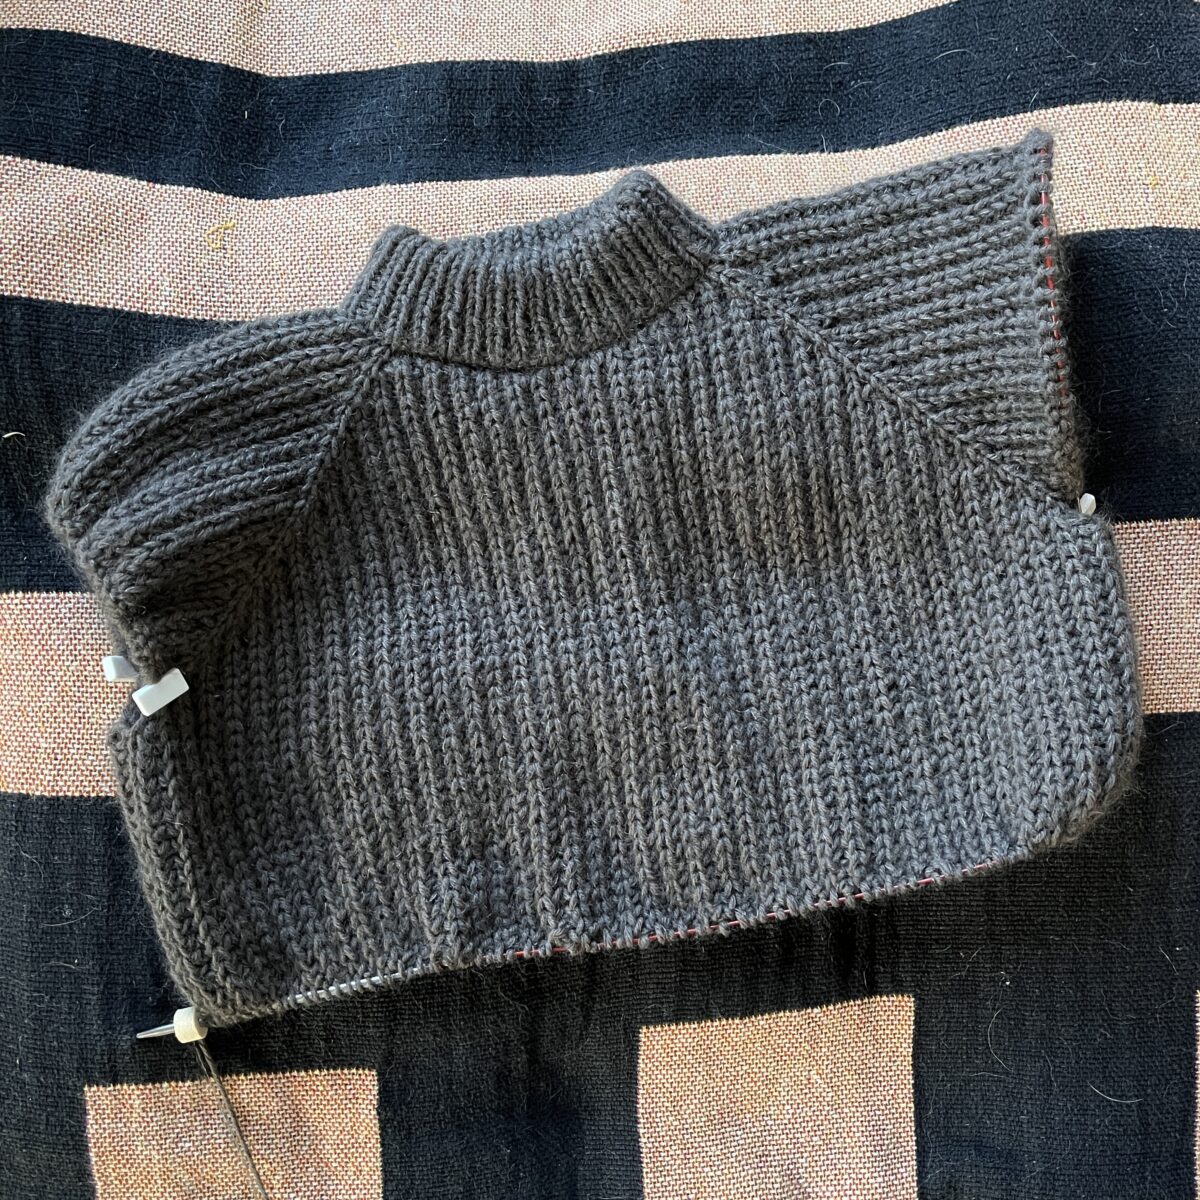
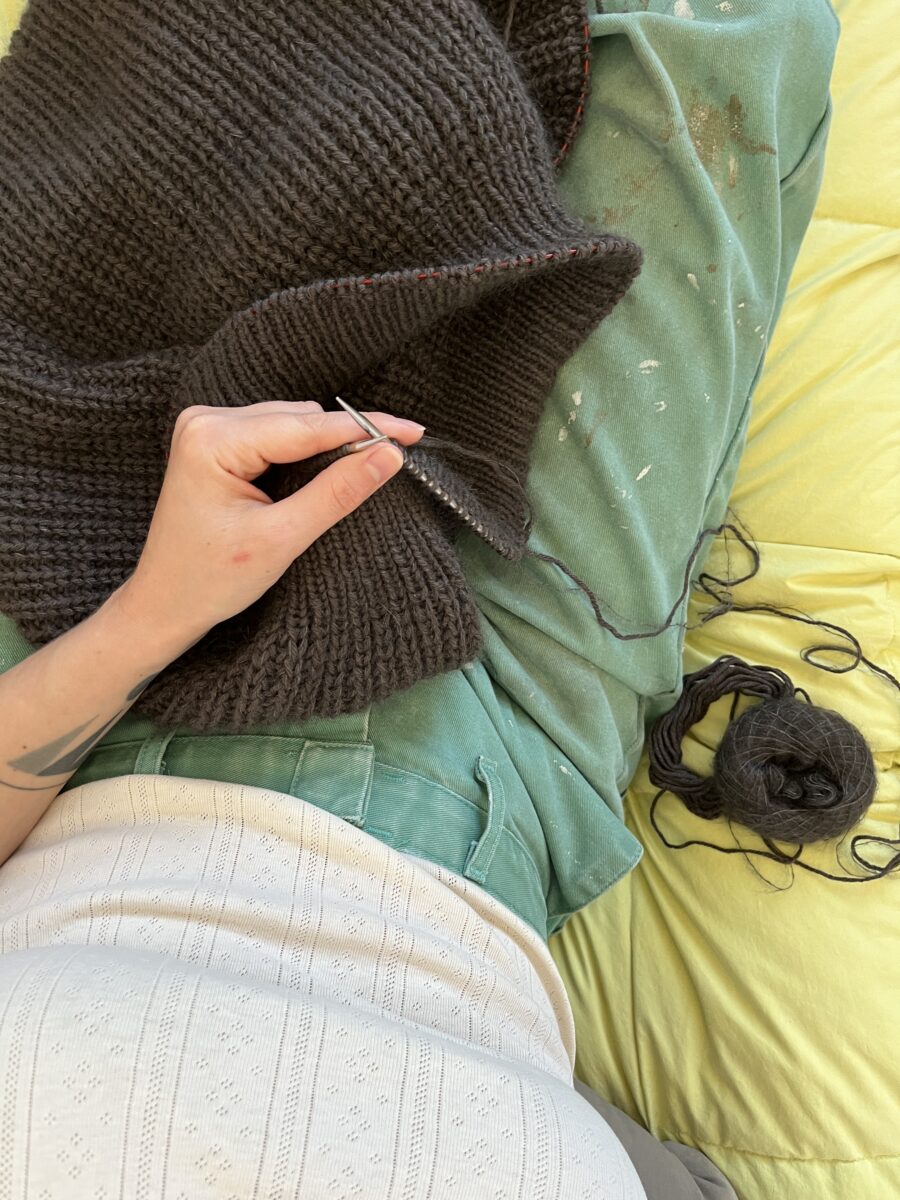
Gray thing #1 is my just finished sweater, which took about four months to knit. The most challenging and time consuming part of this knit was the short rows, but once I got past them, it was smooth knitting. The instructions are great and clear, it was my brain that was the issue here.
This project felt just outside of my current knitting skill set, but it happened and I think I’m ready for the cardigan version. And yes, it’s just as squishy as it looks.
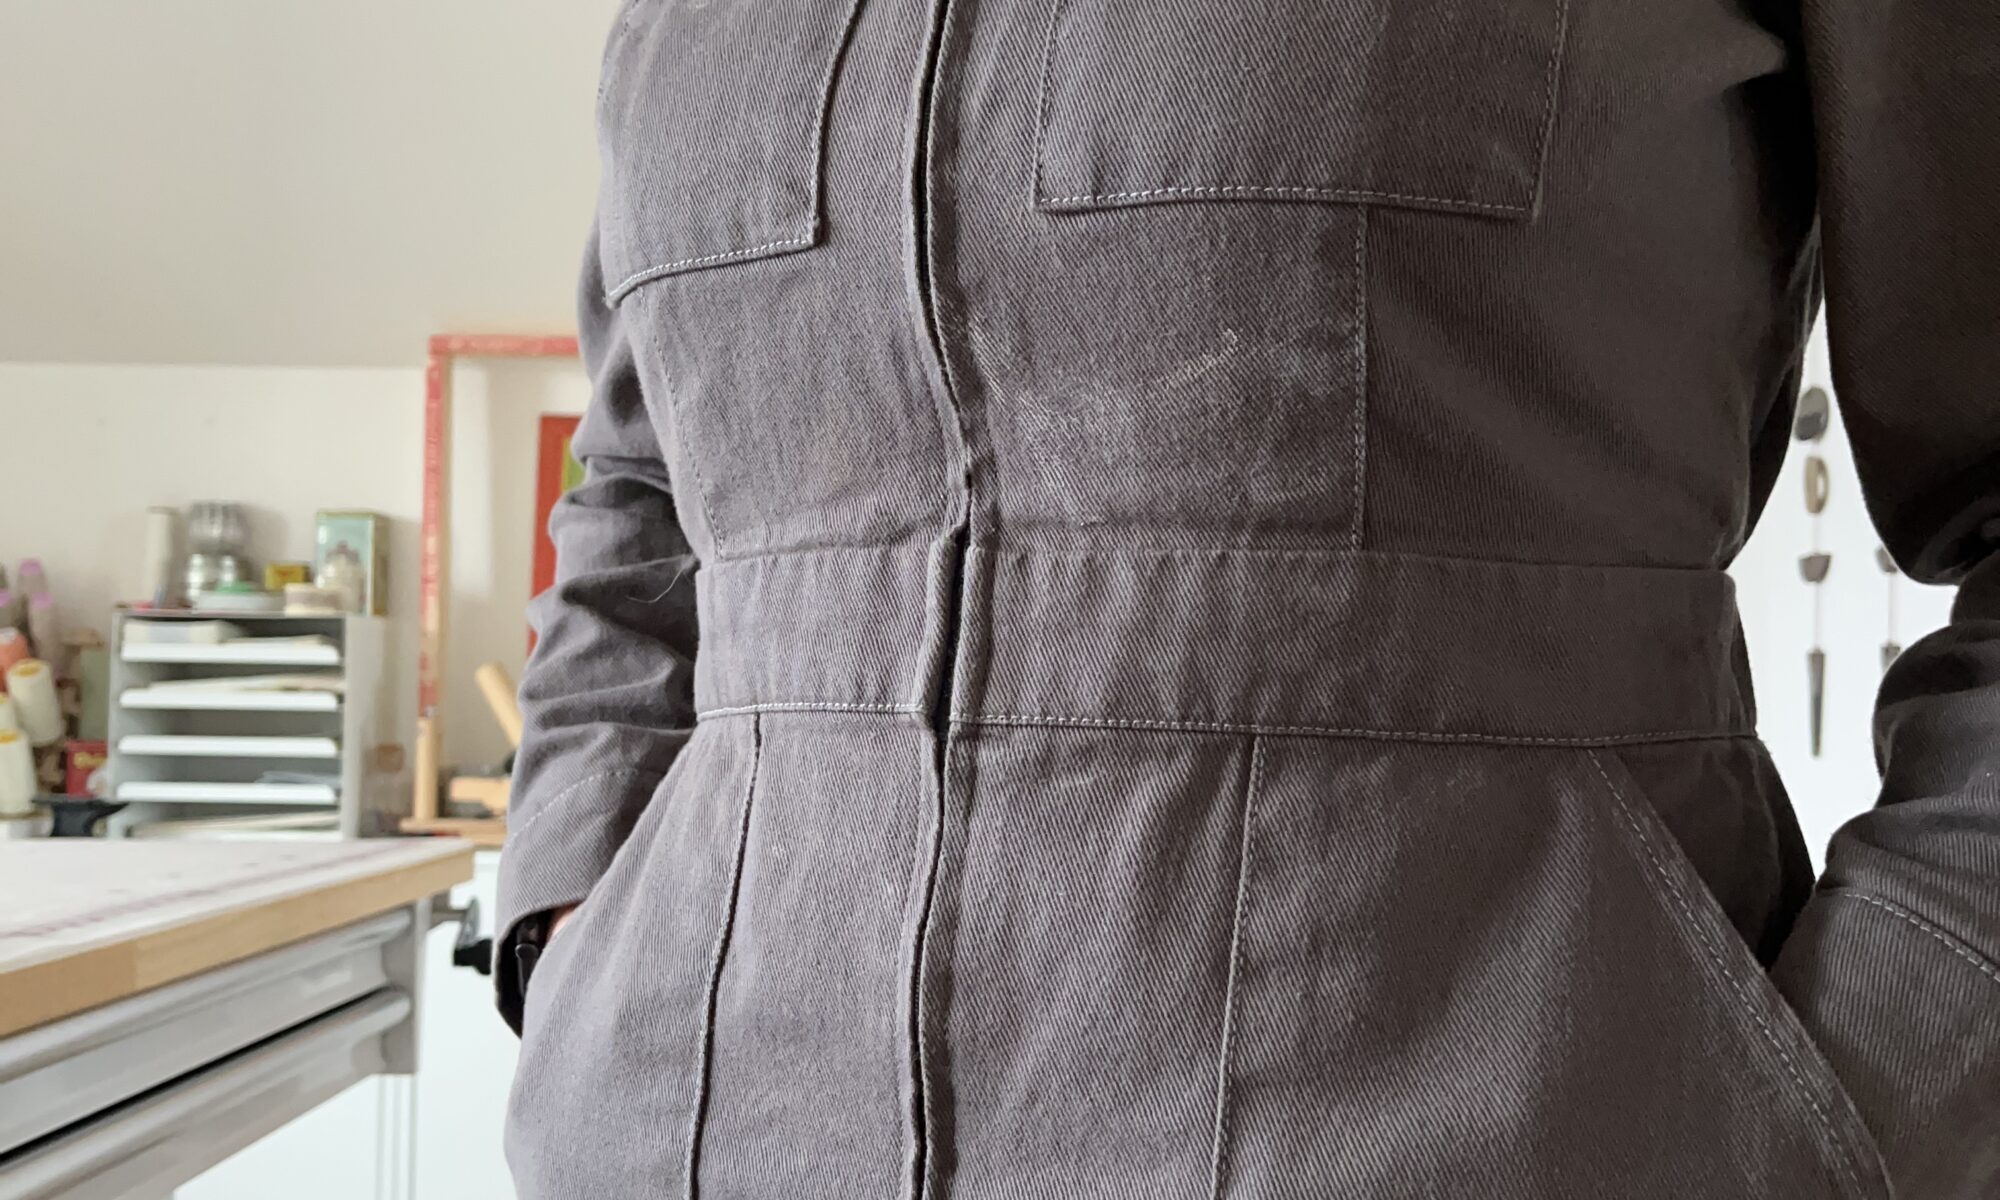
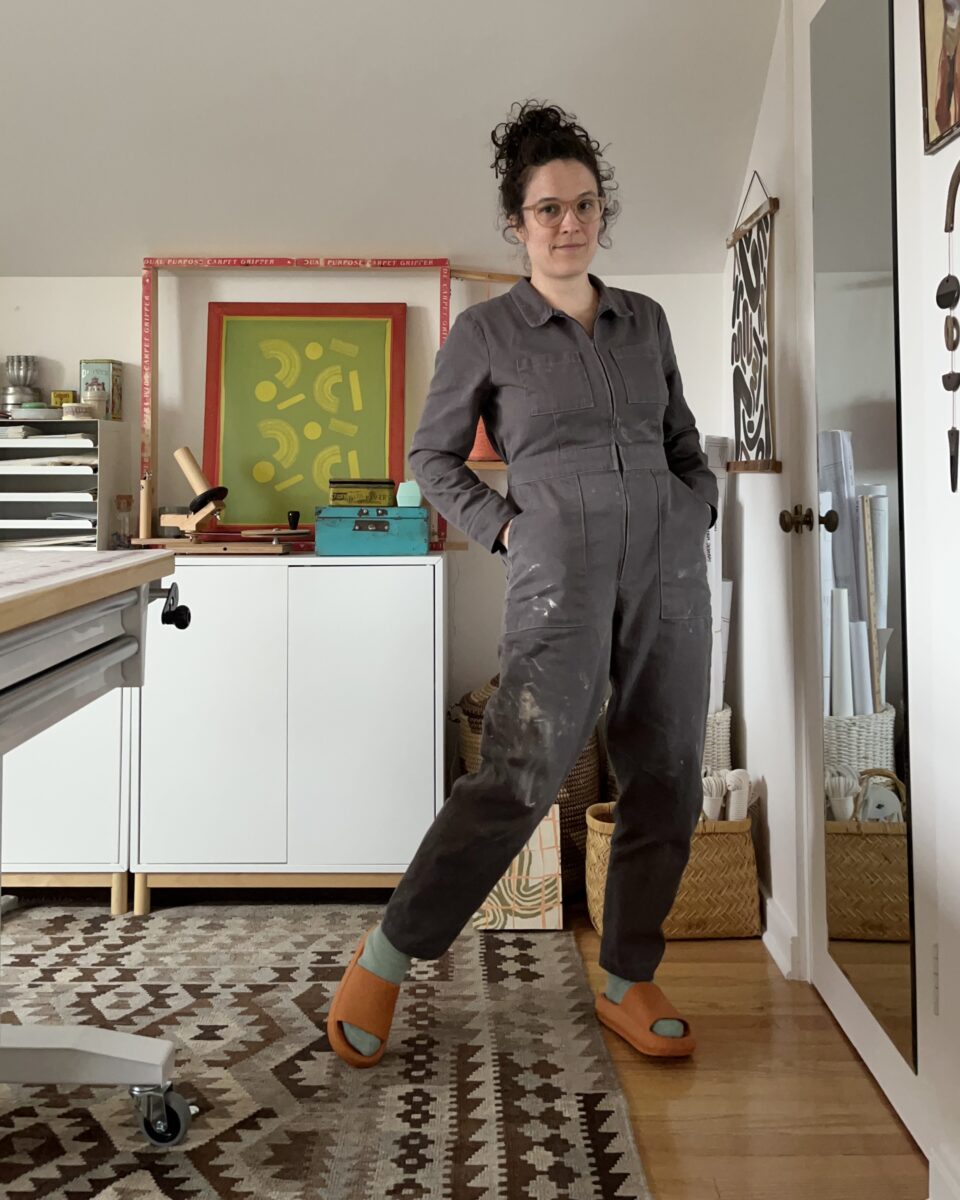
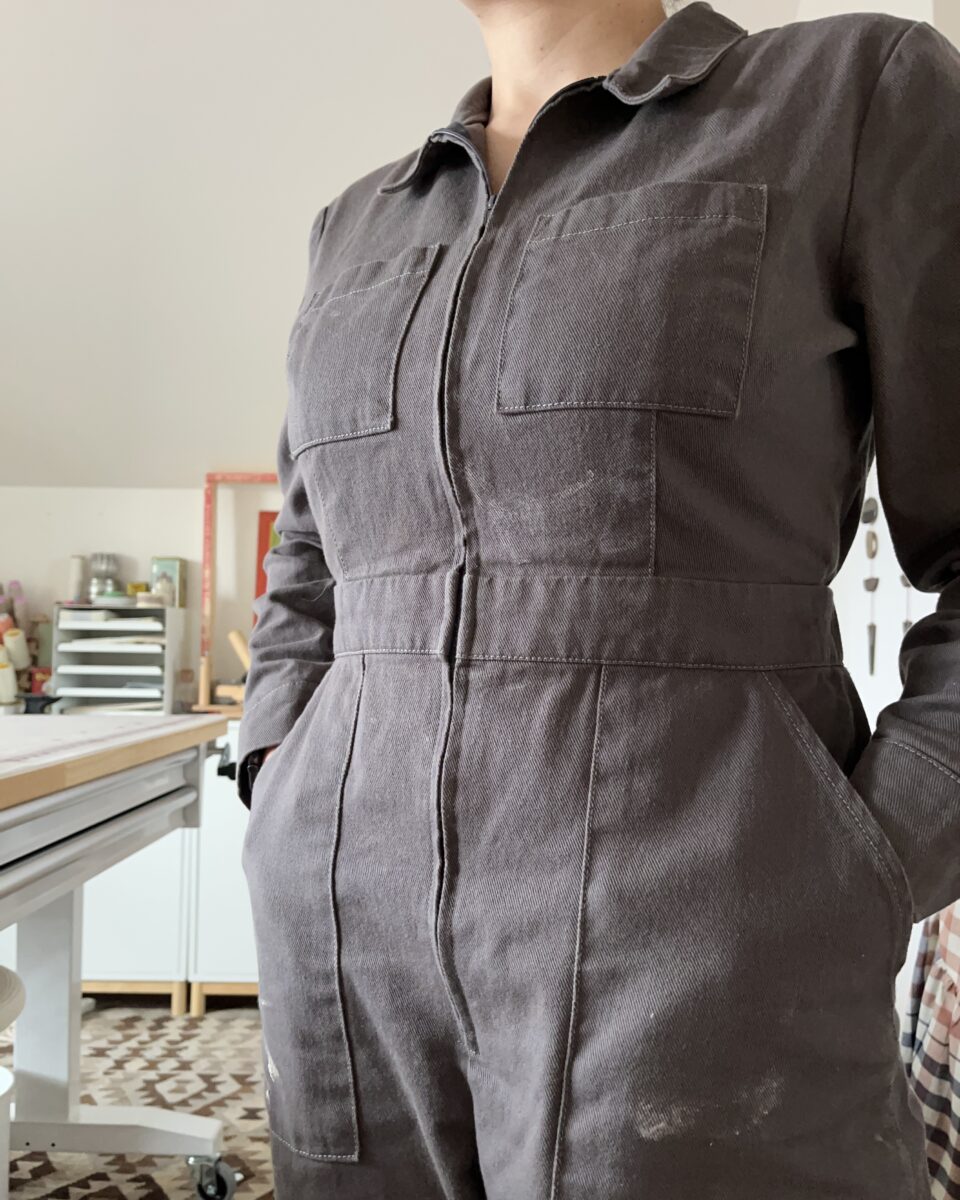
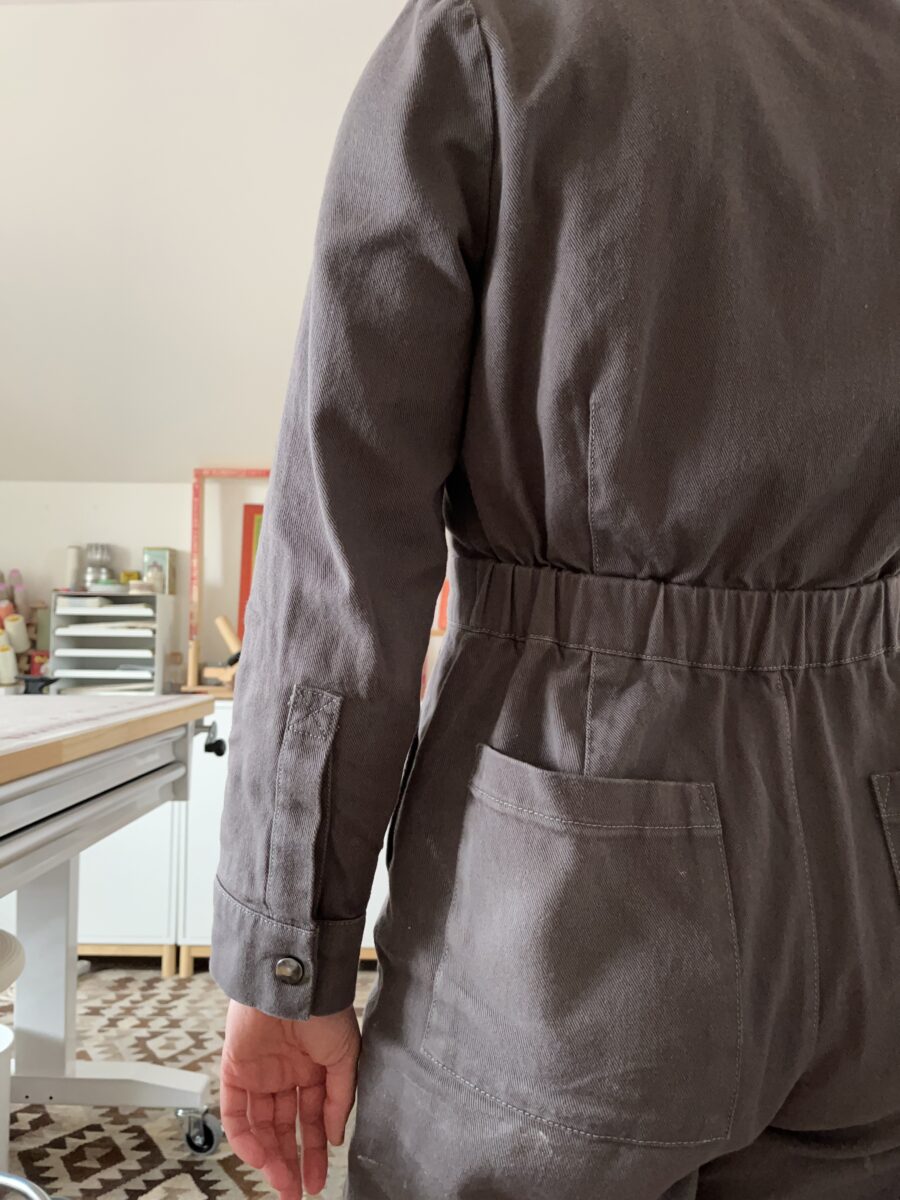
Gray thing #2 is this flight suit. The color I chose leans a little janitorial, but when it’s splattered in clay it leans artist. The fabric does wear a little heavy and I definitely overheat if I’m moving around a lot, but the details on this pattern are jumpsuit perfection.
SIZE: 8 with 3″ removed from leg and 2″ removed from sleeve.
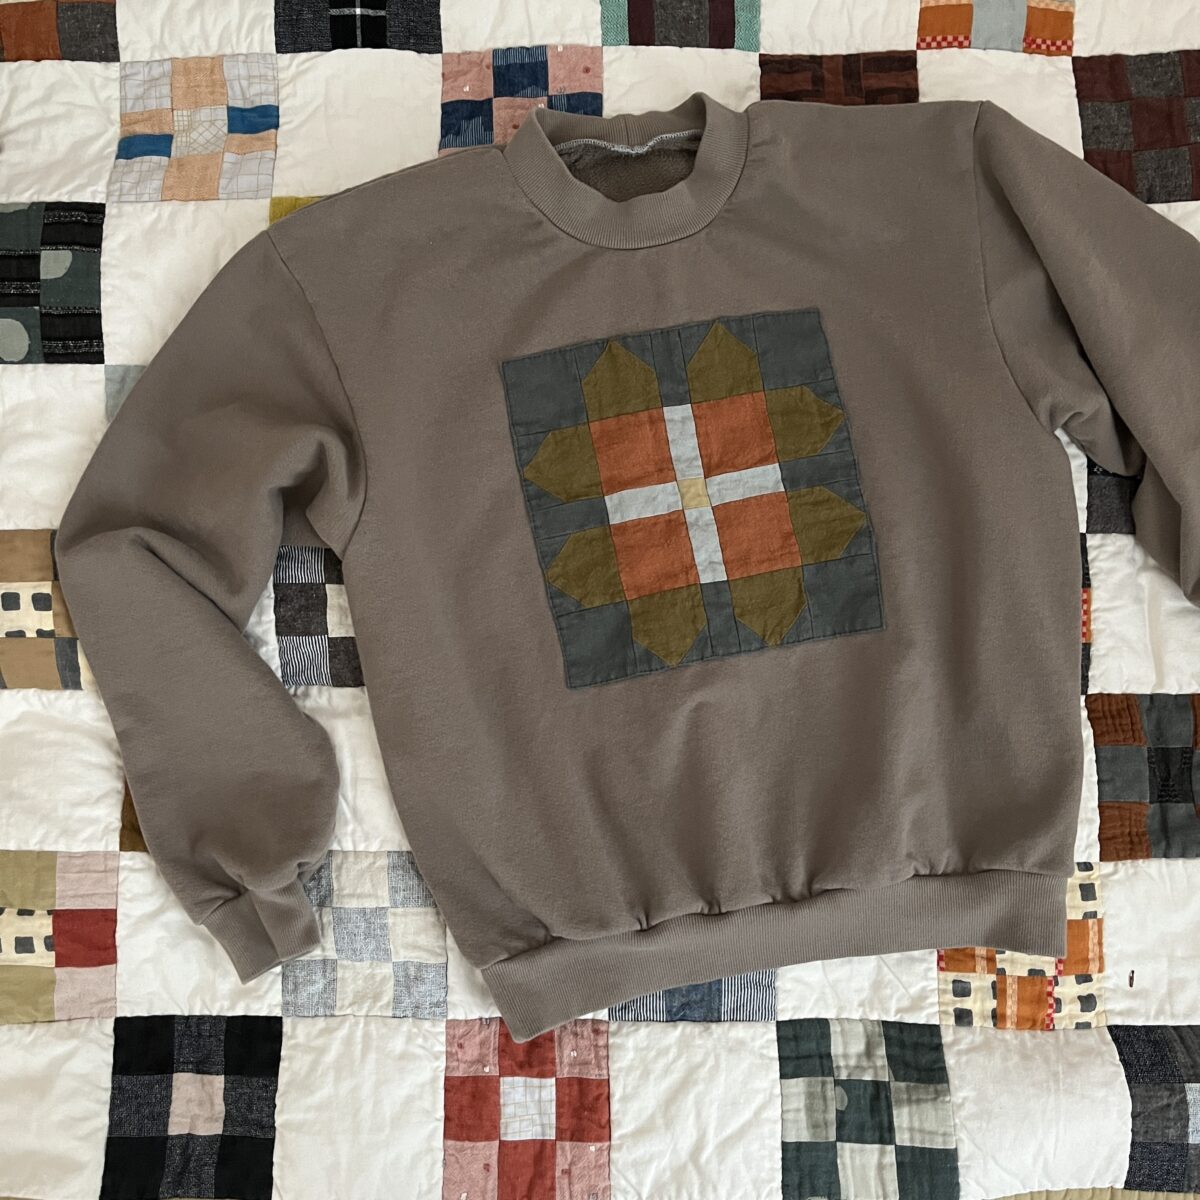
And gray thing #3 is a sweatshirt I made entirely for this single quilt block. Okay, I already had the french terry and rib knit, but I was inspired to sew it up once I had the idea of slapping the quilt block on it. The block was made out of linen scraps and was very shifty, so I fused some knit stay tape to the turned under edges and had to use a sheet of tracing paper to stitch it onto the french terry to keep the fabric from stretching out.
This is a lovely pattern. The instructions are super clear and this whole thing can be sewn using your regular sewing machine. I am going to try using my coverstitch for the bands on the next one.
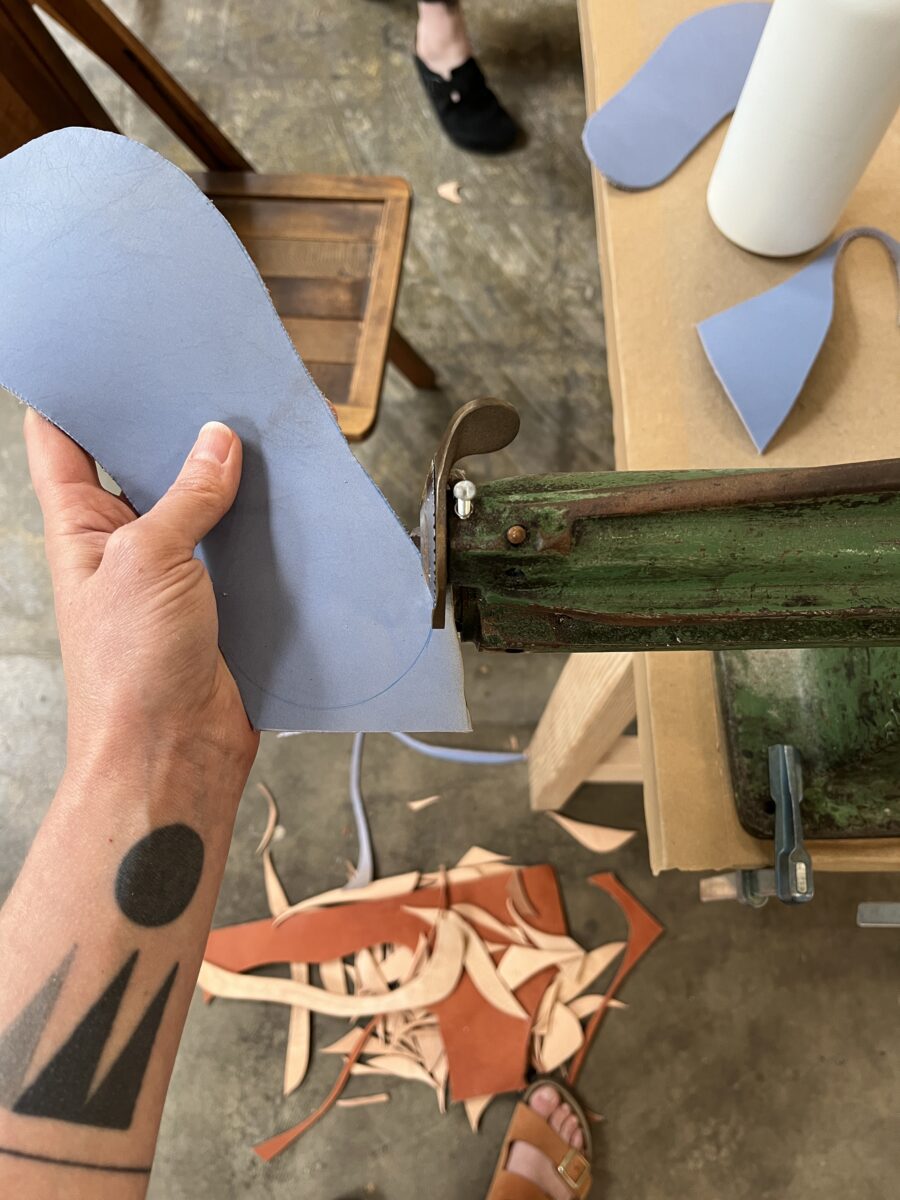
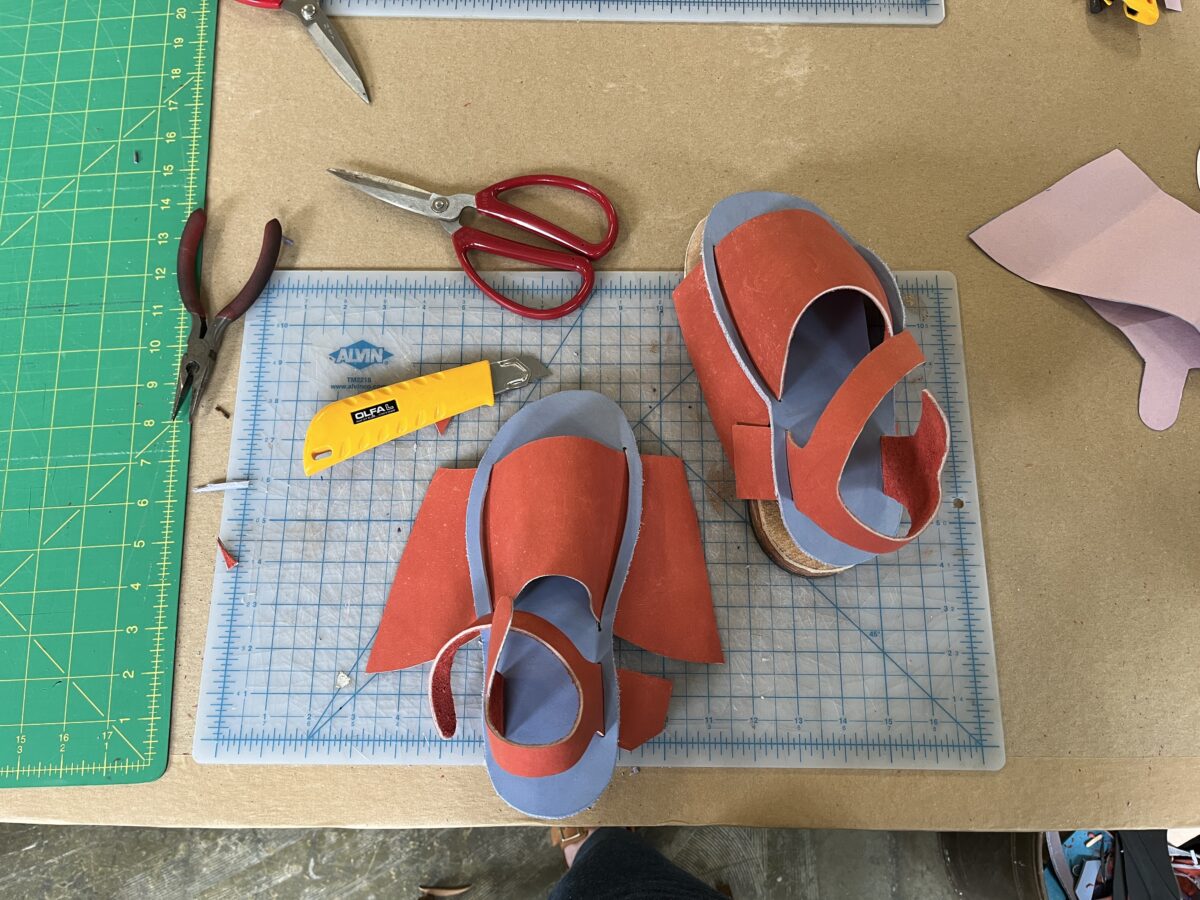
Sandal Making Workshop | Rachel Sees Snail Shoes
Finally snagged a spot in one of Rachel’s sandal making workshops. I didn’t quite nail the fit on these – the vamps are just too thick and the thick leather needed more shaping than my design allowed, so they kinda slice into my big toes. They still need to be sanded, which is why I only have in progress photos.
Sophie Scarf | Petite Knit
I knit a lot of this during my Japan trip and finally finished it a couple weeks ago. This is before blocking. This color is so nice.
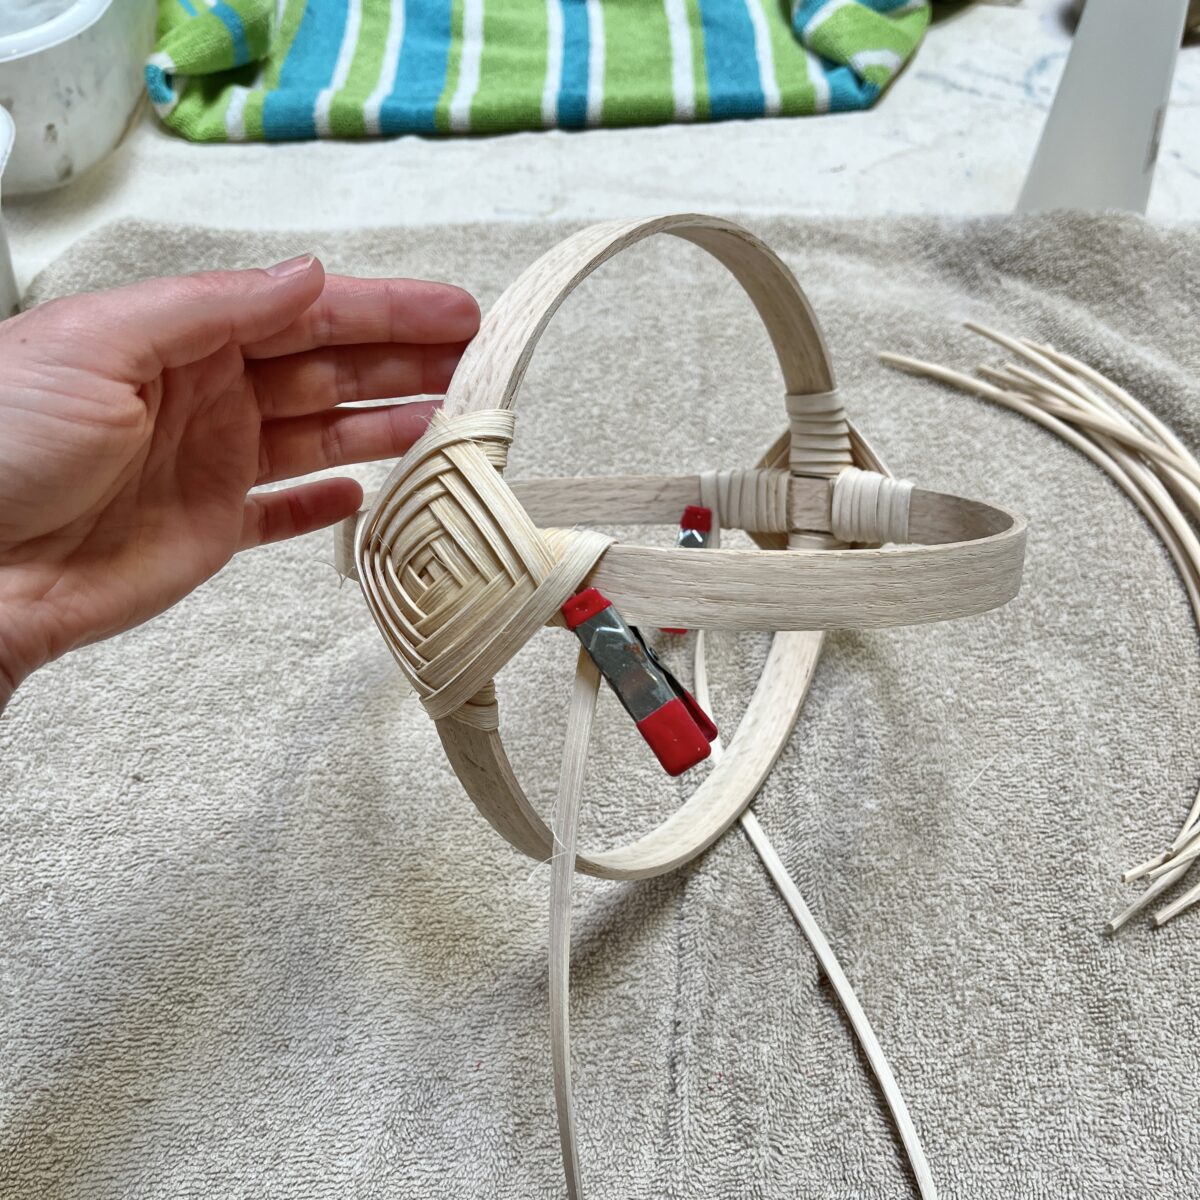
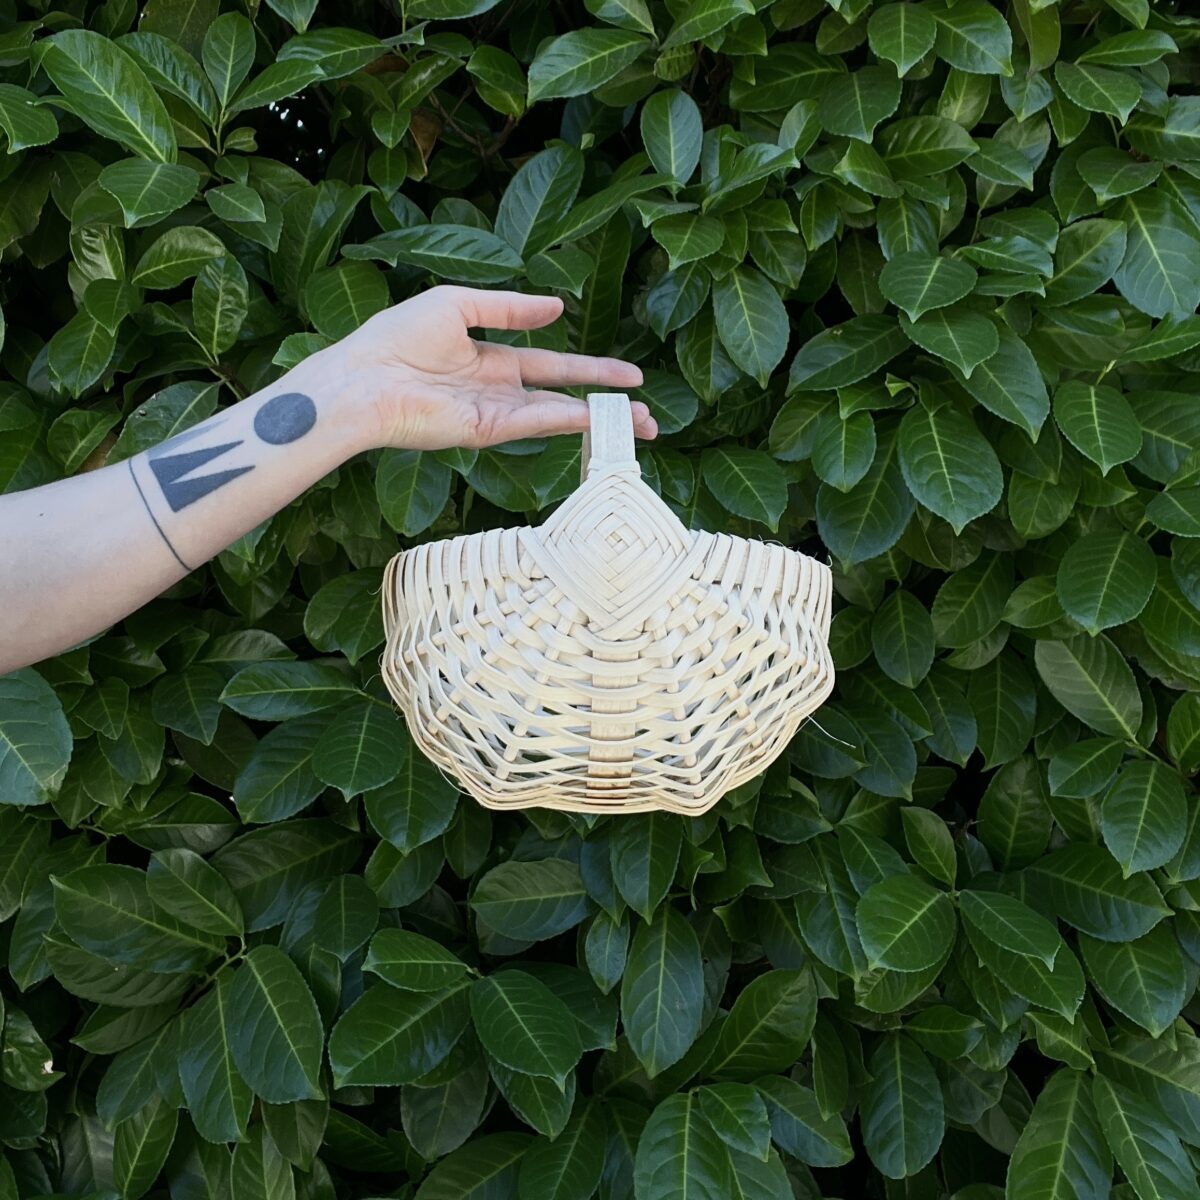
Melon Basket | Wildcraft Workshop taught by Textile Indie
Attended another basket making workshop to make this cute little melon basket. The wrapping technique reminded me of summer camp crafts. I’m thinking about dyeing it with indigo.