Nine Patch Scrap Quilt | part 1

8 Comments

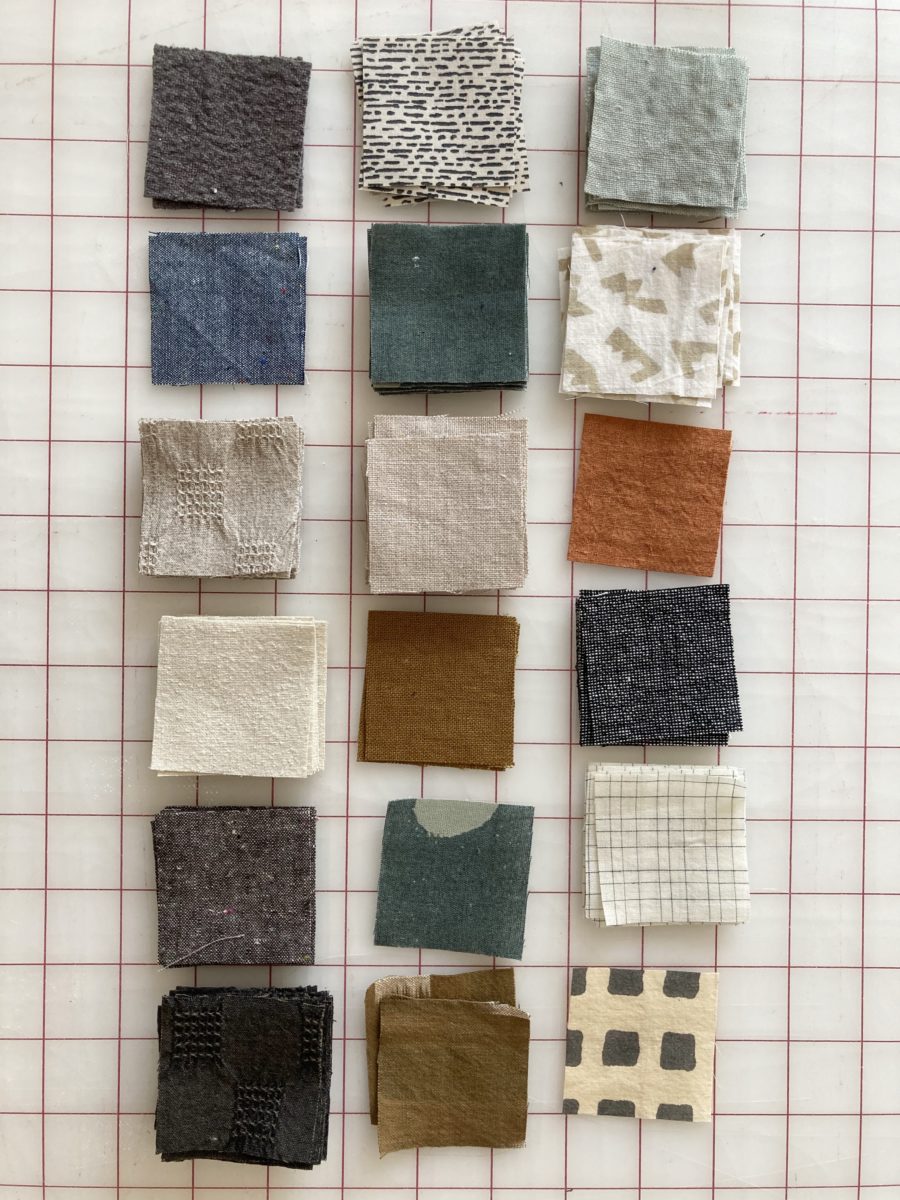
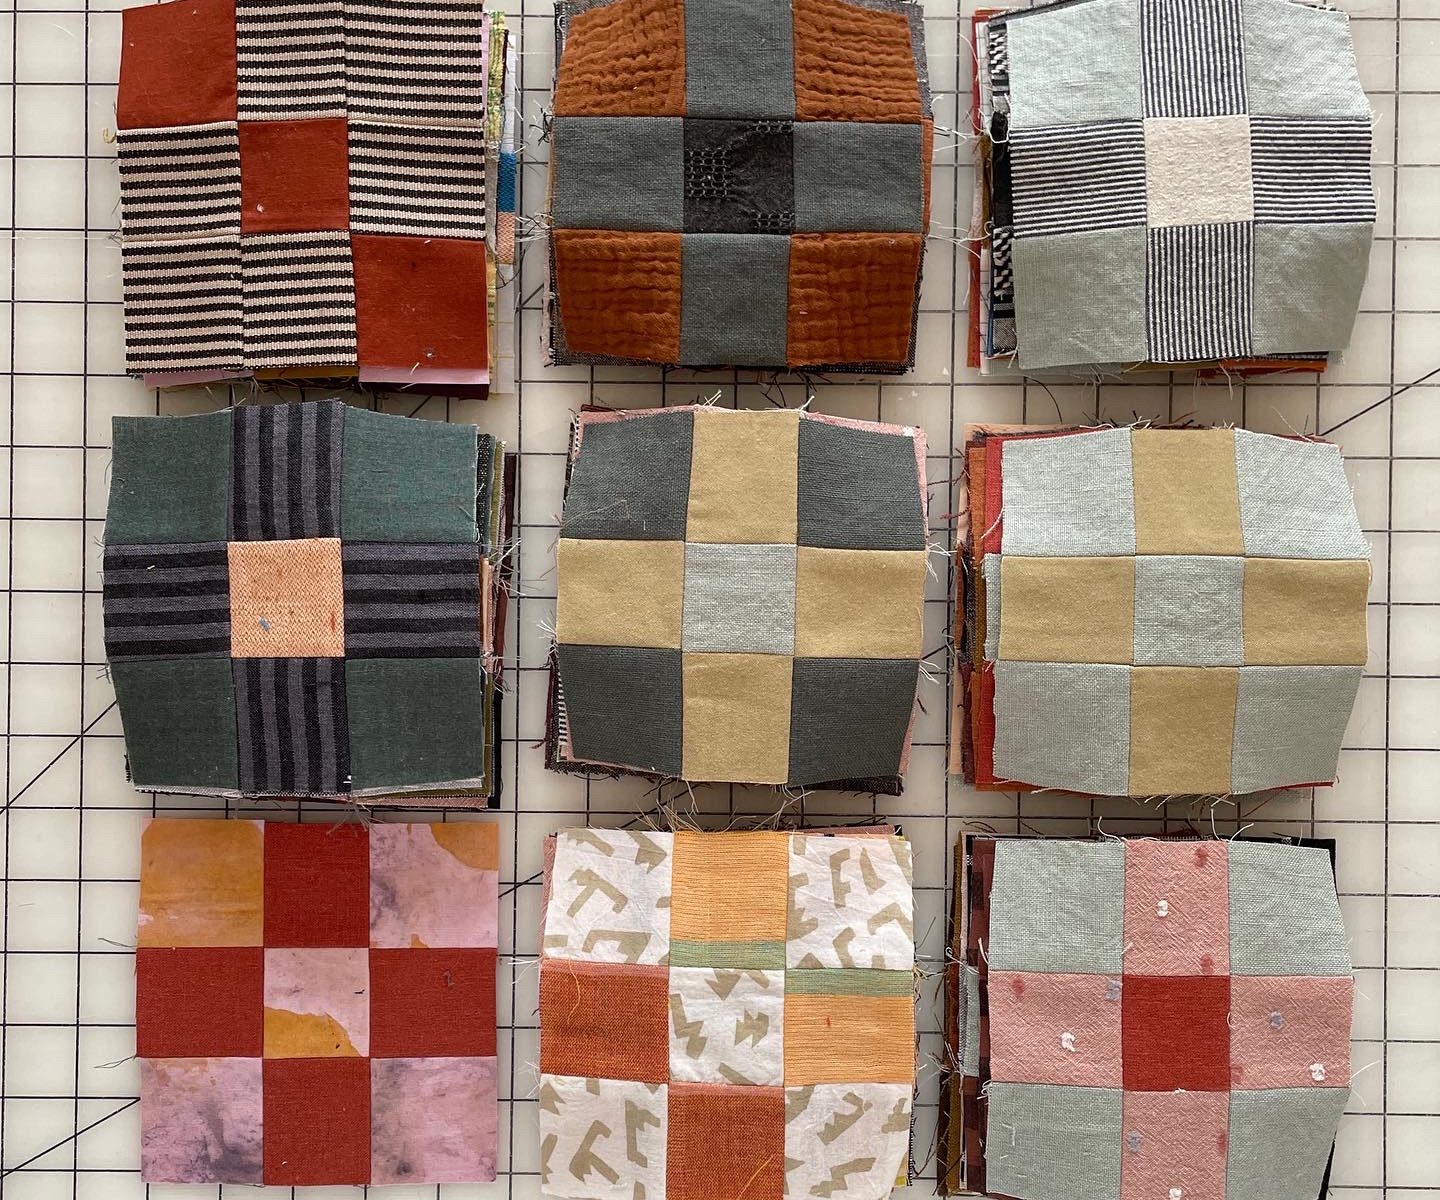
Garment sewing produces waste, sometimes a lot of it. After years of sewing, my woven scrap pile was getting pretty large and I really wanted to turn some of it into a quilt. Then in 2019 Farm & Folk posted this on Instagram and I had a solution: I’d make 100 nine patch blocks using only scraps from previous projects.

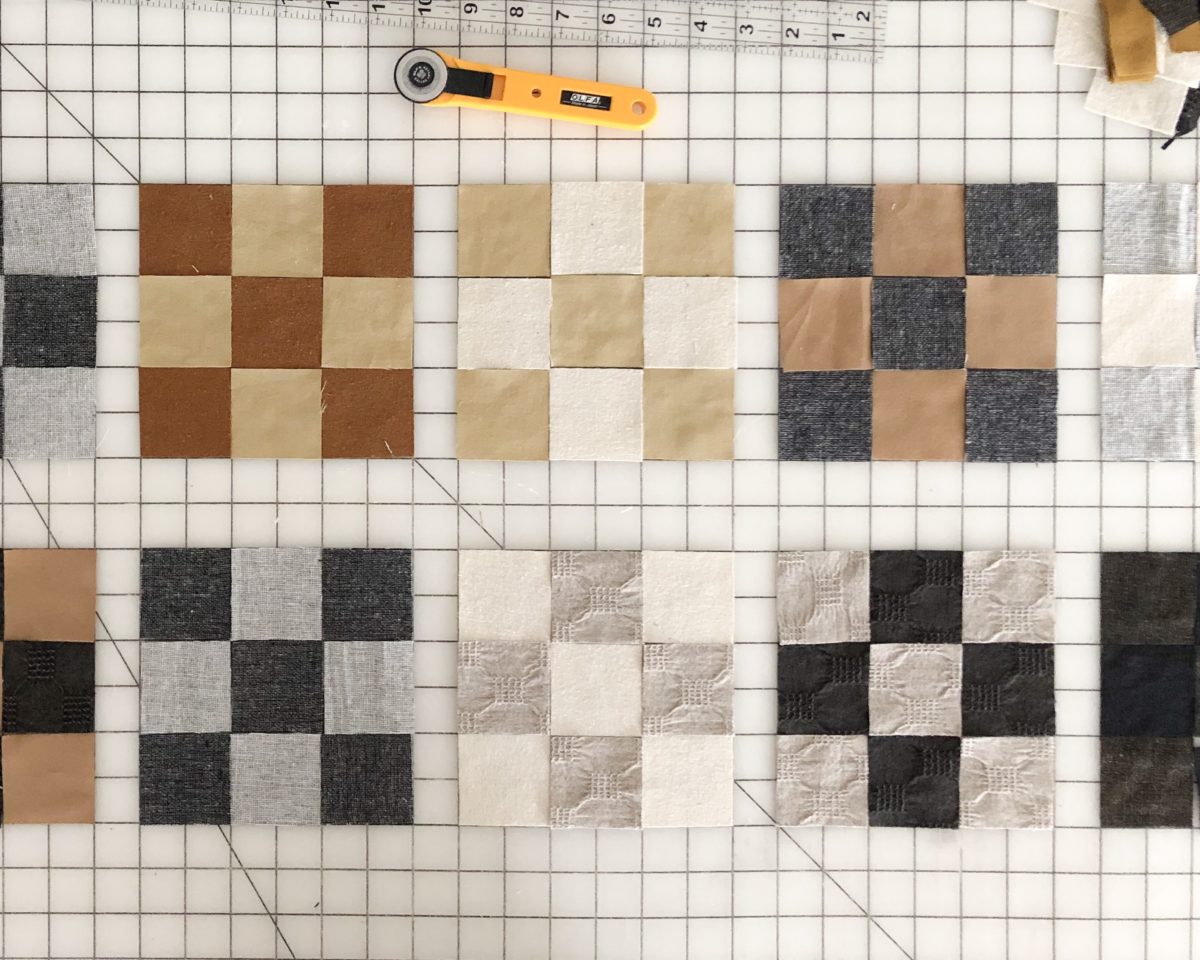
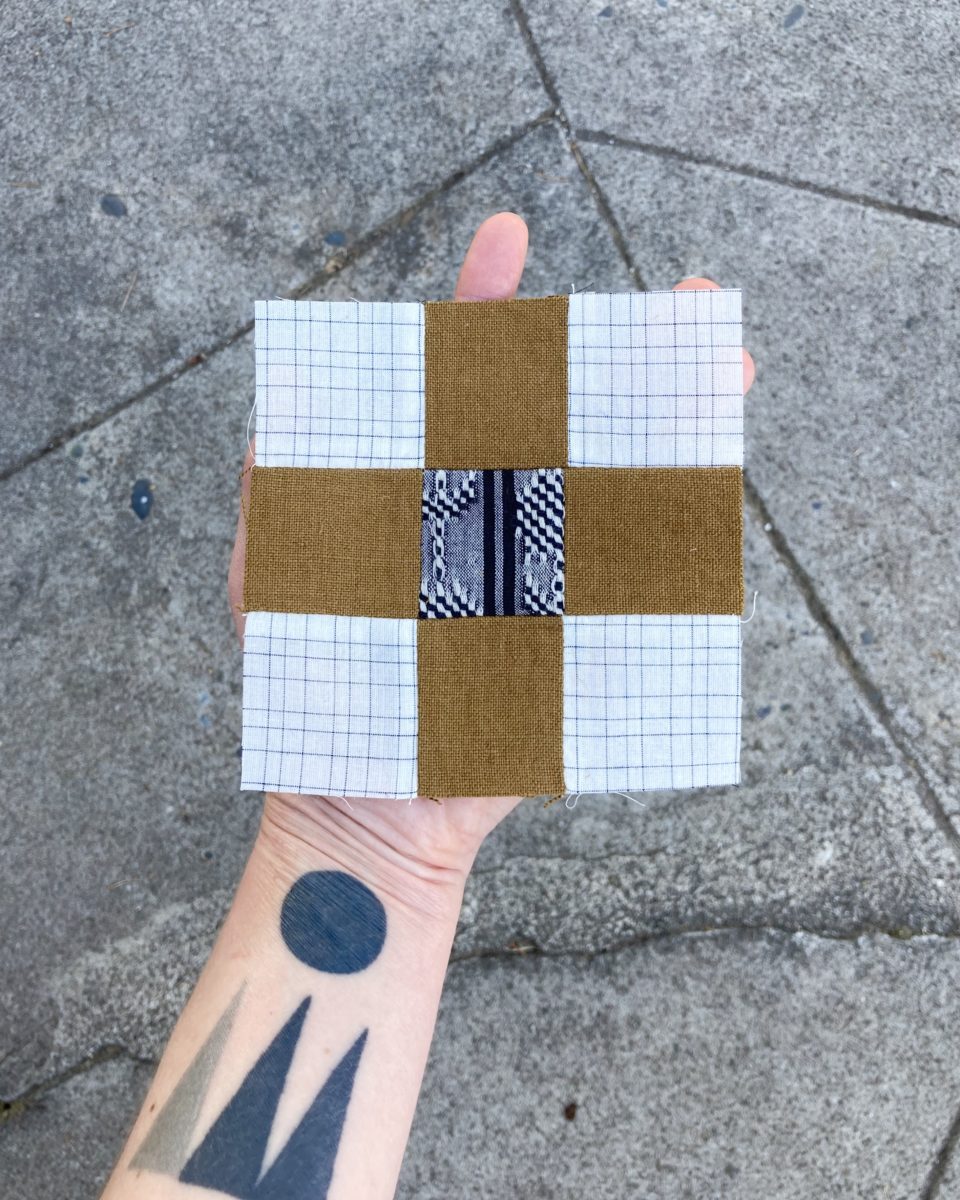
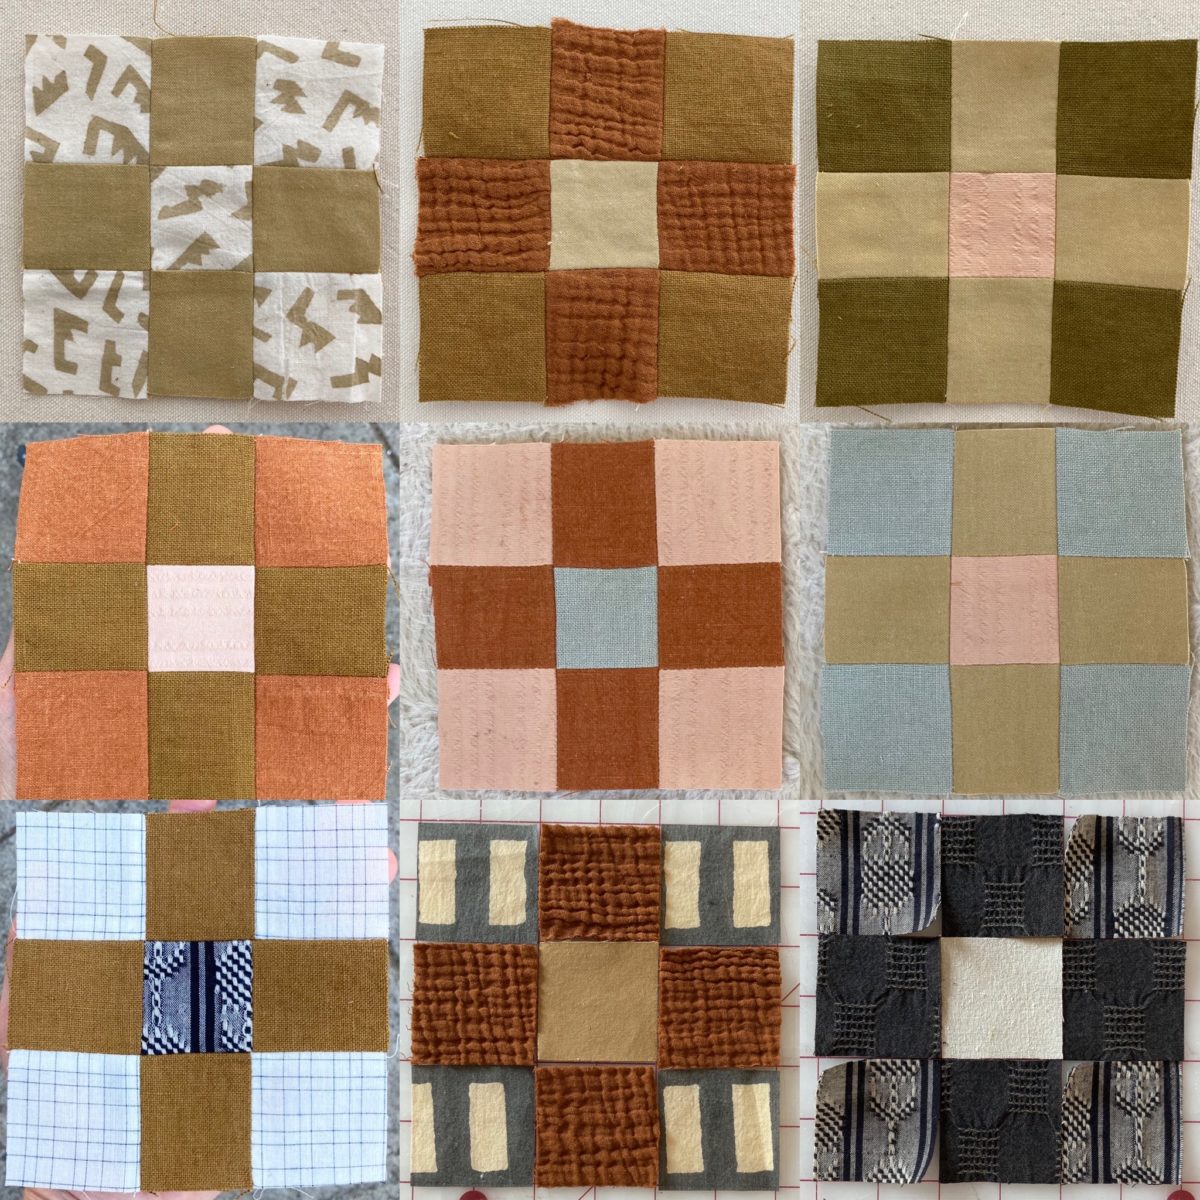
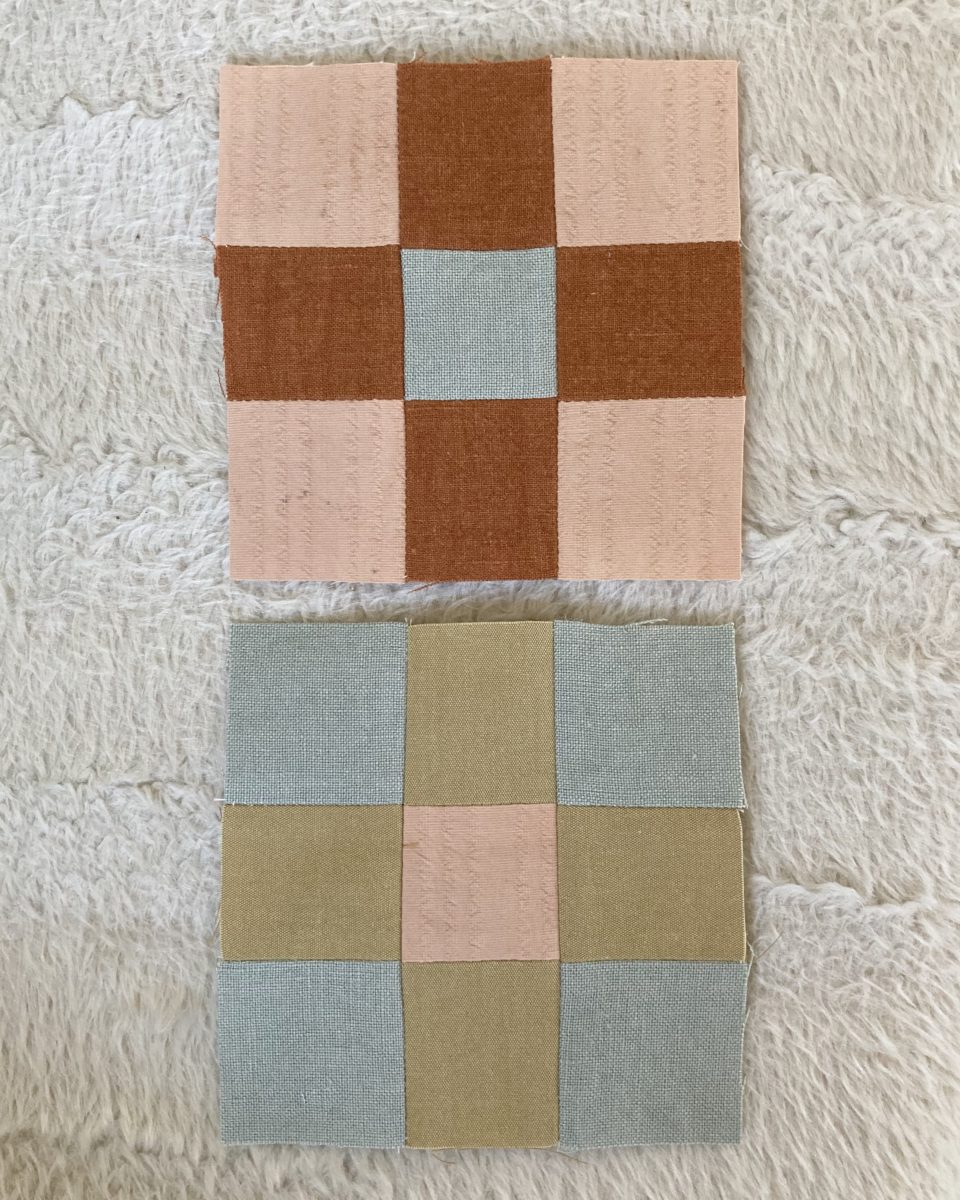
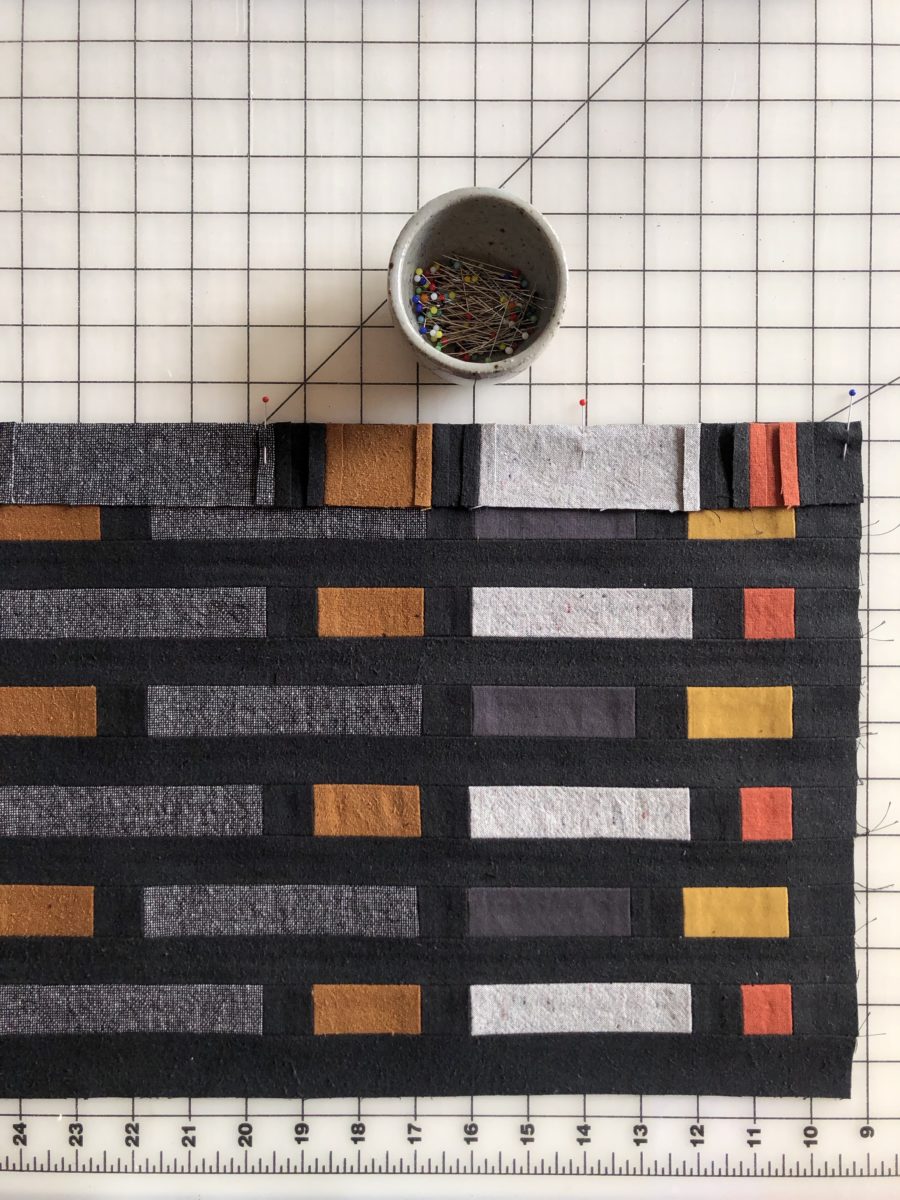
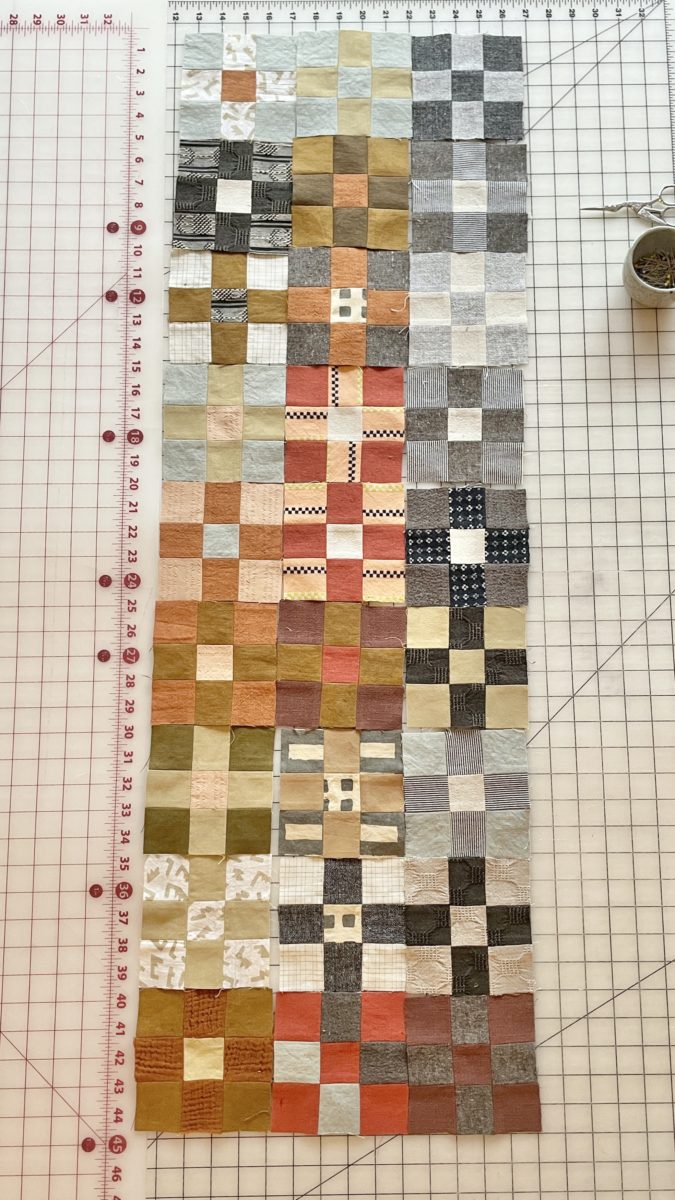
Almost immediately, I started cutting 2″ x 2″ squares and arranging them. It’s pretty amazing how different fabrics and textures can come together and look so cohesive.

I only made a handful at the start and then set this project aside for a while. Almost a year later, I made a quilt design board out of homasote and canvas and picked this project back up. Briefly I wanted to try out a 100 day project but I didn’t enjoy the pressure and I wanted this process to be fun.

There was also a moment where I thought about making the quilt top entirely out of nine patch squares. After realizing this plan would require almost 200 blocks, I abandoned that idea.

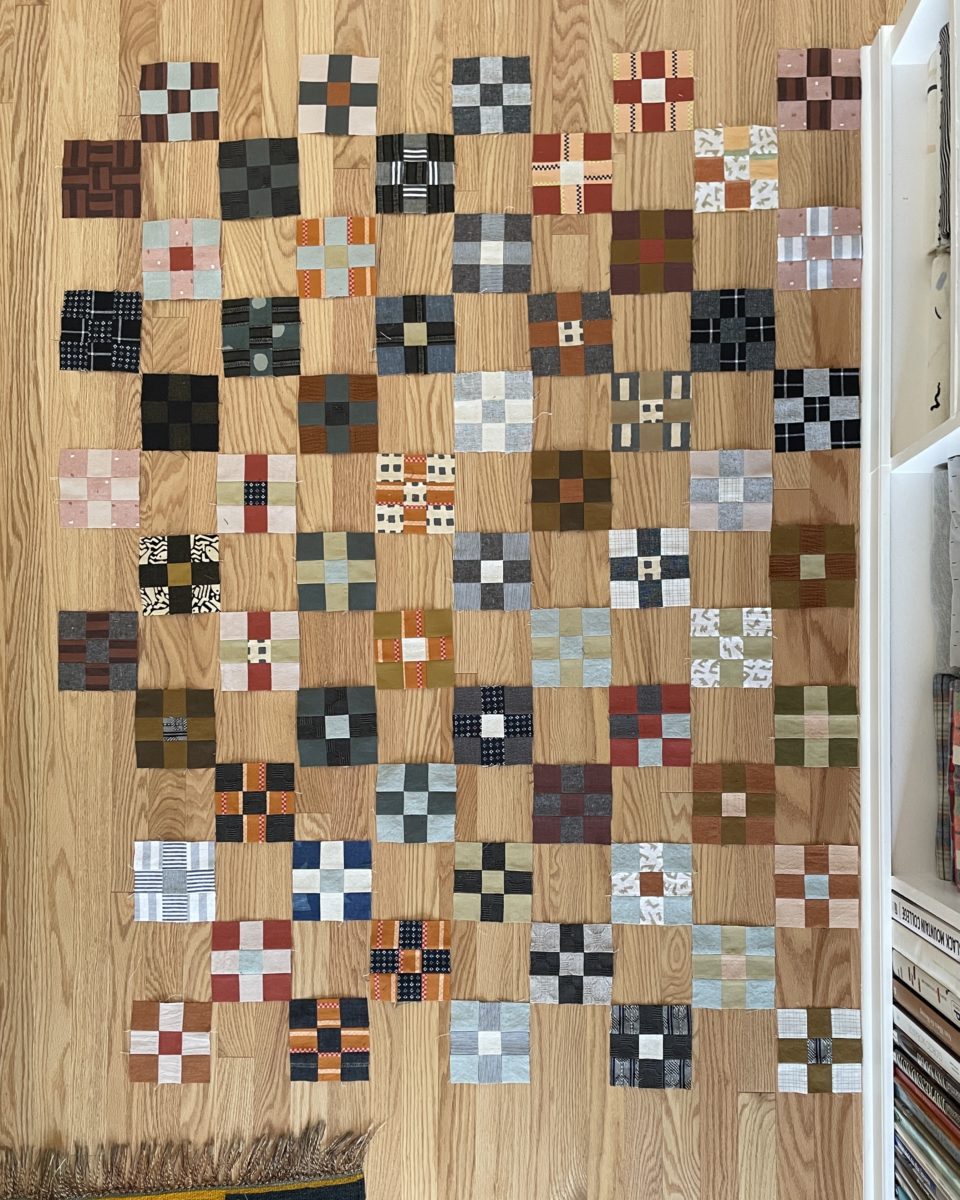
A few months later, I had over 50 blocks and this was the point where I actually calculated how many blocks I’d need for this layout and it was not 100, it was 98.

I decided to make 100 anyway and then I’d have some flexibility if I ended up not liking a couple squares.

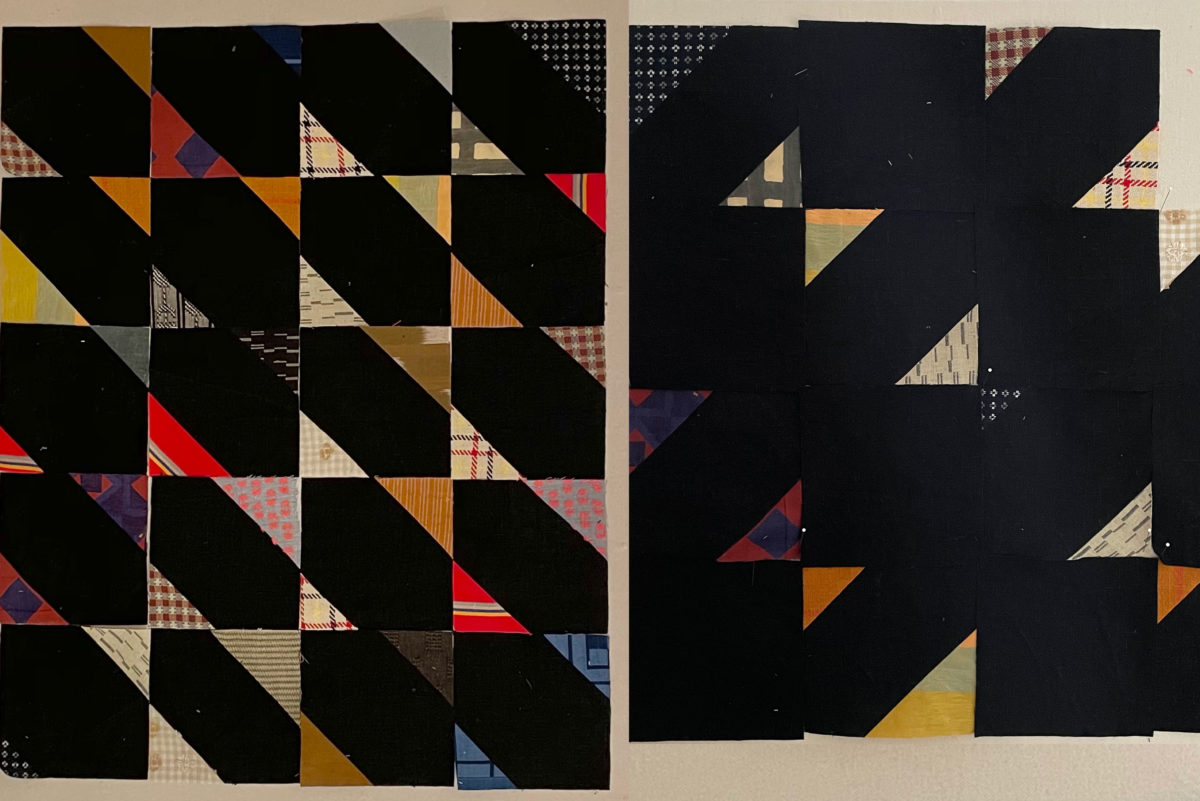
Once I had 100 blocks, I removed the two I didn’t really like (seen on the board above), made seven piles of seven blocks, and laid them out on my table. My table wasn’t large enough so I tucked some foam core underneath the cutting mats. I ended up only moving about three blocks once everything was in place.

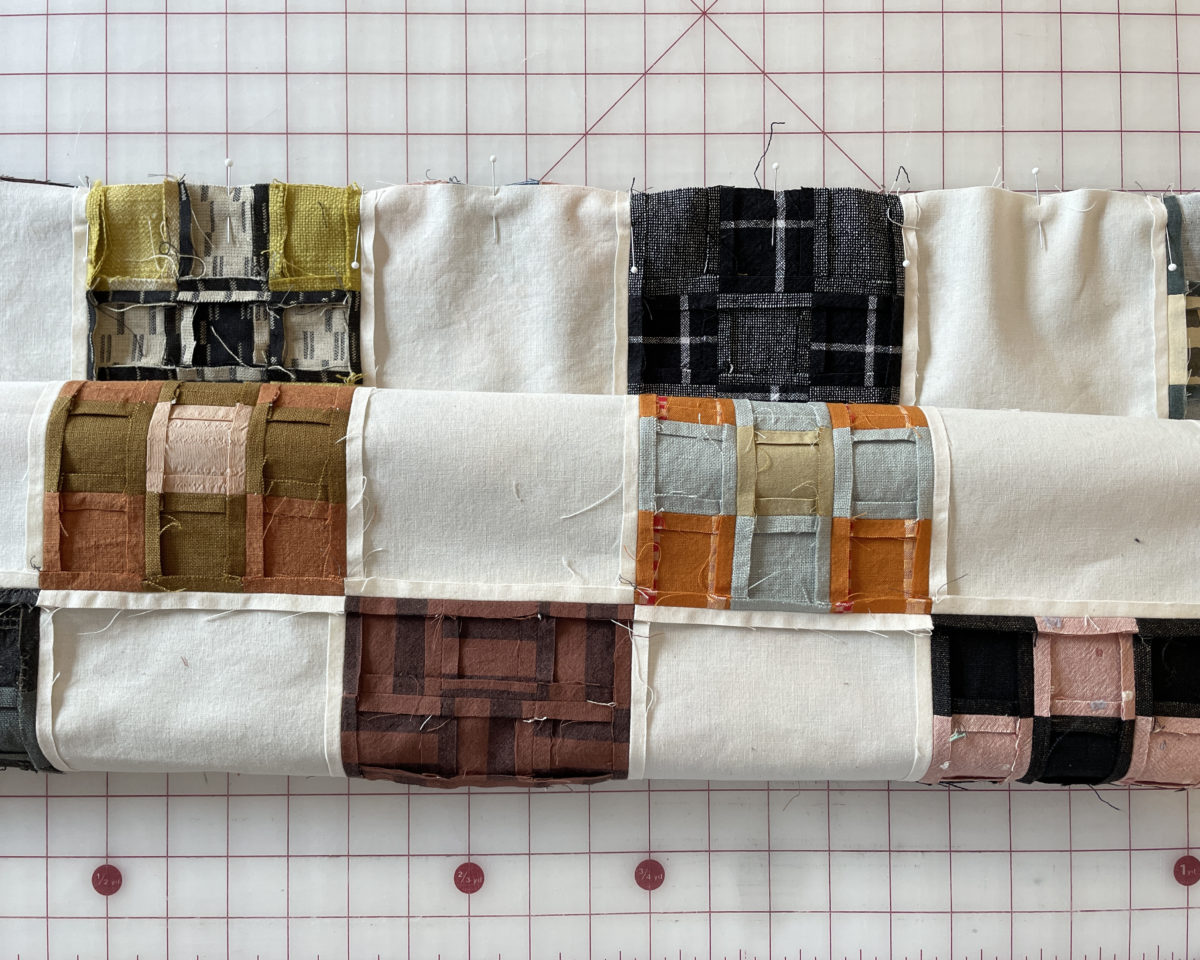
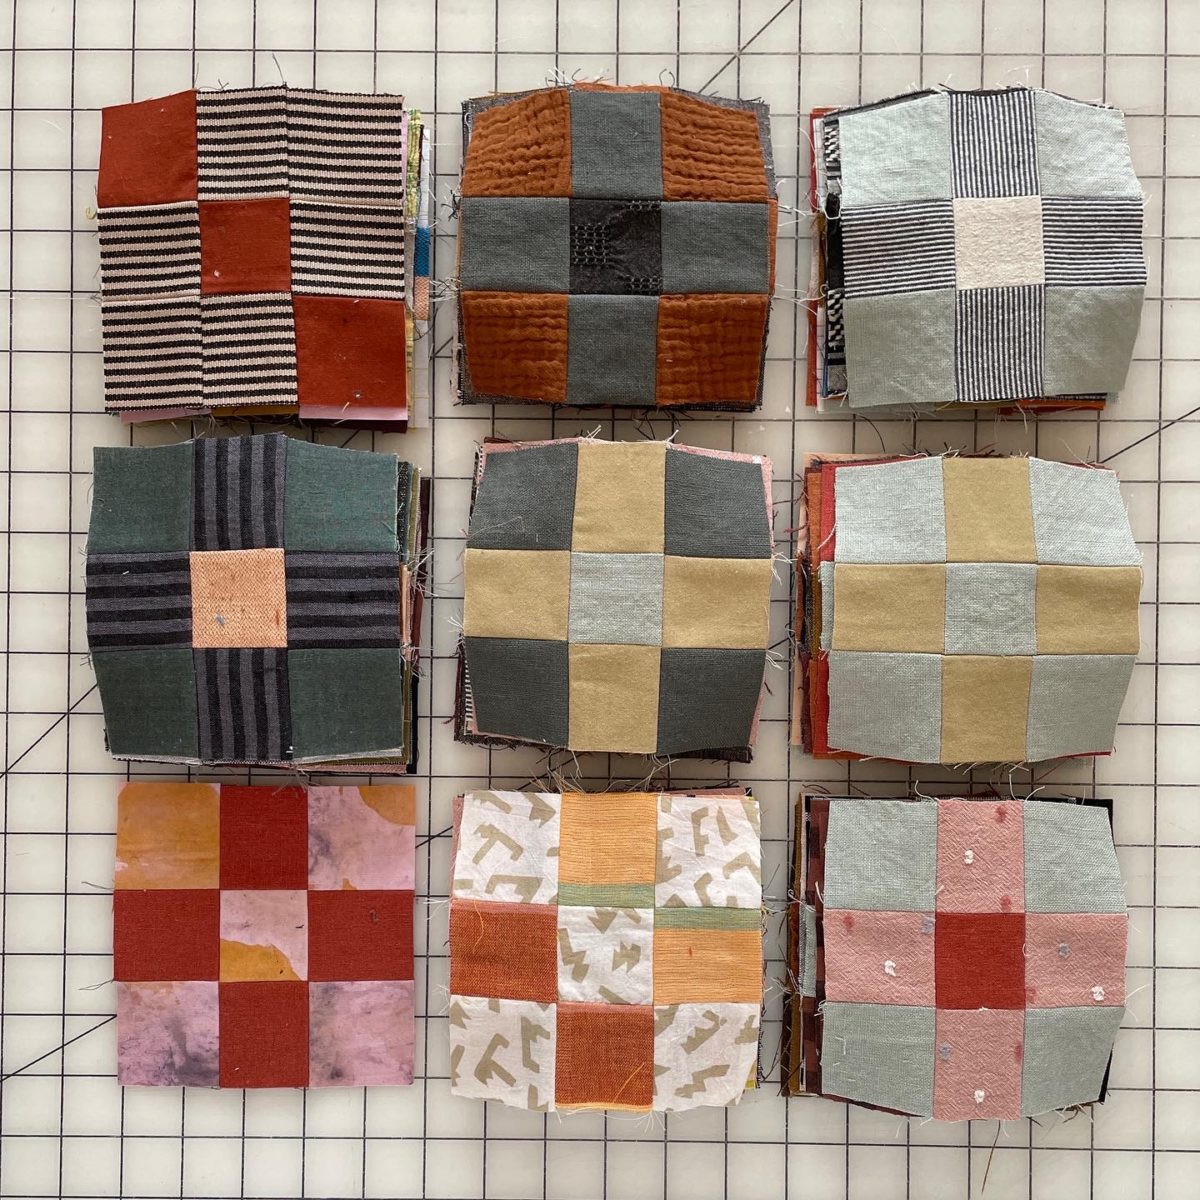
This project taught me that sometimes my 1/4″ seam allowances… vary and that using a bunch of different fabrics can really change the size of a block. The blocks that had double gauze were especially wonky. I ended up having to ease some of the blocks together so the corners were aligned. I could have trimmed everything down to match the smallest block but I threw caution to the wind and just forced the blocks to work together.

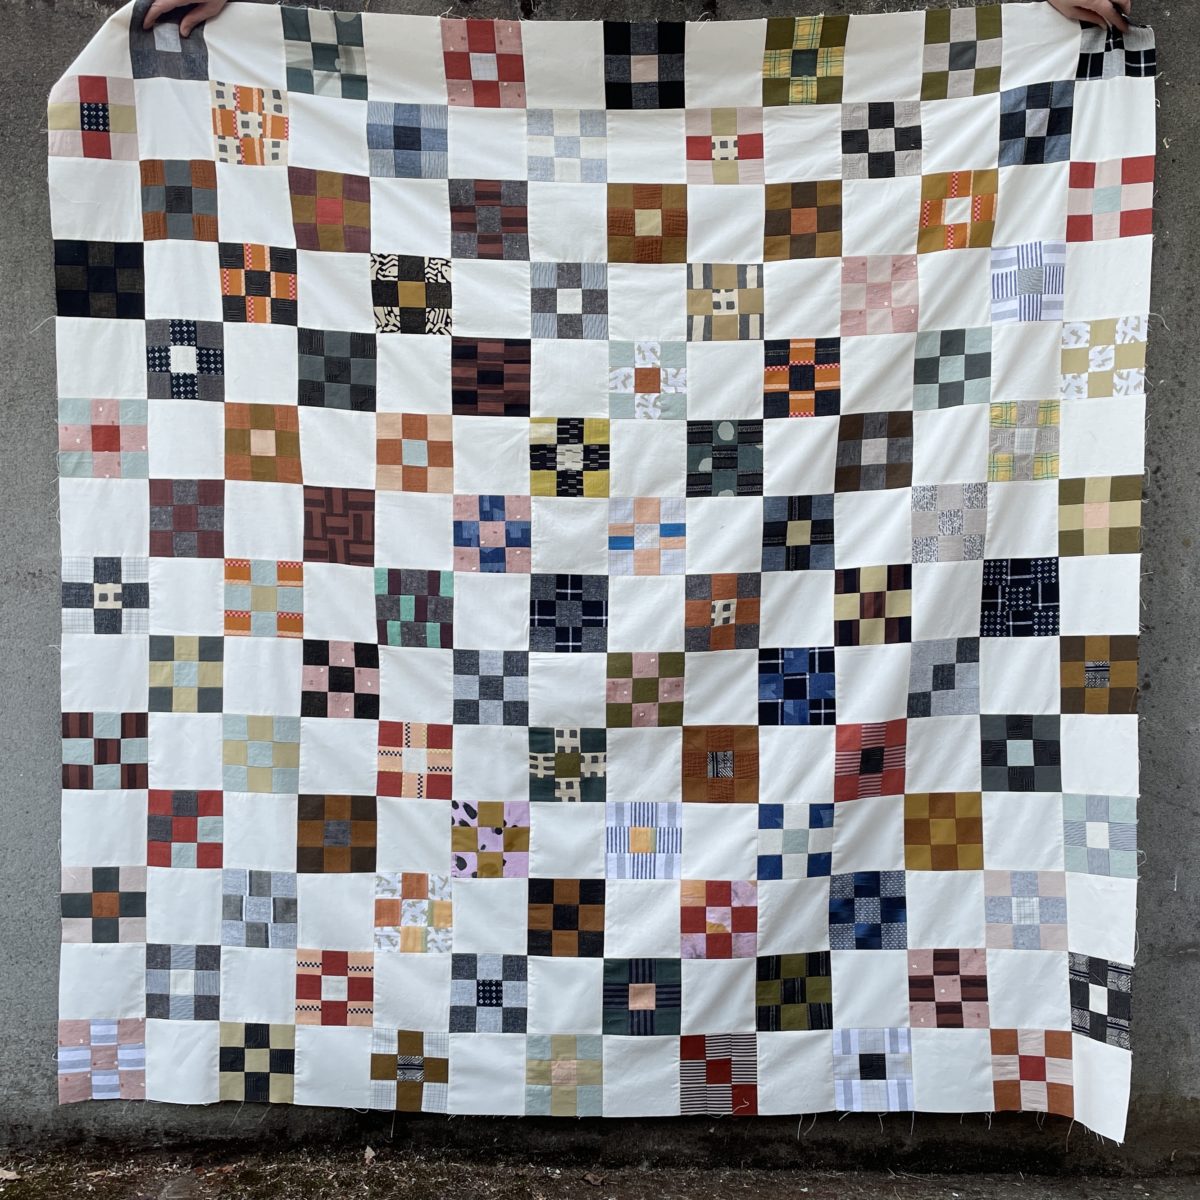
I used Kona cotton in natural for the solid squares. Before I had 100 blocks, I tried using scrap fabric in lighter colors but it made the nine patch blocks disappear. I think the bright solid color really makes the patchwork shine.

Next I’ll make the backing, baste the layers together, quilt, bind, and then wash.

Piecing Together Fabric

6 Comments

Anni Albers Design

My motivation and creative practice was all over the place at the beginning of the pandemic, but I found a lot of comfort in piecing together shapes. It’s repetitive, which allows me to zone out, but also provides some fun opportunities to problem solve.

For this project, I copied an Anni Albers design. I believe there’s a difference between knocking off for personal use and copying for profit. I think that when it’s for personal use, the act of replicating can be an incredible learning process and a means to improving your skills. Copying encourages you to assess construction and puzzle out how things come together.

I used 10oz cotton duck in Natural, Black, and Khaki. I need to find a new canvas supplier because the company I got these from had blue lives matter bullshit in one of its recent newsletters.

I had a lot of fun figuring out the blocks for this. There is one section that I would do a different way, if I were to do it all over again, but whatever!

Initially I had planned to use the khaki canvas for the border but must have used it in another project. I’m actually quite pleased with how the natural color border turned out. This color definitely made the stretching process a little easier – the wonkiness from stretching is somewhat hidden.

Some day we’re going to rip out this terrible 70s “update” and make the fireplace a focal point instead of an eyesore.

Scrap Quilt

Another piecing project I’m slowly working on is a scrap quilt. Whenever I cut out a woven garment project, I’ll cut 2″ x 2″ squares out of the leftovers. As a chronic over-buyer of fabric/project switcher, it’s making me feel better about the waste that comes with each garment project.

I recently made a small design wall for quilting projects. It’s just a 48″ x 48″ piece of homasote that I stretched cotton canvas over. It’s not as sticky as a traditional design wall, plus it’s right next to a vent, so stuff needs to be pinned to it.

If you’d like a tutorial for this, Farm & Folk has an excellent one.

Anyway, I started this project back in early September of 2019. It’s a nice long-term project that I can pick up and leave whenever feels right. However, my goal is to make 100 blocks and document them in my IG stories.

Initially I wanted to do 100 consecutive days, but I completely forgot about one day, then another… and then I felt silly about it. So now I’m just gonna call it a “100 Blocks” projects that will be completed in the time frame that feels good to me. I’m especially fond of these blocks. The pink seersucker is my first attempt at using natural dyes.

Quilted Jacket

The third pieced project I’m working on is a quilted jacket. I’m lengthening the Seamwork Easton jacket and adding hidden pockets.

Here’s what a single block looks like (above). I am using leftover wovens, plus Ace & Jig scraps with a black linen. I like how this project will be a reminder of past garment projects.

I’m leaning toward using the composition on the right. Maybe this jacket will be ready by next winter!

Ace & Jig Inspired Wilder

1 Comment

Victorian nightgown or not, I went for it and made another Wilder Gown. This was actually the first one I wanted to make, but Stonemountain had just shy the amount of yardage I needed, so it was put on the back burner until more stock came in.

PATTERN – Wilder Gown by Friday Pattern Company

FABRIC – Textured Yarn Dyed Cotton Square Stitch in Black from Stonemountain Fabric

SIZE – Medium

MODS – read on

ACCESSORIES – Sienna Maker Jacket, vintage roper boots.

For this version I shorted the skirt pattern piece by 2″, shortening the dress overall by 4″, which I think works much better on my 5’2″ frame. The bottom tier of the skirt is made up of three panels and I decided to make it into two so everything needed to be cut on cross-grain (it’s a LONG pattern piece).

I also, of course, added in-seam pockets. Twirl on!

Sienna’s Sienna Maker Jacket!

5 Comments

Back in April, Heather from Closet Case Patterns asked if it would be okay if an upcoming fall pattern was named after me. She said it wasn’t quite ready to share, but that it was “worker jacket realness” and “totes my jam.” And then she sent the flats and I about fainted.

I have been dreaming of making a chore jacket for a good, long while and this one literally has my name on it!

PATTERN: Sienna Maker Jacket by Closet Case Patterns

FABRIC: 10oz indigo denim from Stonemountain

SIZE: 8, view B

MODS: omitted the belt

ACCESSORIES: Raspberry Rucksack, Mitchell Jumpsuit, Baleen earrings, Clark’s shoes

I have a total of three versions planned and this denim one was made specially for the Stonemountain Sewists program. As a Stonemountain Sewist, I received a stipend to purchase fabric, sew up an indie pattern with said fabric, and answer a few questions on the Stonemountain blog. You can read all about why I chose this yummy denim here.

I have a natural bull denim set aside for view A and a beige canvas for another view B. The fabrics are, of course, from Stonemountain.

Up until this project, I had only used matching topstitching thread on denim projects. Silly me. Even though there are some wobbly bits, the contrasting thread looks so good against the indigo!

For the facing, I changed up the construction following Natalie Ebaugh’s Fancy Facing tutorial in her stories. It was a little awkward with the long facing pieces but I really love the clean edges. I will definitely use this method on other projects.

On my next two versions, I will shorten the sleeve a bit, probably 2-4″. I love the look of a rolled cuff, but there’s just a little too much fabric hanging out in that roll.

I’ve worn this jacket every day since finishing it. It’s such a good fall layering piece. I might add some antique brass snaps to the front closure, but I’m going to wear it for a while before I decide if they’re needed.

I love this pattern and I’m so honored to have been its muse!

Seamwork Bo | the first of many

2 Comments

I love a good boxy top and I’ve made quite a few. But the Bo. Why, oh why did I wait so dang long to make the Bo?! IT’S THE PERFECT BOXY TOP.

PATTERN: Bo top by Seamwork

FABRIC: Seedlings by Anna Maria Horner

SIZE: 6

MODS: raised neckline by about an inch

This beautiful fabric has been languishing in my stash for years. Thankfully I had juuuuust enough to make this top. Bo is a quick and satisfying sew and I’m certain I’ll make many more.

Oberlin Tote | Klum House

Leave a comment

I’ve added yet another bag to my growing collection of Klum Houses – the Oberlin Tote!

Klum House has really perfected bag making. The instructions lovingly walk you through each step and the maker kits have everything you need. Really though, you can unroll your tube of supplies and have yourself a beautiful, functional, and high quality bag in a few hours.

Klum House reached out to me a few months ago to ask if I’d be up for sewing the revamped Oberlin, and despite my impending move, I said yes. I was super stoked to be able to pick up the kit in person after moving to Portland!

The Oberlin is an elevated tote. It features FOUR exterior pockets, sturdy leather straps, an interior zipper pocket, and now with the relaunch, an optional zipper closure and lining. I opted to add both of the expansions because I can’t say no to lining a bag and I know I’ll actually use a tote if it can secure stuff underneath a zipper.

Klum House has so many colors of waxed canvas to choose from, but I defaulted to the same colors I used for my Maywood – dark brown (looks like a warm black) and brush brown, but with brown leather straps. I love the brush brown color so much, I wish I had leaned in an done the whole bag in it. Oh well!

One of the many things I appreciate about Klum House patterns and kits is the fun details. I mean I can’t think of a better way to finish a zipper. That little end tab is perfection! Also I really want a new key chain just so I clip my keys to that little D-ring.

The Oberlin is a really versatile size. It’s great for toting your everyday things around and I can see it working well as a travel bag too. The zipper expansion pops up allowing you to really cram it full of stuff.

The instructions allow you to customize your Oberlin. Only want to add the lining? The main instructions tell you exactly when to pop over to the lining PDF. Want to do both the lining and the zipper expansion? The instructions tell you when to switch from the main instructions to the zipper PDF, and then from the zipper instructions to the lining PDF.

I had one hiccup in the construction, but mostly because I was frantically sewing late at night to finish her up. The last sewing step before hammering in the straps is that line of stitching at the top, which I somehow managed to make three ugly folds in. Having never tried it before, I was really nervous about ripping stitching out on waxed canvas, but the puckers were bad and I had to. After redoing the stitching, I blasted the waxed canvas with a HOT hair dryer and now you can barely see the previous holes.

For the lining, I used some plain ol’ cotton duck from my stash. I think a bright lining in a cavernous bag is best! I’m really impressed with how clean the finish is with the lining and zipper expansions. All of the seams are hidden, except for a small opening in the lining to turn it right side out.

Full disclosure this bag took me a while to make, but only because in the middle of making it, I had to move all of my sewing stuff to another part of my house. We’re doing some construction in my soon to be fabulous sewing space and it started a lot sooner than I anticipated. I definitely misplaced so many things while moving which caused some fun challenges – who needs pins?!?! The construction is also why I wasn’t able to snap any blog or Instagram worthy progress pics.

Click here to shop Oberlin!

Disclosure: I received the Oberlin Maker Kit for free but all thoughts and opinions are my own. If you use the above link to purchase a Klum House product, I will receive a small commission from the sale with no change in cost to you.

Kalaloch Pillow | Simple Geometric Quilting Book

Leave a comment

If you’re at all into quilting, you’ve probably laid your eyes on Laura’s beautiful modern quilts. One of the first things that drew me to the Vacilando Instagram account was that production was taking place entirely in an Airstream… on the road. As a person that loves to spread way, way out while making, Laura’s small space process blew my mind. Her use of geometric shapes and yummy colors also appealed to my aesthetic.

When Laura asked if I’d be willing to make one of the patterns in her soon-to-be-released book, I enthusiastically said YES even though I was about to move across state lines.

It took me a while to get going on this project, only because I couldn’t find anything after moving. It took me a couple of weeks to just find my iron and for some reason I packed my fabric scraps in several different boxes (seemed like a good idea at the time).

The construction of this pillow looks like it requires lots of precise cutting and piecing, but it’s really beginner friendly! Basically you sew larger rectangles together, then cut them up, rearrange, add some strips in between, and BAM, you’ve got a pillow top! I chose a really simple quilting pattern so as to not detract from the pattern.

It’s the perfect project for using up scraps and I told myself I wasn’t allowed to buy any new fabric for it. The majority of it is silk noil, which makes it super luxurious, but I would not recommend this substrate if you’re just starting out – it’s a little hard to control.

  • Brown and black silk noil fabric is from some Willow Tanks, a men’s tie, and a Shirt No. 1.
  • Speckled dark grey cotton linen blend is from my block printed Tamarack
  • Speckled light gray cotton fabric is from my Making Backpack
  • Red linen is from my Emerson Crop Pants
  • The yellow and dark gray cotton fabrics are thrifted remnants that have been in my stash forever

Laura’s book is a comprehensive guide to Simple Geometric Quilting and I highly recommend it!

Wilder Gown | first PDX make

3 Comments

I did it. I finally sewed something and it’s way outside of my usual style.

Not long ago, on this very blog, I declared a hatred of ruffles, and here I am covered in them. There are more ruffled garments planned too. I guess I’ve changed my mind.

PATTERNWilder Gown by Friday Pattern Company

FABRICJapanese Yarn Dyed Dobby in Wheat from Stonemountain

SIZE – medium

MODS – none

ACCESSORIESBaleen earrings, vintage shoes.

I can’t say that this garment has been a huge hit with my partner – “you look like you’re wearing a Victorian nightgown,” . . . “there’s no amount of swishing that’ll make that look good,” and “are you wearing that nightgown outside?” have all been uttered by his usually supportive mouth. Oh well – I’m here for this lewk.

Wiksten Shift | last Bay Area make

4 Comments

PATTERNWiksten Shift by Wiksten

FABRICJapanese Yarn Dyed Dobby in Black Walnut from Stonemountain

SIZE – 4 (went with my hip measurement)

MODS – none

ACCESSORIES – Clogs are Bryr and necklace is by Fanny Penny. Both worn for my wedding!

Jenny over at Wiksten kindly sent me this pattern shortly before it was released. After opening it up and drooling over the beautiful photos in the instruction booklet, I became super irritated that life wouldn’t allow me to dive right in to making one.

But the school year finally ended, packing up the house for our impending move was in a sort of good place, and I had just picked up this amazing fabric on my last trip to Stonemountain… it had to happen.

So I made a deal with myself that once this idea was out of my head and on my body, I’d pack up my sewing space.

After all, my last summer break as a teacher should include at least one day of uninterrupted sewing, right?!

This texture is just so good! The fabric is probably a little more structured than the pattern calls for, but I don’t care.

I contemplated shortening the length while tracing off the pattern, but decided not to. I’m happy with its length even though I’m sure it was drafted for someone taller than 5’2″.

Pattern matching is not my strong suit, so I am wicked proud of the side seams and patch pockets.

I had hoped to have this dress finished for a family wedding in May, but that didn’t happen, so I wore it out to a super casual breakfast yesterday morning.

Layered over some tights and worn with a sweater, this textile works year-round. I love it when a garment turns out to be seasonless.

Yep, pretty sure once we’ve moved and my new, huge studio space is set up , I’ll be making the Shift Top too.

Reunited

4 Comments

After five months, she’s back. I wrote a decent amount about her and the mess that followed in another blog post, so this post is just about the pictures.